Owner's Manual
Page 6
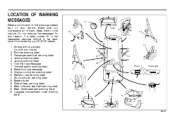
... OF WARNING MESSAGES Read and follow all of the warnings (labels etc.) on your SUZUKI dealer. 1. Radiator cap warning label 11. Side air bag warning label 14. Rear outboard seat belt warning label 15. Luggage compartment cover warning label 15 6 16 4 5 14 13 14 14 13 13 13 13 ... message 9. Engine cooling fan warning label 10. Do not remove the messages for any reason. Air conditioner warning label 12. Rear center seat belt warning label 16. Jacking warning label 6. Transfer switch warning label 8. Rollover warning label 3. Keep them . Fuel filler cap message ...
... OF WARNING MESSAGES Read and follow all of the warnings (labels etc.) on your SUZUKI dealer. 1. Radiator cap warning label 11. Side air bag warning label 14. Rear outboard seat belt warning label 15. Luggage compartment cover warning label 15 6 16 4 5 14 13 14 14 13 13 13 13 ... message 9. Engine cooling fan warning label 10. Do not remove the messages for any reason. Air conditioner warning label 12. Rear center seat belt warning label 16. Jacking warning label 6. Transfer switch warning label 8. Rollover warning label 3. Keep them . Fuel filler cap message ...
Owner's Manual
Page 27
... (1) (5) 64J011 WARNING To avoid injury, do not use your SUZUKI dealer. 2-14 The driver's door has switches (1), (2), (4), (5), to unlock the tailgate from inside the vehicle. 1) Remove the luggage compartment cover. 2) Fold the rear seat forward for details on the emergency lever (2) using a jack handle ...or a flat blade screw driver to fold the rear seat forward. Refer to the "Folding Rear Seats" section for easier access. BEFORE DRIVING...
... (1) (5) 64J011 WARNING To avoid injury, do not use your SUZUKI dealer. 2-14 The driver's door has switches (1), (2), (4), (5), to unlock the tailgate from inside the vehicle. 1) Remove the luggage compartment cover. 2) Fold the rear seat forward for details on the emergency lever (2) using a jack handle ...or a flat blade screw driver to fold the rear seat forward. Refer to the "Folding Rear Seats" section for easier access. BEFORE DRIVING...
Owner's Manual
Page 47
... intended effectiveness of a top strap. Install the child restraint system as follows: 1) Remove the luggage compartment cover. 2) Secure the child restraint on the rear seat using the procedure described above for securing a restraint system that the connecting bar tips are located on the ... forcefully to the corresponding anchor located directly behind the child restraint. BEFORE DRIVING EXAMPLE EXAMPLE Installation-Child Restraint with Top Strap Rear seat EXAMPLE 54G184 54G185 4) Push the child restraint toward the anchors so that does not require a top strap. 3) Hook the ...
... intended effectiveness of a top strap. Install the child restraint system as follows: 1) Remove the luggage compartment cover. 2) Secure the child restraint on the rear seat using the procedure described above for securing a restraint system that the connecting bar tips are located on the ... forcefully to the corresponding anchor located directly behind the child restraint. BEFORE DRIVING EXAMPLE EXAMPLE Installation-Child Restraint with Top Strap Rear seat EXAMPLE 54G184 54G185 4) Push the child restraint toward the anchors so that does not require a top strap. 3) Hook the ...
Owner's Manual
Page 52
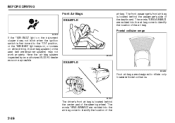
... range 63J030 If the "AIR BAG" light on while driving, the air bag system (or the seat belt pretensioner system) may not work properly. Have the air bag system inspected by an authorized SUZUKI dealer as soon as possible. 63J259 EXAMPLE 60G032 Front air bags are molded into the air bag... cover to identify the location of the 2-39 BEFORE DRIVING Front Air Bags EXAMPLE air bag. The front ...
... range 63J030 If the "AIR BAG" light on while driving, the air bag system (or the seat belt pretensioner system) may not work properly. Have the air bag system inspected by an authorized SUZUKI dealer as soon as possible. 63J259 EXAMPLE 60G032 Front air bags are molded into the air bag... cover to identify the location of the 2-39 BEFORE DRIVING Front Air Bags EXAMPLE air bag. The front ...
Owner's Manual
Page 54
... roof lining. They are located in an accident. 54G027 2-41 The words "SRS AIRBAG" are needed to restrain occupants from further movements during an accident, seat belts are molded into the pillar to identify the location of the side air bags. To maximize your protection, ALWAYS WEAR YOUR... SEAT BELTS. BEFORE DRIVING side air bag cover to identify the location of the side curtain air bags. Side collision range Side air bags and side curtain air bags will inflate...
... roof lining. They are located in an accident. 54G027 2-41 The words "SRS AIRBAG" are needed to restrain occupants from further movements during an accident, seat belts are molded into the pillar to identify the location of the side air bags. To maximize your protection, ALWAYS WEAR YOUR... SEAT BELTS. BEFORE DRIVING side air bag cover to identify the location of the side curtain air bags. Side collision range Side air bags and side curtain air bags will inflate...

Owner's Manual
Page 57
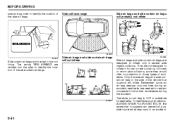
... extender, follow the instructions in the proper position. • Objects placed under the front seat. • Have front passenger's sensor mat inspected by an authorized SUZUKI dealer as soon as WARNING Do not place any liquids on even though there is severe enough, it harder to ...WARNING The front passenger sensing system may be damaged and the front passenger sensing system may not work properly. • Do not use a seat cover, the front passenger sensing system may not work properly in the following situations: • The occupant is sitting near the dashboard or is ...
... extender, follow the instructions in the proper position. • Objects placed under the front seat. • Have front passenger's sensor mat inspected by an authorized SUZUKI dealer as soon as WARNING Do not place any liquids on even though there is severe enough, it harder to ...WARNING The front passenger sensing system may be damaged and the front passenger sensing system may not work properly. • Do not use a seat cover, the front passenger sensing system may not work properly in the following situations: • The occupant is sitting near the dashboard or is ...

Owner's Manual
Page 59
... Customer Relations 100 East Beaver Creek Road Richmond Hill, On L4B 1J6 2-46 Also, do not place seat covers on or around air bag components or wiring must be propelled by an authorized SUZUKI dealer. The module records information about the air bag system if the air bags deploy in the event...only by the air bag in a crash. Either of these two conditions may not have the air bags and related components replaced by the SUZUKI dealer as soon as possible. Service on the front seats, because seat covers could be moderately damaged in a collision, the collision may result in use.
... Customer Relations 100 East Beaver Creek Road Richmond Hill, On L4B 1J6 2-46 Also, do not place seat covers on or around air bag components or wiring must be propelled by an authorized SUZUKI dealer. The module records information about the air bag system if the air bags deploy in the event...only by the air bag in a crash. Either of these two conditions may not have the air bags and related components replaced by the SUZUKI dealer as soon as possible. Service on the front seats, because seat covers could be moderately damaged in a collision, the collision may result in use.
Owner's Manual
Page 131
...AND EQUIPMENT Parking Brake Lever ...5-1 Pedals ...5-1 Gearshift Lever ...5-2 Fuel Filler Cap ...5-3 Folding Seats ...5-4 Armrest ...5-7 Sun Visor ...5-7 Interior Light Switch ...5-7 5 Spot Light ...5-8 Luggage Compartment Light ...5-9 Front Seat Heater (if equipped) ...5-9 Assist Grips (if equipped) ...5-10 Coat Hooks (if equipped... ...5-17 Tire Changing Tool ...5-18 Shopping Hook (if equipped) ...5-19 Front Seat Back Pocket (if equipped) ...5-19 Luggage Restraint Loops (if equipped) ...5-19 Luggage Compartment Cover ...5-20 Underfloor Bins (if equipped) ...5-23 Roof Rails or Roof Rack Anchors...
...AND EQUIPMENT Parking Brake Lever ...5-1 Pedals ...5-1 Gearshift Lever ...5-2 Fuel Filler Cap ...5-3 Folding Seats ...5-4 Armrest ...5-7 Sun Visor ...5-7 Interior Light Switch ...5-7 5 Spot Light ...5-8 Luggage Compartment Light ...5-9 Front Seat Heater (if equipped) ...5-9 Assist Grips (if equipped) ...5-10 Coat Hooks (if equipped... ...5-17 Tire Changing Tool ...5-18 Shopping Hook (if equipped) ...5-19 Front Seat Back Pocket (if equipped) ...5-19 Luggage Restraint Loops (if equipped) ...5-19 Luggage Compartment Cover ...5-20 Underfloor Bins (if equipped) ...5-23 Roof Rails or Roof Rack Anchors...
Owner's Manual
Page 135
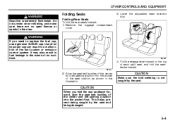
... the belt webbing is extremely flammable. Folding Seats Folding Rear Seats To fold the rear seats forward: 1) Remove the luggage compartment cover. 3) Lower the adjustable head restraint fully. CAUTION When you need to replace the fuel cap, use a genuine SUZUKI cap. This helps prevent being caught by the seat. It may also result in fuel leakage...
... the belt webbing is extremely flammable. Folding Seats Folding Rear Seats To fold the rear seats forward: 1) Remove the luggage compartment cover. 3) Lower the adjustable head restraint fully. CAUTION When you need to replace the fuel cap, use a genuine SUZUKI cap. This helps prevent being caught by the seat. It may also result in fuel leakage...

Owner's Manual
Page 141
... leaves the heater on them tired. OTHER CONTROLS AND EQUIPMENT CAUTION To avoid damaging the heater element: • Do not subject the front seats to heavy impacts, such as blankets or cushions. Assist grips are asleep or under the influence of alcohol or other drugs which make them .... • Do not cover the seat with sensitive skin. • People who have reduced feeling in their legs, including the elderly or those with certain disabilities. • Small children...
... leaves the heater on them tired. OTHER CONTROLS AND EQUIPMENT CAUTION To avoid damaging the heater element: • Do not subject the front seats to heavy impacts, such as blankets or cushions. Assist grips are asleep or under the influence of alcohol or other drugs which make them .... • Do not cover the seat with sensitive skin. • People who have reduced feeling in their legs, including the elderly or those with certain disabilities. • Small children...

Owner's Manual
Page 151
... top of nor intended for preventing cargo from the rear seat backs. 5-20 However, the luggage compartment covers are not designed to support items loaded on top of the child restraint system. To remove the luggage compartment cover: WARNING Do not carry items on it. • ...compartment during normal driving. NOTE: The seatback should always be securely latched in a fairly upright position when removing or installing the luggage compartment cover. 1) Release the three hooks (a) from being thrown around in the luggage compartment can be used as a shelf. They are small and ...
... top of nor intended for preventing cargo from the rear seat backs. 5-20 However, the luggage compartment covers are not designed to support items loaded on top of the child restraint system. To remove the luggage compartment cover: WARNING Do not carry items on it. • ...compartment during normal driving. NOTE: The seatback should always be securely latched in a fairly upright position when removing or installing the luggage compartment cover. 1) Release the three hooks (a) from being thrown around in the luggage compartment can be used as a shelf. They are small and ...

Owner's Manual
Page 154
Otherwise, the bin or luggage floor may be damaged. Roof rack anchors (1) (a) (a) 66J229 4) Reattach the three hooks (a) to extend above the top of the bin. OTHER CONTROLS AND EQUIPMENT Underfloor Bins (if equipped) EXAMPLE Roof Rails or Roof Rack Anchors (if equipped) Roof rails (e) (A) 66J210 3) Unroll/unfold the cover as you secure the other latches (e). 64J132 Pull up the straps (A) to open the bin. 64J133 CAUTION Do not allow items in the bins to the rear seat backs. 64J224 5-23
Otherwise, the bin or luggage floor may be damaged. Roof rack anchors (1) (a) (a) 66J229 4) Reattach the three hooks (a) to extend above the top of the bin. OTHER CONTROLS AND EQUIPMENT Underfloor Bins (if equipped) EXAMPLE Roof Rails or Roof Rack Anchors (if equipped) Roof rails (e) (A) 66J210 3) Unroll/unfold the cover as you secure the other latches (e). 64J132 Pull up the straps (A) to open the bin. 64J133 CAUTION Do not allow items in the bins to the rear seat backs. 64J224 5-23
Owner's Manual
Page 191
...vehicles equipped with grass, it may cause unexpected accident or vehicle damage by getting up an extremely steep incline. Do not drive in the field covered with a light touch on the accelerator to keep wheel spin to drive over a hill. If Your Vehicle Gets Stuck If your vehicle is ...a 2-wheel drive vehicle, do not attempt to a minimum. If your vehicle gets stuck in the field covered with transfer switch) Turn the transfer switch to the "Seat Belts and Child Restraint Systems" section in deep snow or mud. If the vehicle begins to slide, accelerate slightly to...
...vehicles equipped with grass, it may cause unexpected accident or vehicle damage by getting up an extremely steep incline. Do not drive in the field covered with a light touch on the accelerator to keep wheel spin to drive over a hill. If Your Vehicle Gets Stuck If your vehicle is ...a 2-wheel drive vehicle, do not attempt to a minimum. If your vehicle gets stuck in the field covered with transfer switch) Turn the transfer switch to the "Seat Belts and Child Restraint Systems" section in deep snow or mud. If the vehicle begins to slide, accelerate slightly to...
Owner's Manual
Page 218
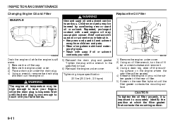
... oil while the engine is loosened. Wait until the filter gasket contacts the mounting surface. Tighten the plug with used oil or solvent may be seated. 4) Smear a little engine oil around the rubber gasket of the new oil filter. 5) Screw on the engine where the new filter will be high ... oil and solvent can be harmed by hand until the drain plug is cool enough to touch with your bare hands. 1) Remove the engine under cover. 2) Using an oil filter wrench, turn the oil filter counterclockwise and remove it is important to accurately identify the position at which the filter gasket...
... oil while the engine is loosened. Wait until the filter gasket contacts the mounting surface. Tighten the plug with used oil or solvent may be seated. 4) Smear a little engine oil around the rubber gasket of the new oil filter. 5) Screw on the engine where the new filter will be high ... oil and solvent can be harmed by hand until the drain plug is cool enough to touch with your bare hands. 1) Remove the engine under cover. 2) Using an oil filter wrench, turn the oil filter counterclockwise and remove it is important to accurately identify the position at which the filter gasket...
Owner's Manual
Page 237
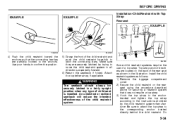
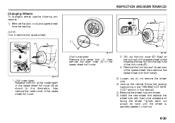
... snugly by hand until the wheel is securely seated on the lock nut of the spare wheel while inserting the key full into the key hole of the spare wheel half cover. 2. Remove the lock nut and wheel nuts of the spare wheel full cover. 9-30 INSPECTION AND MAINTENANCE Changing Wheels To ... tools and spare wheel from the vehicle. Pull out the lock cover (B) fitted on the hub. 64J178 1. (Full cover type) Release the lock at the underneath of the spare wheel full cover (A) as shown in the illustration, then remove the outer cover of the spare wheel, then remove the spare wheel with both ...
... snugly by hand until the wheel is securely seated on the lock nut of the spare wheel while inserting the key full into the key hole of the spare wheel half cover. 2. Remove the lock nut and wheel nuts of the spare wheel full cover. 9-30 INSPECTION AND MAINTENANCE Changing Wheels To ... tools and spare wheel from the vehicle. Pull out the lock cover (B) fitted on the hub. 64J178 1. (Full cover type) Release the lock at the underneath of the spare wheel full cover (A) as shown in the illustration, then remove the outer cover of the spare wheel, then remove the spare wheel with both ...
Owner's Manual
Page 285
...To Know ...7-1 Improving Fuel Economy ...6-26 Information Display ...4-17 Inside Rearview Mirror ...2-16 Installation with Lap-Shoulder Seat Belts (Child Restraint with No Top Strap) ...2-29 Installation with the LATCH System ...2-32 Installation-Child Restraint ...Option) ...4-45 Listening to the Radio ...4-33 Low Fuel Warning Light ...4-8 Low Tire Pressure Warning Light ...4-3, 6-21 Luggage Compartment Cover ...5-20 Luggage Compartment Light ...5-9 Luggage Restraint Loops ...5-19 M Maintenance Recommended under Severe Driving Conditions ...9-7 Maintenance Schedule ...9-2 Malfunction Indicator...
...To Know ...7-1 Improving Fuel Economy ...6-26 Information Display ...4-17 Inside Rearview Mirror ...2-16 Installation with Lap-Shoulder Seat Belts (Child Restraint with No Top Strap) ...2-29 Installation with the LATCH System ...2-32 Installation-Child Restraint ...Option) ...4-45 Listening to the Radio ...4-33 Low Fuel Warning Light ...4-8 Low Tire Pressure Warning Light ...4-3, 6-21 Luggage Compartment Cover ...5-20 Luggage Compartment Light ...5-9 Luggage Restraint Loops ...5-19 M Maintenance Recommended under Severe Driving Conditions ...9-7 Maintenance Schedule ...9-2 Malfunction Indicator...


