
Owner's Manual
Page 1
Part No. 99011-66J22-03E July, 2007 Contains Important Information On Safety, Operation & Maintenance. 2008 OWNER'S MANUAL Keep With Vehicle At All Times.
Part No. 99011-66J22-03E July, 2007 Contains Important Information On Safety, Operation & Maintenance. 2008 OWNER'S MANUAL Keep With Vehicle At All Times.
Owner's Manual
Page 3
... a great value that will give you will provide the best possible service and use only genuine SUZUKI parts and accessories. In it you years of your SUZUKI, we recommend you resell the vehicle, please leave this important information. In addition to help you have a safe, enjoyable, and trouble-free... of driving pleasure. Please read them as well to our growing family. INTRODUCTION Thank you read it carefully before operating your SUZUKI. We recommend you for future reference. This Owner's Manual was a wise one; Afterwards, keep this Manual in the glove box for choosing...
... a great value that will give you will provide the best possible service and use only genuine SUZUKI parts and accessories. In it you years of your SUZUKI, we recommend you resell the vehicle, please leave this important information. In addition to help you have a safe, enjoyable, and trouble-free... of driving pleasure. Please read them as well to our growing family. INTRODUCTION Thank you read it carefully before operating your SUZUKI. We recommend you for future reference. This Owner's Manual was a wise one; Afterwards, keep this Manual in the glove box for choosing...
Owner's Manual
Page 21
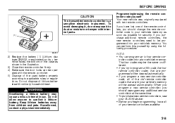
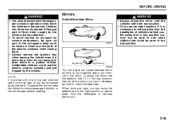
If you should reprogram any additional remote controllers at the same time. • To purchase new remote controllers, see your SUZUKI dealer. • Before you begin programming, have lost one of lithium batteries with two remote controllers. BEFORE DRIVING CAUTION The ...CR2032 or equivalent) so its + terminal faces the bottom of the used battery properly according to dust or moisture or tamper with internal parts. (1) Programming/erasing the remote controller code yourself Your new vehicle was originally equipped with ordinary household trash. To avoid damaging it, do...
If you should reprogram any additional remote controllers at the same time. • To purchase new remote controllers, see your SUZUKI dealer. • Before you begin programming, have lost one of lithium batteries with two remote controllers. BEFORE DRIVING CAUTION The ...CR2032 or equivalent) so its + terminal faces the bottom of the used battery properly according to dust or moisture or tamper with internal parts. (1) Programming/erasing the remote controller code yourself Your new vehicle was originally equipped with ordinary household trash. To avoid damaging it, do...
Owner's Manual
Page 23
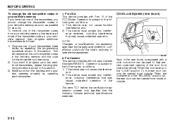
...seconds after you insert the key into the ignition switch during this time, the light will not unlock. For Canada This device complies with Part 15 of the transmitters, ask your vehicle's memory so that the old code is subject to the following two conditions: 1) This device may... code in this can vary depending on for a replacement. Operation is erased, or perform the programming procedure yourself according to the instructions in your SUZUKI dealer as soon as radio towers or CB (Citizen's Band) radios. • The door locks can lock or unlock all doors (including the...
...seconds after you insert the key into the ignition switch during this time, the light will not unlock. For Canada This device complies with Part 15 of the transmitters, ask your vehicle's memory so that the old code is subject to the following two conditions: 1) This device may... code in this can vary depending on for a replacement. Operation is erased, or perform the programming procedure yourself according to the instructions in your SUZUKI dealer as soon as radio towers or CB (Citizen's Band) radios. • The door locks can lock or unlock all doors (including the...

Owner's Manual
Page 25
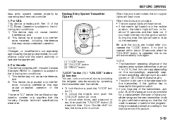
... All the doors will lock/unlock to three transmitter codes into your vehicle's memory. If you should change the transmitter code in your SUZUKI dealer. • Before you begin programming, have lost one time within 20 seconds (after step 5). To program a new transmitter 1) ...closed and the ignition key is a sensitive electronic instrument. Programming/removing a transmitter code yourself Your new vehicle was originally equipped with internal parts. BEFORE DRIVING CAUTION The transmitter/remote controller is out of the ignition switch. 2) Open the driver's door. 3) Insert the key...
... All the doors will lock/unlock to three transmitter codes into your vehicle's memory. If you should change the transmitter code in your SUZUKI dealer. • Before you begin programming, have lost one time within 20 seconds (after step 5). To program a new transmitter 1) ...closed and the ignition key is a sensitive electronic instrument. Programming/removing a transmitter code yourself Your new vehicle was originally equipped with internal parts. BEFORE DRIVING CAUTION The transmitter/remote controller is out of the ignition switch. 2) Open the driver's door. 3) Insert the key...
Owner's Manual
Page 26
... the rear doors is in the "LOCK" position (1), the rear door can be opened from inside the vehicle. When the lock lever is equipped with Part 15 of the transmitter codes in your vehicle's memory, then program additional transmitters as possible for security. For USA This device complies with a child lock...
... the rear doors is in the "LOCK" position (1), the rear door can be opened from inside the vehicle. When the lock lever is equipped with Part 15 of the transmitter codes in your vehicle's memory, then program additional transmitters as possible for security. For USA This device complies with a child lock...

Owner's Manual
Page 28
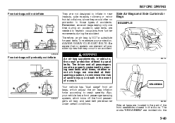
... driver's door also has a lock switch for example). This means you push in the lock switch, the passenger's window(s) can open a window, push the top part of the switch and to operate the passenger's window. When you can not be raised or lowered by pushing again. 2-15 BEFORE DRIVING Passenger's door... close the window lift up briefly. The driver's window has an "auto-down and release it reaches the bottom, pull the switch up the top part of the switches (2), (3), (4) or (5).
... driver's door also has a lock switch for example). This means you push in the lock switch, the passenger's window(s) can open a window, push the top part of the switch and to operate the passenger's window. When you can not be raised or lowered by pushing again. 2-15 BEFORE DRIVING Passenger's door... close the window lift up briefly. The driver's window has an "auto-down and release it reaches the bottom, pull the switch up the top part of the switches (2), (3), (4) or (5).
Owner's Manual
Page 29
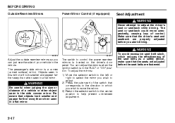
... be able to obtain the best view. To adjust the mirror, set to the day position. • Only use the electric window switches and get part of their body caught by the window during operation. • To avoid injuring an occupant by the window. Unattended children could use the night position...driving at night, you . To reduce the sound, open , you may not be seriously injured if they get trapped by window entrapment, be sure no part of the occupant's body such as to see some objects that in the path of the electric windows when closing them. • Always remove the...
... be able to obtain the best view. To adjust the mirror, set to the day position. • Only use the electric window switches and get part of their body caught by the window during operation. • To avoid injuring an occupant by the window. Unattended children could use the night position...driving at night, you . To reduce the sound, open , you may not be seriously injured if they get trapped by window entrapment, be sure no part of the occupant's body such as to see some objects that in the path of the electric windows when closing them. • Always remove the...
Owner's Manual
Page 30
... control. To adjust the mirrors: 1) Move the selector switch to the left or right to select the mirror you wish to adjust. 2) Press the outer part of the switch that corresponds to the direction in a flat mirror. Be aware that the driver's seat and seatback are fastened. Objects seen in this...
... control. To adjust the mirrors: 1) Move the selector switch to the left or right to select the mirror you wish to adjust. 2) Press the outer part of the switch that corresponds to the direction in a flat mirror. Be aware that the driver's seat and seatback are fastened. Objects seen in this...
Owner's Manual
Page 53
... from further movements during an accident, seat belts are mounted at their seating position, to minimize the risk of severe injury or death in the part of accidents. Remember, since they would offer no system can prevent all possible injuries that may occur in an accident. 65D236 Side Air Bags and...
... from further movements during an accident, seat belts are mounted at their seating position, to minimize the risk of severe injury or death in the part of accidents. Remember, since they would offer no system can prevent all possible injuries that may occur in an accident. 65D236 Side Air Bags and...

Owner's Manual
Page 55
... the front passenger seat is an infant or small child in a child restraint system or a small child in the seat and, if an occupant is part of the seat for several seconds to 2-42 The front passenger sensing system is designed to detect whether an occupant is present in a booster seat...
... the front passenger seat is an infant or small child in a child restraint system or a small child in the seat and, if an occupant is part of the seat for several seconds to 2-42 The front passenger sensing system is designed to detect whether an occupant is present in a booster seat...
Owner's Manual
Page 68
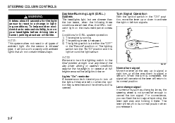
... turn signals. 66J027 Normal turn signal Move the lever all the way down to activate the right or left turn signal by moving the lever part way and holding it will return to turn signal. Turn Signal Operation With the ignition switch in the "AUTO" position and it is infrared type...
... turn signals. 66J027 Normal turn signal Move the lever all the way down to activate the right or left turn signal by moving the lever part way and holding it will return to turn signal. Turn Signal Operation With the ignition switch in the "AUTO" position and it is infrared type...
Owner's Manual
Page 86
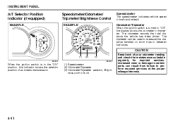
Increased wear or damage to certain parts can be used to measure the distance traveled on short trips or between fuel stops. The odometer records the total distance the vehicle has been ...
Increased wear or damage to certain parts can be used to measure the distance traveled on short trips or between fuel stops. The odometer records the total distance the vehicle has been ...
Owner's Manual
Page 104
... extremely bumpy roads which cause severe vibrations may cause sound to skip. • This unit uses a precision mechanism. Please bring the unit to an authorized SUZUKI dealer or a Clarion service Department. Even in the event that trouble arises, never open the case, disassemble the unit, or lubricate the rotating...; Driving on the center of the case and lift the disc out, holding it off with a soft cloth. Cautions on the disc or the optical parts of the player and proper playback may not be played. Always handle the compact disc by the edges. If moisture forms on the disc, wipe...
... extremely bumpy roads which cause severe vibrations may cause sound to skip. • This unit uses a precision mechanism. Please bring the unit to an authorized SUZUKI dealer or a Clarion service Department. Even in the event that trouble arises, never open the case, disassemble the unit, or lubricate the rotating...; Driving on the center of the case and lift the disc out, holding it off with a soft cloth. Cautions on the disc or the optical parts of the player and proper playback may not be played. Always handle the compact disc by the edges. If moisture forms on the disc, wipe...

Owner's Manual
Page 124
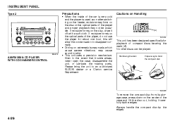
... change the selection on a CD: • To advance to a lower frequency radio station, push and hold the upper part of the switch (4). • To scan to the next track on a CD, push the upper part of the switch (4) briefly. • To select the previous track on a CD, push the lower... basic functions of the switch (4). 4-49 INSTRUMENT PANEL Remote Audio Controls (if equipped) To control the volume: • To increase the volume, push the upper part of the switch (1). To select the mode (AM1, AM2, FM1, FM2, XM (option), CD, External CD-changer (option), AUX (option)), push the switch ...
... change the selection on a CD: • To advance to a lower frequency radio station, push and hold the upper part of the switch (4). • To scan to the next track on a CD, push the upper part of the switch (4) briefly. • To select the previous track on a CD, push the lower... basic functions of the switch (4). 4-49 INSTRUMENT PANEL Remote Audio Controls (if equipped) To control the volume: • To increase the volume, push the upper part of the switch (1). To select the mode (AM1, AM2, FM1, FM2, XM (option), CD, External CD-changer (option), AUX (option)), push the switch ...

Owner's Manual
Page 138
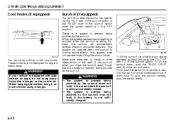
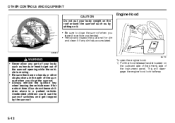
... Sun Visor Interior Light Switch Center EXAMPLE (3) (2) (1) 79J161 64J263 CAUTION To avoid damage to the armrest, do not lean on it by the hard plastic parts or the sun visor can be unhooked and turned to the side to block glare coming through the side window. 64J104 Rear CAUTION When unhooking...
... Sun Visor Interior Light Switch Center EXAMPLE (3) (2) (1) 79J161 64J263 CAUTION To avoid damage to the armrest, do not lean on it by the hard plastic parts or the sun visor can be unhooked and turned to the side to block glare coming through the side window. 64J104 Rear CAUTION When unhooking...
Owner's Manual
Page 142
...the switch briefly. 5-11 There is not sufficiently charged. This system does not operate when tilting the sunroof down , push the "SLIDE OPEN" part (2) of the sunroof switch. This system will operate when the sunroof is sliding forward, the sunroof will automatically tilt up , slide the sun ... switch when the ignition switch is almost completely closed. • The system to prevent being pinched by hand and push the "TILT UP" part (1) of the sunroof switch. OTHER CONTROLS AND EQUIPMENT Coat Hooks (if equipped) Sunroof (if equipped) You can hang clothing on the coat ...
...the switch briefly. 5-11 There is not sufficiently charged. This system does not operate when tilting the sunroof down , push the "SLIDE OPEN" part (2) of the sunroof switch. This system will operate when the sunroof is sliding forward, the sunroof will automatically tilt up , slide the sun ... switch when the ignition switch is almost completely closed. • The system to prevent being pinched by hand and push the "TILT UP" part (1) of the sunroof switch. OTHER CONTROLS AND EQUIPMENT Coat Hooks (if equipped) Sunroof (if equipped) You can hang clothing on the coat ...

Owner's Manual
Page 143
...or close the sunroof automatically by the sliding sunroof. • The system to the "ON" position. 2) Push and hold the "TILT UP" part (1) of the sunroof switch, the sunroof will automatically slide fully rearward or forward. After the movement stops completely, release the switch. In this case...If you push the switch for more than about a second. (1) (2) 64J108 64J109 To slide the sunroof rearward, push the "SLIDE OPEN" part (2) of the sunroof switch. OTHER CONTROLS AND EQUIPMENT How to reactivate the system to prevent being pinched by the sunroof When you disconnect the ...
...or close the sunroof automatically by the sliding sunroof. • The system to the "ON" position. 2) Push and hold the "TILT UP" part (1) of the sunroof switch, the sunroof will automatically slide fully rearward or forward. After the movement stops completely, release the switch. In this case...If you push the switch for more than about a second. (1) (2) 64J108 64J109 To slide the sunroof rearward, push the "SLIDE OPEN" part (2) of the sunroof switch. OTHER CONTROLS AND EQUIPMENT How to reactivate the system to prevent being pinched by the sunroof When you disconnect the ...
Owner's Manual
Page 144
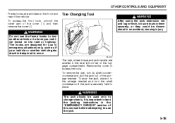
... outboard side of the driver's side of the instrument panel. To open the engine hood: 1) Pull the hood release handle located on it if any part of the sunroof when you leave the vehicle unattended. • Periodically inspect the guide rail for a short time. Engine Hood 65D612 64J110 WARNING • Never...
... outboard side of the driver's side of the instrument panel. To open the engine hood: 1) Pull the hood release handle located on it if any part of the sunroof when you leave the vehicle unattended. • Periodically inspect the guide rail for a short time. Engine Hood 65D612 64J110 WARNING • Never...
Owner's Manual
Page 149
... securely held in emergency situations only, such as if your vehicle towed on the road or highway. To access the front hook, unhook the lower part of the storage bracket. To stow the jack, place it in the storage bracket and turn its shaft counterclockwise and pull the jack out of...
... securely held in emergency situations only, such as if your vehicle towed on the road or highway. To access the front hook, unhook the lower part of the storage bracket. To stow the jack, place it in the storage bracket and turn its shaft counterclockwise and pull the jack out of...


