
Owner's Manual
Page 7
... their assistance in resolving your Warranty Information booklet. FOREWORD All information in this manual and your vehicle. IF YOU HAVE ANY PROBLEMS WITH YOUR SUZUKI: Please review the New Vehicle Warranty Information booklet supplied with the following action: Consult the Service Manager and the Owner of your vehicle, please take the following...
... their assistance in resolving your Warranty Information booklet. FOREWORD All information in this manual and your vehicle. IF YOU HAVE ANY PROBLEMS WITH YOUR SUZUKI: Please review the New Vehicle Warranty Information booklet supplied with the following action: Consult the Service Manager and the Owner of your vehicle, please take the following...
Owner's Manual
Page 12
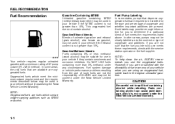
... RECOMMENDATION Fuel Recommendation Gasoline Containing MTBE Unleaded gasoline containing MTBE (methyl tertiary butyl ether) may be used in your vehicle without jeopardizing the New Vehicle Limited Warranty. In some states, pumps that the fuel you use in your vehicle if the ethanol content is not greater than ...known as gasohol, may be used in your vehicle if the MTBE content is not covered under the New Vehicle Limited Warranty. If you are not the responsibility of SUZUKI and may not be labeled for the type and percentage of oxygenate and whether important additives are not...
... RECOMMENDATION Fuel Recommendation Gasoline Containing MTBE Unleaded gasoline containing MTBE (methyl tertiary butyl ether) may be used in your vehicle without jeopardizing the New Vehicle Limited Warranty. In some states, pumps that the fuel you use in your vehicle if the ethanol content is not greater than ...known as gasohol, may be used in your vehicle if the MTBE content is not covered under the New Vehicle Limited Warranty. If you are not the responsibility of SUZUKI and may not be labeled for the type and percentage of oxygenate and whether important additives are not...

Owner's Manual
Page 14
... to prevent occupants from being thrown from inside the vehicle, push down the lock knob. Write the number below for your keys, you to have new keys made. To lock a front door from outside the vehicle, insert the key and turn the top of the key toward the front of the...
... to prevent occupants from being thrown from inside the vehicle, push down the lock knob. Write the number below for your keys, you to have new keys made. To lock a front door from outside the vehicle, insert the key and turn the top of the key toward the front of the...

Owner's Manual
Page 18
You can program up to four transmitter codes into your SUZUKI dealer. • Before you should change the transmitter code in your transmitters available. If you purchase additional transmitters, the new transmitters need to confirm that the keyless entry system operates properly by using the following procedure: ... All doors will lock/unlock to be programmed into your vehicle's memory. The four codes may be cleared automatically. • To purchase new transmitters, see your vehicle's memory. All the doors will be the same or different. • If you try to program a fifth ...
You can program up to four transmitter codes into your SUZUKI dealer. • Before you should change the transmitter code in your transmitters available. If you purchase additional transmitters, the new transmitters need to confirm that the keyless entry system operates properly by using the following procedure: ... All doors will lock/unlock to be programmed into your vehicle's memory. The four codes may be cleared automatically. • To purchase new transmitters, see your vehicle's memory. All the doors will be the same or different. • If you try to program a fifth ...

Owner's Manual
Page 62
...vehicle has then release • Move the control lever up in the "CRUISE ON-OFF" switch. When you release the lever, the new speed will steadily increase. Cruise control operation will be cancelled until you in the "SET/COAST" direction. Cruise control operation will be ...accelerator pedal. To Change Cruising Speed To reset the cruise control speed, hold the control lever COAST" position until you release the lever, the new speed will be maintained. • Accelerate to the desired speed, move the control lever down in the "SET/ COAST" direction. 3-7 When...
...vehicle has then release • Move the control lever up in the "CRUISE ON-OFF" switch. When you release the lever, the new speed will steadily increase. Cruise control operation will be cancelled until you in the "SET/COAST" direction. Cruise control operation will be ...accelerator pedal. To Change Cruising Speed To reset the cruise control speed, hold the control lever COAST" position until you release the lever, the new speed will be maintained. • Accelerate to the desired speed, move the control lever down in the "SET/ COAST" direction. 3-7 When...

Owner's Manual
Page 93
... system from operating properly. 52D348 52D347 To remove fingermarks and dust, use a soft cloth, and wipe in this unit due to clean compact discs. 52D277 New discs may skip if such discs are misshaped, or cracked, etc. NOTE: • Do not use any heat source. to remove the roughness (C) from the...
... system from operating properly. 52D348 52D347 To remove fingermarks and dust, use a soft cloth, and wipe in this unit due to clean compact discs. 52D277 New discs may skip if such discs are misshaped, or cracked, etc. NOTE: • Do not use any heat source. to remove the roughness (C) from the...

Owner's Manual
Page 110
... (for the future use. 2) Press the power on /off knob (2) while pressing and holding the track up button (4). 3) Input your current PIN, then set the new one. 4-45 The number "0" is to be done when you want to normal position. Press the CD button (3). Press the disc select button [1] once. If...
... (for the future use. 2) Press the power on /off knob (2) while pressing and holding the track up button (4). 3) Input your current PIN, then set the new one. 4-45 The number "0" is to be done when you want to normal position. Press the CD button (3). Press the disc select button [1] once. If...

Owner's Manual
Page 112
...Cause Another compact disc is heavily scratched or warped. Compact disc is already loaded. Remedy Eject the compact disc before loading the new one. Remedy Tune the frequency correctly to every device Phenomenon Power is not turned on the internal lens when the car is ...Sound is bad directly after power is noisy. Connections are not properly made. Select stations by seek tuning. Cause Remedy Contact your authorized SUZUKI dealer. 4-47 CD Phenomenon Compact disc cannot be selected by manual tuning. Cause Not tuned correctly to the frequency of a station. Clean...
...Cause Another compact disc is heavily scratched or warped. Compact disc is already loaded. Remedy Eject the compact disc before loading the new one. Remedy Tune the frequency correctly to every device Phenomenon Power is not turned on the internal lens when the car is ...Sound is bad directly after power is noisy. Connections are not properly made. Select stations by seek tuning. Cause Remedy Contact your authorized SUZUKI dealer. 4-47 CD Phenomenon Compact disc cannot be selected by manual tuning. Cause Not tuned correctly to the frequency of a station. Clean...

Owner's Manual
Page 165
.... 3) Using a wrench, remove the drain plug and drain out the engine oil. Brief contact with used oil and solvent can be harmed by swallowing new or used oil and solvent away from children and pets. • Wear a long-sleeve shirt and waterproof gloves. • Wash with a wrench to... with soap if oil or solvent contacts your bare hands. 9-12 INSPECTION AND MAINTENANCE Refilling EXAMPLE Open Close Changing Engine Oil and Filter WARNING EXAMPLE New and used oil or solvent may cause [skin] cancer. Repeated, prolonged contact with your skin. 4) Reinstall the drain plug and gasket. Wait ...
.... 3) Using a wrench, remove the drain plug and drain out the engine oil. Brief contact with used oil and solvent can be harmed by swallowing new or used oil and solvent away from children and pets. • Wear a long-sleeve shirt and waterproof gloves. • Wash with a wrench to... with soap if oil or solvent contacts your bare hands. 9-12 INSPECTION AND MAINTENANCE Refilling EXAMPLE Open Close Changing Engine Oil and Filter WARNING EXAMPLE New and used oil or solvent may cause [skin] cancer. Repeated, prolonged contact with your skin. 4) Reinstall the drain plug and gasket. Wait ...
Owner's Manual
Page 166
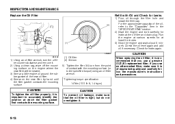
...oil through the filler hole and install the filler cap. If you use an after-market filter, make sure that you use a genuine SUZUKI replacement filter. CAUTION To prevent oil leakage, make sure it is of equivalent quality and carefully follow the manufacturer's instructions and precautions. 1).... 2) Using a clean rag, wipe off the mounting surface on the engine where the new filter will be seated. 3) Smear a little engine oil around the rubber gasket of the new oil filter. 4) Screw on the new filter by hand until the filter gasket contacts the mounting surface. (1) Oil filter (2) ...
...oil through the filler hole and install the filler cap. If you use an after-market filter, make sure that you use a genuine SUZUKI replacement filter. CAUTION To prevent oil leakage, make sure it is of equivalent quality and carefully follow the manufacturer's instructions and precautions. 1).... 2) Using a clean rag, wipe off the mounting surface on the engine where the new filter will be seated. 3) Smear a little engine oil around the rubber gasket of the new oil filter. 4) Screw on the new filter by hand until the filter gasket contacts the mounting surface. (1) Oil filter (2) ...

Owner's Manual
Page 173
... your vehicle's paint. (1) CAUTION Damage may result if the washer motor is necessary when you drive under dusty conditions. More frequent replacement is operated with a new one. 9-20 To remove the air cleaner element: 1) Loosen the clamp of the hose and detach the hose from the cover. 2) Remove the connector of...
... your vehicle's paint. (1) CAUTION Damage may result if the washer motor is necessary when you drive under dusty conditions. More frequent replacement is operated with a new one. 9-20 To remove the air cleaner element: 1) Loosen the clamp of the hose and detach the hose from the cover. 2) Remove the connector of...

Owner's Manual
Page 184
...Jack up the vehicle (follow the jacking instructions in the "EMERGENCY SERVICE" section in this manual). 4) Remove the wheel nuts and wheel. 5) Install the new wheel and replace the wheel nuts with their cone shaped end facing the wheel. Wheel tightening torque 85 Nm (61.5 lb-ft, 8.5 kg-m) 6) Lower...same type and brand on all -season tires which are designed for use in the illustration. For improved traction in severe winter conditions, SUZUKI recommends mounting radial snow tires on all four wheels of your vehicle. 9-31 Tighten each nut snugly by hand until the wheel is ...
...Jack up the vehicle (follow the jacking instructions in the "EMERGENCY SERVICE" section in this manual). 4) Remove the wheel nuts and wheel. 5) Install the new wheel and replace the wheel nuts with their cone shaped end facing the wheel. Wheel tightening torque 85 Nm (61.5 lb-ft, 8.5 kg-m) 6) Lower...same type and brand on all -season tires which are designed for use in the illustration. For improved traction in severe winter conditions, SUZUKI recommends mounting radial snow tires on all four wheels of your vehicle. 9-31 Tighten each nut snugly by hand until the wheel is ...

Owner's Manual
Page 190
...box. NOTE: Make sure that the fuse box always carries spare fuses. 9-37 Remove the fuse box lid by your SUZUKI dealer for headlight alignment. If you replace a fuse and the new one blows in "FUSES AND PROTECTED CIRCUITS" section. To remove a fuse, use a substitute such as aluminum foil ...or wire to your SUZUKI dealer. Always be sure to replace a blown fuse with a fuse of time, you take your vehicle ...
...box. NOTE: Make sure that the fuse box always carries spare fuses. 9-37 Remove the fuse box lid by your SUZUKI dealer for headlight alignment. If you replace a fuse and the new one blows in "FUSES AND PROTECTED CIRCUITS" section. To remove a fuse, use a substitute such as aluminum foil ...or wire to your SUZUKI dealer. Always be sure to replace a blown fuse with a fuse of time, you take your vehicle ...

Owner's Manual
Page 191
They can burst and injure you if they become cool enough. • The headlight bulbs are on. Handle them carefully. Grasp a new bulb with a clean cloth. 60G115 65D149 Pull down the lens by using a plain screw driver covered with pressurized halogen gas. When replacing the bulb, make ... replace headlight bulbs or parking light bulbs due to under-hood components trust this job to your skin may cause a halogen bulb to burn your SUZUKI dealer. The bulb can be removed by your finger right after they are holding spring and replace the bulb. 9-38 This should be carried out...
They can burst and injure you if they become cool enough. • The headlight bulbs are on. Handle them carefully. Grasp a new bulb with a clean cloth. 60G115 65D149 Pull down the lens by using a plain screw driver covered with pressurized halogen gas. When replacing the bulb, make ... replace headlight bulbs or parking light bulbs due to under-hood components trust this job to your skin may cause a halogen bulb to burn your SUZUKI dealer. The bulb can be removed by your finger right after they are holding spring and replace the bulb. 9-38 This should be carried out...

Owner's Manual
Page 192
... turn it counterclockwise. To remove and install a full glass type bulb (1), simply pull out or push in and turn signal, etc.) 54G299 9-39 To install a new bulb, push it in and turn the holder counterclockwise and pull it out. To remove a glass metal type bulb (2) from a light housing, turn it clockwise...
... turn it counterclockwise. To remove and install a full glass type bulb (1), simply pull out or push in and turn signal, etc.) 54G299 9-39 To install a new bulb, push it in and turn the holder counterclockwise and pull it out. To remove a glass metal type bulb (2) from a light housing, turn it clockwise...

Owner's Manual
Page 194
...For windshield wipers: 80G083 70G119 If the wiper blades become brittle or damaged, or make streaks when wiping, replace the wiper blades. To install new wiper blades, follow the procedures below. 1) Hold the wiper arm away from the ones described here depending on vehicle specifications. CAUTION To avoid ... window while replacing the wiper blade. NOTE: Some wiper blades may be sure to withstand the prying force. If so, consult your SUZUKI dealer for proper replacement method. 9-41 The hooks (3) and (4) are not strong enough to unhook only hooks (1) and (2) with the screwdriver.
...For windshield wipers: 80G083 70G119 If the wiper blades become brittle or damaged, or make streaks when wiping, replace the wiper blades. To install new wiper blades, follow the procedures below. 1) Hold the wiper arm away from the ones described here depending on vehicle specifications. CAUTION To avoid ... window while replacing the wiper blade. NOTE: Some wiper blades may be sure to withstand the prying force. If so, consult your SUZUKI dealer for proper replacement method. 9-41 The hooks (3) and (4) are not strong enough to unhook only hooks (1) and (2) with the screwdriver.

Owner's Manual
Page 195
INSPECTION AND MAINTENANCE 52D102 60A260 52D124 2) Squeeze lock lever (1) towards wiper arm (2) and remove the wiper frame from the arm as shown. 3) Pull the locked end of the wiper blade firmly to unlock the blade and slide the blade out as shown. (3) Retainer 4) If the new blade is provided without the two metal retainers, move them from the old blade to the new one. 9-42
INSPECTION AND MAINTENANCE 52D102 60A260 52D124 2) Squeeze lock lever (1) towards wiper arm (2) and remove the wiper frame from the arm as shown. 3) Pull the locked end of the wiper blade firmly to unlock the blade and slide the blade out as shown. (3) Retainer 4) If the new blade is provided without the two metal retainers, move them from the old blade to the new one. 9-42
Owner's Manual
Page 196
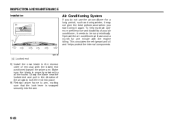
... to lock the end into the arm. 9-43 This circulates the refrigerant and oil and helps protect the internal components. 52D125 (4) Locked end 5) Install the new blade in the direction of removal, with the engine idling. Operate the air conditioner at least once a month for a long period, such as during winter...
... to lock the end into the arm. 9-43 This circulates the refrigerant and oil and helps protect the internal components. 52D125 (4) Locked end 5) Install the new blade in the direction of removal, with the engine idling. Operate the air conditioner at least once a month for a long period, such as during winter...

Owner's Manual
Page 215
GENERAL INFORMATION Safety Certification Label Emission Compliance Label (for U.S.A.) Warranties The warranties covering your vehicle are provided with your vehicle: • New Vehicle Limited Warranty • Limited Warranty For SUZUKI Parts or Accessories • Emission Components Defect Warranty • Emission Performance Warranty 60A412 52D059 This label contains important safetyrelated information about your rights...
GENERAL INFORMATION Safety Certification Label Emission Compliance Label (for U.S.A.) Warranties The warranties covering your vehicle are provided with your vehicle: • New Vehicle Limited Warranty • Limited Warranty For SUZUKI Parts or Accessories • Emission Components Defect Warranty • Emission Performance Warranty 60A412 52D059 This label contains important safetyrelated information about your rights...

