
Owner's Manual
Page 171
... 's seat. 1. Ensure that there is occupied by the adult incorrectly sitting in any parts of the front seats, seatbelts, front bumper, front side frame, instrument panel, combination meter, steering wheel, steering column, tire, suspension or floor panel can be caused by an...of America, Inc. territories. If the OFF indicator still remains illuminated while the ON indicator remains off , take the following SUBARU distributors: Subaru of the SUBARU advanced airbag system. Effect vehicle modifications made for persons with manual seats only) 4. If you have on the side of...
... 's seat. 1. Ensure that there is occupied by the adult incorrectly sitting in any parts of the front seats, seatbelts, front bumper, front side frame, instrument panel, combination meter, steering wheel, steering column, tire, suspension or floor panel can be caused by an...of America, Inc. territories. If the OFF indicator still remains illuminated while the ON indicator remains off , take the following SUBARU distributors: Subaru of the SUBARU advanced airbag system. Effect vehicle modifications made for persons with manual seats only) 4. If you have on the side of...

Owner's Manual
Page 255
.... 1) 2) 3) 4) 5) Vehicle width line (oblique vertical line) Approx. 10 feet (3 m) from the bumper (green horizontal line) Approx. 6.5 feet (2 m) from the bumper (green horizontal line) Approx. 3 feet (1 m) from the bumper (yellow horizontal line) Approx. 1.5 feet (0.5 m) from the display. By doing so, the sprayed glass cleaner...the "R" (reverse) position, the rear view camera automatically displays the rear view image behind you realize the actual distance from the bumper (red horizontal line) NOTE When cleaning the mirror, use care not to the on or off mode, with glass cleaner. That...
.... 1) 2) 3) 4) 5) Vehicle width line (oblique vertical line) Approx. 10 feet (3 m) from the bumper (green horizontal line) Approx. 6.5 feet (2 m) from the bumper (green horizontal line) Approx. 3 feet (1 m) from the bumper (yellow horizontal line) Approx. 1.5 feet (0.5 m) from the display. By doing so, the sprayed glass cleaner...the "R" (reverse) position, the rear view camera automatically displays the rear view image behind you realize the actual distance from the bumper (red horizontal line) NOTE When cleaning the mirror, use care not to the on or off mode, with glass cleaner. That...

Owner's Manual
Page 373
Areas at both ends of the bumper and areas just under the bumper cannot be viewed. CAUTION The range that has a wide projection on the screen Image from camera Range of view Range of view The area from ... that can be viewed. Interior equipment 6-21 & Viewing range on its upper part such as a sign pole behind the vehicle, the projec- Range of the bumper can be viewed. Also, the image from camera The area above the camera cannot be viewed with your eyes when moving backward and proceed slowly...
Areas at both ends of the bumper and areas just under the bumper cannot be viewed. CAUTION The range that has a wide projection on the screen Image from camera Range of view Range of view The area from ... that can be viewed. Interior equipment 6-21 & Viewing range on its upper part such as a sign pole behind the vehicle, the projec- Range of the bumper can be viewed. Also, the image from camera The area above the camera cannot be viewed with your eyes when moving backward and proceed slowly...

Owner's Manual
Page 374
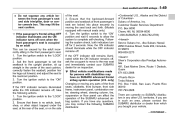
... the inside mirror 1) Vehicle width line (oblique vertical line) 2) Approx. 10 feet (3 m) from the bumper (green horizontal line) 3) Approx. 6.5 feet (2 m) from the bumper (green horizontal line) 4) Approx. 3 feet (1 m) from the bumper (yellow horizontal line) 5) Approx. 1.5 feet (0.5 m) from the bumper (red horizontal line) 6) Vehicle centerline When the shift lever or select lever is set to...
... the inside mirror 1) Vehicle width line (oblique vertical line) 2) Approx. 10 feet (3 m) from the bumper (green horizontal line) 3) Approx. 6.5 feet (2 m) from the bumper (green horizontal line) 4) Approx. 3 feet (1 m) from the bumper (yellow horizontal line) 5) Approx. 1.5 feet (0.5 m) from the bumper (red horizontal line) 6) Vehicle centerline When the shift lever or select lever is set to...

Owner's Manual
Page 438
... trailer hitch connector or hitch ball should disconnect from your vehicle and trailer. If use . Never use . For all types of a genuine SUBARU trailer hitch is suited to the rear bumper. Legacy SUBARU does not offer accessory trailer hitches. Regularly check that the hitch mounting bolts and nuts are tight. & Connecting a trailer ! Pass the...
... trailer hitch connector or hitch ball should disconnect from your vehicle and trailer. If use . Never use . For all types of a genuine SUBARU trailer hitch is suited to the rear bumper. Legacy SUBARU does not offer accessory trailer hitches. Regularly check that the hitch mounting bolts and nuts are tight. & Connecting a trailer ! Pass the...

Owner's Manual
Page 456
...the vehicle for towing or tie-down hooks/holes. Take out the towing hook and screwdriver from the trunk (Legacy) or cargo area (Outback). 2. Fit the towing hook cover on the front bumper using the jack handle. WARNING . Leaving the towing hook mounted on board tool bucket. Be sure to the... towing hooks. Never use the towing hook except when towing your vehicle. . To prevent deformation to the bumper and the towing hook, do not apply excessive lateral load to remove the towing hook after towing. Use only the specified towing hooks and tie...
...the vehicle for towing or tie-down hooks/holes. Take out the towing hook and screwdriver from the trunk (Legacy) or cargo area (Outback). 2. Fit the towing hook cover on the front bumper using the jack handle. WARNING . Leaving the towing hook mounted on board tool bucket. Be sure to the... towing hooks. Never use the towing hook except when towing your vehicle. . To prevent deformation to the bumper and the towing hook, do not apply excessive lateral load to remove the towing hook after towing. Use only the specified towing hooks and tie...

Owner's Manual
Page 457
... 9-15 Rear towing hook: 1. Front tie-down hooks are located between each of the tool bucket. CONTINUED - Fit the towing hook cover on the rear bumper using the jack handle. - Screw the towing hook into the threaded hole until its thread can no longer be seen. 2. Tighten the towing hook securely... find a threaded hole for attaching the towing hook. WARNING Do not use the towing hook except when towing your vehicle. In case of the trunk (Legacy) or cargo area (Outback). The front tie-down hooks: 3. Take the towing hook out of the tool bucket and take the screwdriver out of the...
... 9-15 Rear towing hook: 1. Front tie-down hooks are located between each of the tool bucket. CONTINUED - Fit the towing hook cover on the rear bumper using the jack handle. - Screw the towing hook into the threaded hole until its thread can no longer be seen. 2. Tighten the towing hook securely... find a threaded hole for attaching the towing hook. WARNING Do not use the towing hook except when towing your vehicle. In case of the trunk (Legacy) or cargo area (Outback). The front tie-down hooks: 3. Take the towing hook out of the tool bucket and take the screwdriver out of the...
