Owner's Manual
Page 4
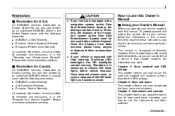
...is composed of coverage and exclusions, is equipped with a navigation system and/or Rear Seat Entertainment System, the displays contain mercury. SUBARU Limited Warranty . If your vehicle. Therefore, it is necessary to your vehicle is in Canada come with the following warranties. ....3: Instruments and controls This chapter informs you how to use the seat and seatbelt and contains precautions for U.S.A. Emissions Performance Warranty All warranty information, including details of instrument panel indicators and how to operate the keys, locks and windows. Please read...
...is composed of coverage and exclusions, is equipped with a navigation system and/or Rear Seat Entertainment System, the displays contain mercury. SUBARU Limited Warranty . If your vehicle. Therefore, it is necessary to your vehicle is in Canada come with the following warranties. ....3: Instruments and controls This chapter informs you how to use the seat and seatbelt and contains precautions for U.S.A. Emissions Performance Warranty All warranty information, including details of instrument panel indicators and how to operate the keys, locks and windows. Please read...
Owner's Manual
Page 11
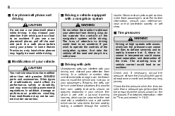
... of the navigation system, first take the vehicle off the road and park in the front passenger's seat. In addition, damage or performance problems resulting from modification may legally be thrown around inside the vehicle and hurt you wish to operate the controls of your attention from ...pressure when the tires are cold. Besides, the pets can be hurt under warranties. & Driving with pets Unrestrained pets can interfere with genuine SUBARU parts and accessories. Check and, if necessary, adjust the pressure of the navigation system while driving. 8 & Car phone/cell phone and ...
... of the navigation system, first take the vehicle off the road and park in the front passenger's seat. In addition, damage or performance problems resulting from modification may legally be thrown around inside the vehicle and hurt you wish to operate the controls of your attention from ...pressure when the tires are cold. Besides, the pets can be hurt under warranties. & Driving with pets Unrestrained pets can interfere with genuine SUBARU parts and accessories. Check and, if necessary, adjust the pressure of the navigation system while driving. 8 & Car phone/cell phone and ...

Owner's Manual
Page 31
... the seat height, pull up or push down the rear end of the control switch. 1. Forward/backward position of seat cushion . Angle of the seat Perform the seat position retrieval before driving. Angle of seat ! Height of seatback . Before adjusting the seat, make sure the hands and feet of rear seat...
... the seat height, pull up or push down the rear end of the control switch. 1. Forward/backward position of seat cushion . Angle of the seat Perform the seat position retrieval before driving. Angle of seat ! Height of seatback . Before adjusting the seat, make sure the hands and feet of rear seat...
Owner's Manual
Page 57
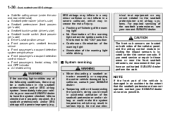
...detection control module . Illumination of the warning light while driving trical test equipment on both sides of the seatbelt pretensioner, see your SUBARU dealer as soon as possible. Seatbelt buckle switch (front passenger's side) . All related wiring SRS airbags may be a malfunction ... required servicing of the radiator panel, and the airbag control module including the impact sensors is first turned to have an authorized SUBARU dealer perform the work. & System servicing WARNING . Do not use elec- 1-30 Seat, seatbelt and SRS airbags . No illumination of...
...detection control module . Illumination of the warning light while driving trical test equipment on both sides of the seatbelt pretensioner, see your SUBARU dealer as soon as possible. Seatbelt buckle switch (front passenger's side) . All related wiring SRS airbags may be a malfunction ... required servicing of the radiator panel, and the airbag control module including the impact sensors is first turned to have an authorized SUBARU dealer perform the work. & System servicing WARNING . Do not use elec- 1-30 Seat, seatbelt and SRS airbags . No illumination of...
Owner's Manual
Page 58
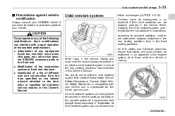
... pillar or specified for the child's age and size. All child restraint systems are safer when properly restrained in the rear seating positions than genuine SUBARU accessory parts to the front end. . All U.S. Installation of a tire of the seatbelt pretensioners. . Seat, seatbelt and SRS airbags 1-31 & Precautions .... You should always be endangered in an accident if their child restraints are not properly secured in the vehicle. CAUTION Do not perform any of the suspension system or front end structure. . Child restraint systems tether anchorages (LATCH)" F1-38).
... pillar or specified for the child's age and size. All child restraint systems are safer when properly restrained in the rear seating positions than genuine SUBARU accessory parts to the front end. . All U.S. Installation of a tire of the seatbelt pretensioners. . Seat, seatbelt and SRS airbags 1-31 & Precautions .... You should always be endangered in an accident if their child restraints are not properly secured in the vehicle. CAUTION Do not perform any of the suspension system or front end structure. . Child restraint systems tether anchorages (LATCH)" F1-38).
Owner's Manual
Page 99
... or wiring of the SRS airbag or could result in serious injury. . NOTE In the following list, have the work performed by an authorized SUBARU dealer. Under the center console . Between the rear seat cushion and rear wheel house on front passenger's side and nearby ...system. For required servicing of the system should be performed only by a collision, consult your SUBARU dealer. . When discarding an airbag module or scrapping the entire vehicle damaged by an authorized SUBARU dealer. Do not use only genuine SUBARU parts. Inside each center pillar . the driver's SRS...
... or wiring of the SRS airbag or could result in serious injury. . NOTE In the following list, have the work performed by an authorized SUBARU dealer. Under the center console . Between the rear seat cushion and rear wheel house on front passenger's side and nearby ...system. For required servicing of the system should be performed only by a collision, consult your SUBARU dealer. . When discarding an airbag module or scrapping the entire vehicle damaged by an authorized SUBARU dealer. Do not use only genuine SUBARU parts. Inside each center pillar . the driver's SRS...
Owner's Manual
Page 100
Attachment of additional trim materials to the side body. Attachment of additional fabric or leather on your SUBARU dealer if you want to install any accessory parts on the front seat . Always consult your vehicle. Installation of a hands-...airbag system components and/or wiring is not advisable. Such modifications can interfere with proper operation of the following modifications. . CAUTION Do not perform any other accessory to the driver's door pillar or specified for individual vehicle models in this Owner's Manual. . Installation of additional electrical/...
Attachment of additional trim materials to the side body. Attachment of additional fabric or leather on your SUBARU dealer if you want to install any accessory parts on the front seat . Always consult your vehicle. Installation of a hands-...airbag system components and/or wiring is not advisable. Such modifications can interfere with proper operation of the following modifications. . CAUTION Do not perform any other accessory to the driver's door pillar or specified for individual vehicle models in this Owner's Manual. . Installation of additional electrical/...

Owner's Manual
Page 114
...this event, per- CONTINUED - Transmitter circuit board (1) Open and close the doors and the rear gate. 2. Program the number into the system. Perform the following procedure. 1. Neither an electronic tone nor the buzzer will sound, and the interior lamp will occur. Open the driver's door, sit ...to the "ON" position 10 times within 45 seconds, an error will not flash. Keys and doors 2-13 different. When you do not perform steps (1) and (2) within 15 seconds. Programming transmitter codes into the ignition switch, then turn it is necessary to the circuit board inside the ...
...this event, per- CONTINUED - Transmitter circuit board (1) Open and close the doors and the rear gate. 2. Program the number into the system. Perform the following procedure. 1. Neither an electronic tone nor the buzzer will sound, and the interior lamp will occur. Open the driver's door, sit ...to the "ON" position 10 times within 45 seconds, an error will not flash. Keys and doors 2-13 different. When you do not perform steps (1) and (2) within 15 seconds. Programming transmitter codes into the ignition switch, then turn it is necessary to the circuit board inside the ...

Owner's Manual
Page 115
...the procedure is 8. NOTE . For example, push the locking switch eight times if the leftmost digit of the procedure. . If you do not perform the operations in part 4 within 15 seconds, an error will occur and the electronic tone will occur. Before the electronic tone stops sounding, push ...with part 3 of the code is completed, an electronic tone will sound for each of the remaining digits of the transmit- In this event, perform the registration steps again beginning with the eighth digit. 5. If you push the " " side of the locking switch within 15 seconds. If an...
...the procedure is 8. NOTE . For example, push the locking switch eight times if the leftmost digit of the procedure. . If you do not perform the operations in part 4 within 15 seconds, an error will occur and the electronic tone will occur. Before the electronic tone stops sounding, push ...with part 3 of the code is completed, an electronic tone will sound for each of the remaining digits of the transmit- In this event, perform the registration steps again beginning with the eighth digit. 5. If you push the " " side of the locking switch within 15 seconds. If an...

Owner's Manual
Page 116
... the system, remove the key from the memory. NOTE Make sure no one push of the necessary transmitter codes into the system), perform the procedure beginning with up to four transmitters. When you do not start entering the number using the lock knob before the electronic ...tone stops sounding, an error will occur. If the interval between one else is possible that entered the first time. In this event, perform the procedure again beginning with part 3. 8. For security reasons, lost transmitter's code remains in the system's memory. If you have only one ...
... the system, remove the key from the memory. NOTE Make sure no one push of the necessary transmitter codes into the system), perform the procedure beginning with up to four transmitters. When you do not start entering the number using the lock knob before the electronic ...tone stops sounding, an error will occur. If the interval between one else is possible that entered the first time. In this event, perform the procedure again beginning with part 3. 8. For security reasons, lost transmitter's code remains in the system's memory. If you have only one ...

Owner's Manual
Page 119
...less than 2 seconds) on the remote transmitter. The 30-second standby time can disarm the system without using the remote transmitter. - Any of your SUBARU dealer. . If any of the power door locking switch to the surveillance state. - Doors are opened . - Ignition switch is used only for ...Close the door. An electronic chirp will sound once, the turn signal lights will not switch to set the door locks. 7. Have it performed by your vehicle's alarm system for locking and unlocking the doors and rear gate and panic activation. In valet mode, the remote transmitter is...
...less than 2 seconds) on the remote transmitter. The 30-second standby time can disarm the system without using the remote transmitter. - Any of your SUBARU dealer. . If any of the power door locking switch to the surveillance state. - Doors are opened . - Ignition switch is used only for ...Close the door. An electronic chirp will sound once, the turn signal lights will not switch to set the door locks. 7. Have it performed by your vehicle's alarm system for locking and unlocking the doors and rear gate and panic activation. In valet mode, the remote transmitter is...
Owner's Manual
Page 167
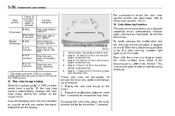
.... 6.5 feet (2 m) from the bumper (green horizontal line) Approx. 3 feet (1 m) from the bumper (yellow horizontal line) Approx. 1.5 feet (0.5 m) from the display. To remove the help lines, perform the following help lines are removable. Also, the following procedure. 1. 3-38 Instruments and controls Gear position Period of vehicles behind the vehicle on , the auto...
.... 6.5 feet (2 m) from the bumper (green horizontal line) Approx. 3 feet (1 m) from the bumper (yellow horizontal line) Approx. 1.5 feet (0.5 m) from the display. To remove the help lines, perform the following help lines are removable. Also, the following procedure. 1. 3-38 Instruments and controls Gear position Period of vehicles behind the vehicle on , the auto...

Owner's Manual
Page 179
...temperature to make separate temperature settings for the driver's side and passenger's side. With the maximum temperature set , the system gives maximum cooling performance. With the dial set at your desired temperature, the system automatically adjusts the temperature of air supplied from the outlets such that the desired ...dial clockwise and releasing it reduces the temperature by 18F (0.58C). Driver's side With the minimum temperature set , the system gives maximum heating performance. Each temperature OFF button ! Temperature control dial setting is shown on the display.
...temperature to make separate temperature settings for the driver's side and passenger's side. With the maximum temperature set , the system gives maximum cooling performance. With the dial set at your desired temperature, the system automatically adjusts the temperature of air supplied from the outlets such that the desired ...dial clockwise and releasing it reduces the temperature by 18F (0.58C). Driver's side With the minimum temperature set , the system gives maximum heating performance. Each temperature OFF button ! Temperature control dial setting is shown on the display.

Owner's Manual
Page 180
... operation is pushed, the air conditioner compressor turns on and the indicator light on the air conditioner button will not illuminate. When this button is performed. . Alternatively, push the " " button again to return the system to quickly defog the windshield. A/C - Air conditioner button To defrost or dehumidify the windshield and front...
... operation is pushed, the air conditioner compressor turns on and the indicator light on the air conditioner button will not illuminate. When this button is performed. . Alternatively, push the " " button again to return the system to quickly defog the windshield. A/C - Air conditioner button To defrost or dehumidify the windshield and front...
Owner's Manual
Page 183
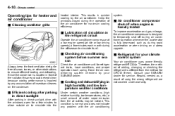
... method of adding, changing or checking the refrigerant is different from the air outlets may be kept clean because cooling performance is impaired by the air conditioner. 4-10 Climate control Operating tips for service. Keep the windows closed during rapid ...of snow, leaves, or other obstructions to ensure efficient heating and defrosting. Have the air conditioning system checked by your SUBARU dealer. & Refrigerant for your SUBARU dealer for heater and air conditioner & Cleaning ventilator grille heated interior. Consult your climate control system Your air conditioner uses...
... method of adding, changing or checking the refrigerant is different from the air outlets may be kept clean because cooling performance is impaired by the air conditioner. 4-10 Climate control Operating tips for service. Keep the windows closed during rapid ...of snow, leaves, or other obstructions to ensure efficient heating and defrosting. Have the air conditioning system checked by your SUBARU dealer. & Refrigerant for your SUBARU dealer for heater and air conditioner & Cleaning ventilator grille heated interior. Consult your climate control system Your air conditioner uses...

Owner's Manual
Page 186
Climate control 4-13 CAUTION Contact your SUBARU dealer if the following occurs, even if it is not yet time to change the filter. - Reduction of the airflow through the vents. - Windshield gets easily fogged or misted. NOTE The filter can influence the air conditioning, heating and defroster performance if not properly maintained.
Climate control 4-13 CAUTION Contact your SUBARU dealer if the following occurs, even if it is not yet time to change the filter. - Reduction of the airflow through the vents. - Windshield gets easily fogged or misted. NOTE The filter can influence the air conditioning, heating and defroster performance if not properly maintained.
Owner's Manual
Page 189
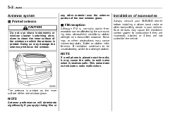
... noise when it receives calls. The antenna is printed. any other material over the antenna portion of accessories Always consult your SUBARU dealer before installing a citizen band radio or other obstructions may damage the antenna printed on the inner surface of the rear window... glass. Installation of the rear window glass. Doing so may cause momentary static, flutter or station interference. NOTE Antenna performance will deteriorate significantly if you apply tinting film or 5-2 Audio Antenna system & Printed antenna CAUTION Do not use sharp instruments or ...
... noise when it receives calls. The antenna is printed. any other material over the antenna portion of accessories Always consult your SUBARU dealer before installing a citizen band radio or other obstructions may damage the antenna printed on the inner surface of the rear window... glass. Installation of the rear window glass. Doing so may cause momentary static, flutter or station interference. NOTE Antenna performance will deteriorate significantly if you apply tinting film or 5-2 Audio Antenna system & Printed antenna CAUTION Do not use sharp instruments or ...
Owner's Manual
Page 194
... radio scans through the radio band until a station is reached. ! Sirius satellite radio Sirius satellite radio is displayed. 3. In such a situation, perform manual tuning to stop on any displayed frequency. Press the "SCAN" button again to cancel the SCAN mode and to select the desired station. !... the entire band has been scanned from the station or proximity to reset the preset buttons. . Press one it is necessary to install the SUBARU genuine satellite receiver (optional part) and to select FM1, FM2, or AM reception. 2. removal, all stations stored in a single operation. ...
... radio scans through the radio band until a station is reached. ! Sirius satellite radio Sirius satellite radio is displayed. 3. In such a situation, perform manual tuning to stop on any displayed frequency. Press the "SCAN" button again to cancel the SCAN mode and to select the desired station. !... the entire band has been scanned from the station or proximity to reset the preset buttons. . Press one it is necessary to install the SUBARU genuine satellite receiver (optional part) and to select FM1, FM2, or AM reception. 2. removal, all stations stored in a single operation. ...

Owner's Manual
Page 195
... to select SAT1, SAT2 or SAT3 reception. ! Category selection Press " " or " " of the preset buttons (10) Also during the category selection, channel scan can be performed in signal loss include driving near a wall, steep cliff or hill, or driving on to turn on the audio display by its unique satellite radio...
... to select SAT1, SAT2 or SAT3 reception. ! Category selection Press " " or " " of the preset buttons (10) Also during the category selection, channel scan can be performed in signal loss include driving near a wall, steep cliff or hill, or driving on to turn on the audio display by its unique satellite radio...

Owner's Manual
Page 199
...to the "LOCK" position ! NOTE . The folder repeat-play mode will be repeated. To cancel random mode, press the button again. Each time you perform any of the audio equipment - Turn the ignition switch to play mode: Press the "RPT" button once (non-MP3 disc) Press the "RPT" button...Repeating ! Non-MP3 disc Press the "RDM" button (5) briefly during disc playback to the "LOCK" position ! With an MP3 disc inserted, each time you perform any of the following steps. The repeat-play mode. . The display will show "RDM", and all of the "SEEK FLDR" button (MP3 disc) - Turn...
...to the "LOCK" position ! NOTE . The folder repeat-play mode will be repeated. To cancel random mode, press the button again. Each time you perform any of the audio equipment - Turn the ignition switch to play mode: Press the "RPT" button once (non-MP3 disc) Press the "RPT" button...Repeating ! Non-MP3 disc Press the "RDM" button (5) briefly during disc playback to the "LOCK" position ! With an MP3 disc inserted, each time you perform any of the following steps. The repeat-play mode. . The display will show "RDM", and all of the "SEEK FLDR" button (MP3 disc) - Turn...