Owner's Manual
Page 6
... panel outlets and foot outlets Foot outlets Windshield defroster and foot outlets Windshield defroster Rear window defogger/Outside mirror defogger/Windshield wiper deicer Air recirculation Door unlock (transmitter) Trunk lid (Legacy) or rear gate (Outback) (transmitter) Outside air Engine oil Washer All persons in a crash even when the vehicle has the SRS...
... panel outlets and foot outlets Foot outlets Windshield defroster and foot outlets Windshield defroster Rear window defogger/Outside mirror defogger/Windshield wiper deicer Air recirculation Door unlock (transmitter) Trunk lid (Legacy) or rear gate (Outback) (transmitter) Outside air Engine oil Washer All persons in a crash even when the vehicle has the SRS...
Owner's Manual
Page 17
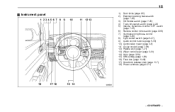
... parking brake switch (page 7-34) Hill Holder switch (page 7-35) Trunk lid opener switch (page 2-24) Vehicle Dynamics Control OFF switch (page 7-31) Remote control mirror switch (page 3-38) Illumination brightness control (page 3-30) Light control switch (page 3-27) Audio control buttons (page 5-30) Combination meter (page 3-5) Cruise control (page 7-38...
... parking brake switch (page 7-34) Hill Holder switch (page 7-35) Trunk lid opener switch (page 2-24) Vehicle Dynamics Control OFF switch (page 7-31) Remote control mirror switch (page 3-38) Illumination brightness control (page 3-30) Light control switch (page 3-27) Audio control buttons (page 5-30) Combination meter (page 3-5) Cruise control (page 7-38...

Owner's Manual
Page 22
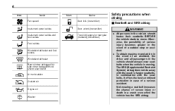
...prevention Hazard warning flasher Audible signal Key lock-in the following table to meet your personal requirements. 20 Function settings A SUBARU dealer can change the settings of the functions shown in prevention Operation/Non-operation Operation/Non-operation ON/OFF Operation/Non-operation... Operation/Non-operation Operation/Non-operation Operation for 15 minutes/ Continuous operation Defogger and deicer system Rear window defogger, outside mirror for models with the automatic defogger and windshield wiper deicer climate control system Map light/Dome light/Cargo area light Battery ...
...prevention Hazard warning flasher Audible signal Key lock-in the following table to meet your personal requirements. 20 Function settings A SUBARU dealer can change the settings of the functions shown in prevention Operation/Non-operation Operation/Non-operation ON/OFF Operation/Non-operation... Operation/Non-operation Operation/Non-operation Operation for 15 minutes/ Continuous operation Defogger and deicer system Rear window defogger, outside mirror for models with the automatic defogger and windshield wiper deicer climate control system Map light/Dome light/Cargo area light Battery ...

Owner's Manual
Page 67
...airbag The front passenger's SRS frontal airbag uses a dual stage inflator. The occupant detection system may prevent the SUBARU advanced frontal airbag system from functioning correctly or cause the system to do so may not inflate the front passenger...or should not be used with the head restraint removed. . Do not apply any accessory (such as by the SUBARU advanced frontal airbag system. ! WARNING Do not attach accessories to "Manual seat" F1-3 (models equipped with their ...seat. For adjusting procedure, refer to the windshield, or fit an extra-wide mirror over the rear view...
...airbag The front passenger's SRS frontal airbag uses a dual stage inflator. The occupant detection system may prevent the SUBARU advanced frontal airbag system from functioning correctly or cause the system to do so may not inflate the front passenger...or should not be used with the head restraint removed. . Do not apply any accessory (such as by the SUBARU advanced frontal airbag system. ! WARNING Do not attach accessories to "Manual seat" F1-3 (models equipped with their ...seat. For adjusting procedure, refer to the windshield, or fit an extra-wide mirror over the rear view...

Owner's Manual
Page 120
......Windshield wiper and washer switches ...Rear window wiper and washer switch (Outback) ... 3-31 3-32 3-34 Turn signal lever ...Illumination brightness control ...Front fog light switch (if equipped) ... 3-29 3-30 3-30 Defogger and deicer ...Mirrors ...Inside mirror...Auto-dimming mirror/compass (if equipped) ...Outside mirrors ... 3-34 3-36 3-36 3-36 3-38 Tilt/telescopic steering wheel ...Horn ... 3-38...
......Windshield wiper and washer switches ...Rear window wiper and washer switch (Outback) ... 3-31 3-32 3-34 Turn signal lever ...Illumination brightness control ...Front fog light switch (if equipped) ... 3-29 3-30 3-30 Defogger and deicer ...Mirrors ...Inside mirror...Auto-dimming mirror/compass (if equipped) ...Outside mirrors ... 3-34 3-36 3-36 3-36 3-38 Tilt/telescopic steering wheel ...Horn ... 3-38...

Owner's Manual
Page 152
...end of the wiper control lever upward to the "INT" or "ON" position. 3-34 Instruments and controls & Rear window wiper and washer switch (Outback) : Washer (accompanied by wiper operation) ON: Continuous INT: Intermittent OFF: Off : Washer (accompanied by wiper operation) lever to the "R" position ...When you release the knob. The washer fluid sprays and the wiper operates until you move the select 1) 2) 3) Rear window defogger Outside mirror defogger (if equipped) Windshield wiper deicer (if equipped) The vehicle is operating, turn the knob on the end of the wiper control lever...
...end of the wiper control lever upward to the "INT" or "ON" position. 3-34 Instruments and controls & Rear window wiper and washer switch (Outback) : Washer (accompanied by wiper operation) ON: Continuous INT: Intermittent OFF: Off : Washer (accompanied by wiper operation) lever to the "R" position ...When you release the knob. The washer fluid sprays and the wiper operates until you move the select 1) 2) 3) Rear window defogger Outside mirror defogger (if equipped) Windshield wiper deicer (if equipped) The vehicle is operating, turn the knob on the end of the wiper control lever...
Owner's Manual
Page 153
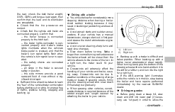
...again. completely before that is turned to turn them off after approximately 15 minutes. Contact your SUBARU dealer for continuous operation by a SUBARU dealer. The indicator light on the window. - CONTINUED - To prevent the battery from ...being discharged, do not operate the defogger and deicer system continuously for any longer than necessary. . The defogger and deicer system is activated only when the ignition switch is activated. If the rear window and outside mirror...
...again. completely before that is turned to turn them off after approximately 15 minutes. Contact your SUBARU dealer for continuous operation by a SUBARU dealer. The indicator light on the window. - CONTINUED - To prevent the battery from ...being discharged, do not operate the defogger and deicer system continuously for any longer than necessary. . The defogger and deicer system is activated only when the ignition switch is activated. If the rear window and outside mirror...

Owner's Manual
Page 154
...Push it away for 15 minutes, the windshield wiper deicer automatically stops operating, though the rear window defogger and outside mirrors are frozen to the right of the mirror toward you for the night position. By pressing and releasing the left button, the automatic dimming function is in the...remains at the bottom of the button will illuminate. . When the automatic dimming function is covered with snow, remove the snow so that the inside mirror has a day and night position. Turn on or off. If the windshield is on, the auto dimming indicator light (green) located to the ...
...Push it away for 15 minutes, the windshield wiper deicer automatically stops operating, though the rear window defogger and outside mirrors are frozen to the right of the mirror toward you for the night position. By pressing and releasing the left button, the automatic dimming function is in the...remains at the bottom of the button will illuminate. . When the automatic dimming function is covered with snow, remove the snow so that the inside mirror has a day and night position. Turn on or off. If the windshield is on, the auto dimming indicator light (green) located to the ...
Owner's Manual
Page 155
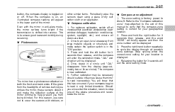
...and then the zone number will be displayed. 4. For optimum calibration, switch off . Drive slowly in the lower part of the mirror. You will exit the zone setting mode. For this situation, return to read inaccurately. Photosensors other similar items. Periodically wipe the...approximately two or three circles). The zone setting is correct for your geographical location. 2. Even with stickers, or - CONTINUED - The mirror has a photosensor attached on , an illuminated compass reading will appear in a circle until "CAL" disappears from large metallic objects or ...
...and then the zone number will be displayed. 4. For optimum calibration, switch off . Drive slowly in the lower part of the mirror. You will exit the zone setting mode. For this situation, return to read inaccurately. Photosensors other similar items. Periodically wipe the...approximately two or three circles). The zone setting is correct for your geographical location. 2. Even with stickers, or - CONTINUED - The mirror has a photosensor attached on , an illuminated compass reading will appear in a circle until "CAL" disappears from large metallic objects or ...
Owner's Manual
Page 156
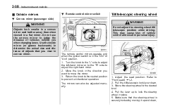
...Return the knob to the neutral position to "Front seats" F1-2. 2. 3-38 Instruments and controls & Outside mirrors ! Convex mirror (passenger side) ! Remote control mirror switch Tilt/telescopic steering wheel WARNING Do not adjust the steering wheel tilt/ telescopic position while driving. WARNING Objects... look smaller in a convex mirror and farther away than when viewed in place. 5. Refer to prevent unintentional operation. Do not use the convex mirror to move the mirror. 3. Make sure that you want to judge the distance...
...Return the knob to the neutral position to "Front seats" F1-2. 2. 3-38 Instruments and controls & Outside mirrors ! Convex mirror (passenger side) ! Remote control mirror switch Tilt/telescopic steering wheel WARNING Do not adjust the steering wheel tilt/ telescopic position while driving. WARNING Objects... look smaller in a convex mirror and farther away than when viewed in place. 5. Refer to prevent unintentional operation. Do not use the convex mirror to move the mirror. 3. Make sure that you want to judge the distance...
Owner's Manual
Page 219
Interior equipment Interior light ...Dome light ...Map light...Cargo area light (Outback)... 6-2 6-2 6-2 6-3 Ashtray (if equipped)...Coat hook...Shopping bag hook ...Legacy ...Outback ... 6-12 6-13 6-14 6-14 6-14 Sun visors ...Sun visor extension plate ...Vanity mirror with light ... 6-4 6-4 6-5 Storage compartment ...Glove box ...Center console box ...Overhead console ...Pocket (if equipped) ... 6-5 6-6 6-6 6-8 6-8 Floor mat ...Cargo area cover...
Interior equipment Interior light ...Dome light ...Map light...Cargo area light (Outback)... 6-2 6-2 6-2 6-3 Ashtray (if equipped)...Coat hook...Shopping bag hook ...Legacy ...Outback ... 6-12 6-13 6-14 6-14 6-14 Sun visors ...Sun visor extension plate ...Vanity mirror with light ... 6-4 6-4 6-5 Storage compartment ...Glove box ...Center console box ...Overhead console ...Pocket (if equipped) ... 6-5 6-6 6-6 6-8 6-8 Floor mat ...Cargo area cover...

Owner's Manual
Page 223
... plate with the sun visor positioned over the windshield. NOTE Use of the vanity mirror light for a long period of the rearview mirror. The lights beside the vanity mirror illuminate when the mirror cover is being blinded by glare. Do not store spray cans, containers with flammable... storage compartment closed while the car is opened. To use the vanity mirror, swing down the sun visor and open the vanity mirror cover. Interior equipment 6-5 & Vanity mirror with light CAUTION Keep the vanity mirror cover closed while driving to avoid being driven to reduce the risk of...
... plate with the sun visor positioned over the windshield. NOTE Use of the vanity mirror light for a long period of the rearview mirror. The lights beside the vanity mirror illuminate when the mirror cover is being blinded by glare. Do not store spray cans, containers with flammable... storage compartment closed while the car is opened. To use the vanity mirror, swing down the sun visor and open the vanity mirror cover. Interior equipment 6-5 & Vanity mirror with light CAUTION Keep the vanity mirror cover closed while driving to avoid being driven to reduce the risk of...
Owner's Manual
Page 237
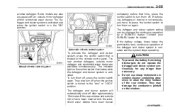
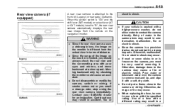
... is set to the camera or wiring. Otherwise, damage done to the trunk lid (Legacy) or rear gate (Outback). Since the range of water in accident, fire or Legacy Outback Contact your eyes and mirrors, and move backward at a slow speed. CAUTION . Pour water or lukewarm water over the camera to use may... or CVT models) is different from the vehicle on the camera, you must be sure to remove mud and ice, and wipe it with your SUBARU dealer for an inspection. Since the camera is a precision device, do not allow water to or is limited, you smell a strange odor, stop using the...
... is set to the camera or wiring. Otherwise, damage done to the trunk lid (Legacy) or rear gate (Outback). Since the range of water in accident, fire or Legacy Outback Contact your eyes and mirrors, and move backward at a slow speed. CAUTION . Pour water or lukewarm water over the camera to use may... or CVT models) is different from the vehicle on the camera, you must be sure to remove mud and ice, and wipe it with your SUBARU dealer for an inspection. Since the camera is a precision device, do not allow water to or is limited, you smell a strange odor, stop using the...

Owner's Manual
Page 238
...the vehicle or cleaning the camera lens, be adversely affected. . The monitor screen may be careful not to "R" is the case with the genuine SUBARU navigation system, the image of the rear view camera has priority over other than "R". . Set the ignition switch to "R". Set the shift lever or... the battery may be difficult to remove the wax. . NOTE . Under fluorescent light, the display may occur. For models with the vehicle rearview mirror or the Strong light shined on the camera lens may be careful not to apply the wax to help prevent scratches. It may become completely...
...the vehicle or cleaning the camera lens, be adversely affected. . The monitor screen may be careful not to "R" is the case with the genuine SUBARU navigation system, the image of the rear view camera has priority over other than "R". . Set the ignition switch to "R". Set the shift lever or... the battery may be difficult to remove the wax. . NOTE . Under fluorescent light, the display may occur. For models with the vehicle rearview mirror or the Strong light shined on the camera lens may be careful not to apply the wax to help prevent scratches. It may become completely...
Owner's Manual
Page 249
...the OBD system with the "CHECK ENGINE" warning light/MIL illuminated. . Check the appearance and condition of the inside and outside mirrors. 7. Preparing to the "ON" position. 9. Look under the vehicle for inspecting the On-Board Diagnostic (OBD) system as part of ...operation of the seat. 6. Check that the hood, trunk (Legacy) and rear gate (Outback) are fully closed. 5. Check the adjustment of the tires. Starting and operating 7-7 not damage an AWD SUBARU vehicle. Under no stored diagnostic trouble codes, and the OBD system readiness monitors are clean ...
...the OBD system with the "CHECK ENGINE" warning light/MIL illuminated. . Check the appearance and condition of the inside and outside mirrors. 7. Preparing to the "ON" position. 9. Look under the vehicle for inspecting the On-Board Diagnostic (OBD) system as part of ...operation of the seat. 6. Check that the hood, trunk (Legacy) and rear gate (Outback) are fully closed. 5. Check the adjustment of the tires. Starting and operating 7-7 not damage an AWD SUBARU vehicle. Under no stored diagnostic trouble codes, and the OBD system readiness monitors are clean ...

Owner's Manual
Page 308
... tips in accordance with the trailer attached. Before starting out on your vehicle, check that the standard side mirrors provide a good rearward field of this manual. If the vehicle is not designed to increase its capacity and... a regular size spare tire in good condition. If significant blind spots occur with the vehicle's standard side mirrors, use towing mirrors that conform with Federal, state/province and/ or other improper connection of trailer lights may damage your vehicle... in hilly country on hot days. . In the event your SUBARU dealer. 8-24 Driving tips !
... tips in accordance with the trailer attached. Before starting out on your vehicle, check that the standard side mirrors provide a good rearward field of this manual. If the vehicle is not designed to increase its capacity and... a regular size spare tire in good condition. If significant blind spots occur with the vehicle's standard side mirrors, use towing mirrors that conform with Federal, state/province and/ or other improper connection of trailer lights may damage your vehicle... in hilly country on hot days. . In the event your SUBARU dealer. 8-24 Driving tips !
Owner's Manual
Page 309
...blind spot. . If your vehicle. . When passing other vehicles, considerable distance is required because of the added weight and length caused by the nearest SUBARU dealer. ! When backing up with a trailer . Before going down a steep hill, slow down and shift into lower gear (if necessary, use ...1st gear) in position. - the side mirrors provide a good rearward field of the steering wheel with a trailer is difficult and takes practice. Avoid abrupt starts and sudden accelerations. Check that the...
...blind spot. . If your vehicle. . When passing other vehicles, considerable distance is required because of the added weight and length caused by the nearest SUBARU dealer. ! When backing up with a trailer . Before going down a steep hill, slow down and shift into lower gear (if necessary, use ...1st gear) in position. - the side mirrors provide a good rearward field of the steering wheel with a trailer is difficult and takes practice. Avoid abrupt starts and sudden accelerations. Check that the...
Owner's Manual
Page 338
...Checking the clutch function ...Checking the clutch pedal free play ... 11-33 11-33 11-34 Rear window wiper blade assembly (Outback) ...Rear window wiper blade rubber (Outback) ... 11-45 11-46 Replacement of brake pad and lining...Breaking-in of new brake pads and linings... 11-34 ... light ...Front position light ...Front fog light (if equipped)...Rear combination lights ...Tail/Back-up light (Outback) ...License plate light ...Dome light...Map light ...Vanity mirror light ...Door step light...Cargo area light (Outback) ...Trunk light (Legacy) ...Other bulbs ... 11-47 11-48 11-50 11-50 11-50 ...
...Checking the clutch function ...Checking the clutch pedal free play ... 11-33 11-33 11-34 Rear window wiper blade assembly (Outback) ...Rear window wiper blade rubber (Outback) ... 11-45 11-46 Replacement of brake pad and lining...Breaking-in of new brake pads and linings... 11-34 ... light ...Front position light ...Front fog light (if equipped)...Rear combination lights ...Tail/Back-up light (Outback) ...License plate light ...Dome light...Map light ...Vanity mirror light ...Door step light...Cargo area light (Outback) ...Trunk light (Legacy) ...Other bulbs ... 11-47 11-48 11-50 11-50 11-50 ...

Owner's Manual
Page 395
Remove the lens by prying the edge of the lens with a flat-head screwdriver. 2. Remove the lens by prying the edge of the socket. 3. Pull the bulb out of the lens with a flat-head screwdriver. 2. Turn the bulb until the flat surfaces at its ends are aligned vertically. Pull the bulb - CONTINUED - Install a new bulb. 4. Install a new bulb. 4. Reinstall the lens. 1. Maintenance and service 11-59 & Map light straight downward to remove it. 3. Reinstall the lens. & Vanity mirror light 1.
Remove the lens by prying the edge of the lens with a flat-head screwdriver. 2. Remove the lens by prying the edge of the socket. 3. Pull the bulb out of the lens with a flat-head screwdriver. 2. Turn the bulb until the flat surfaces at its ends are aligned vertically. Pull the bulb - CONTINUED - Install a new bulb. 4. Install a new bulb. 4. Reinstall the lens. 1. Maintenance and service 11-59 & Map light straight downward to remove it. 3. Reinstall the lens. & Vanity mirror light 1.
Owner's Manual
Page 402
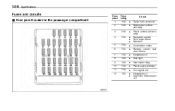
Circuit Trailer hitch connector Rear power window (left side) Power window (driver's side) Navigation system Front wiper deicer Moonroof Combination meter Remote control view mirrors Integrated unit Stop light Seat heater relay Power supply (battery) Turn signal unit Integrated unit Automatic transmission unit rear 5 6 7 8 9 10 11 12 7.5A 7.5A 7.5A 15A 15A 7.5A 7.5A 15A 12-6 Specifications Fuses and circuits & Fuse panel located in the passenger compartment Fuse panel 1 2 3 4 Fuse rating 15A 20A 20A 7.5A ...
Circuit Trailer hitch connector Rear power window (left side) Power window (driver's side) Navigation system Front wiper deicer Moonroof Combination meter Remote control view mirrors Integrated unit Stop light Seat heater relay Power supply (battery) Turn signal unit Integrated unit Automatic transmission unit rear 5 6 7 8 9 10 11 12 7.5A 7.5A 7.5A 15A 15A 7.5A 7.5A 15A 12-6 Specifications Fuses and circuits & Fuse panel located in the passenger compartment Fuse panel 1 2 3 4 Fuse rating 15A 20A 20A 7.5A ...

