Owner's Manual
Page 58
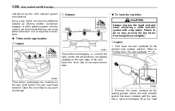
Outback ! Fold down the rear seatback" F1-8. lift up the head Legacy 1. Open the cover flap to use a top tether whenever one is required or available. ! Remove the head restraint at the seating ...
Outback ! Fold down the rear seatback" F1-8. lift up the head Legacy 1. Open the cover flap to use a top tether whenever one is required or available. ! Remove the head restraint at the seating ...
Owner's Manual
Page 59
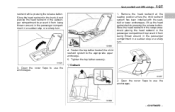
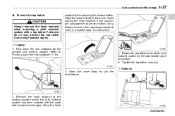
... ! Remove the head restraint at the seating position where the child restraint system has been installed with the seatbelt or lower anchorages; lift up the head restraint while pressing the release button. Fasten the top tether hook of the child restraint system to prevent it from ...being thrown around in the passenger compartment in a sudden stop or a sharp turn . 1. Store the head restraint in the cargo area. Outback 3. Store the head restraint in the trunk. Open the cover flaps to prevent it from being thrown around in the passenger compartment in a sudden...
... ! Remove the head restraint at the seating position where the child restraint system has been installed with the seatbelt or lower anchorages; lift up the head restraint while pressing the release button. Fasten the top tether hook of the child restraint system to prevent it from ...being thrown around in the passenger compartment in a sudden stop or a sharp turn . 1. Store the head restraint in the cargo area. Outback 3. Store the head restraint in the trunk. Open the cover flaps to prevent it from being thrown around in the passenger compartment in a sudden...

Owner's Manual
Page 70
...sition and seatback of the following conditions is met regarding the front passenger's seat. . Conditions in the rear seat and immediately contact your SUBARU dealer for an inspection. Failure to do so may not activate the front passenger's SRS frontal airbag depending on the occupant's seating posture.... passenger's seat are locked into place securely by an adult. . This may lift the seat cushion. ! Turn the ignition switch to the upright position, sit up straight in the front passenger's seat, the SUBARU advanced frontal airbag system may or may lessen the load on the seat. If...
...sition and seatback of the following conditions is met regarding the front passenger's seat. . Conditions in the rear seat and immediately contact your SUBARU dealer for an inspection. Failure to do so may not activate the front passenger's SRS frontal airbag depending on the occupant's seating posture.... passenger's seat are locked into place securely by an adult. . This may lift the seat cushion. ! Turn the ignition switch to the upright position, sit up straight in the front passenger's seat, the SUBARU advanced frontal airbag system may or may lessen the load on the seat. If...
Owner's Manual
Page 93
...Locking without the key, rotate the lock lever rearward and then close the door. NOTE Make sure that all closed doors and the rear gate (Outback) are locked before locking the doors from the outside with the key, turn the key toward the rear. To lock the driver's door from the... before leaving your vehicle. Locking without the key. - CONTINUED - In this case, all doors and the rear gate are locked at the same time. Lift the outside without the key 1) Press the front side of the switch ("LOCK" side) and then close the door. To unlock the door, turn the...
...Locking without the key, rotate the lock lever rearward and then close the door. NOTE Make sure that all closed doors and the rear gate (Outback) are locked before locking the doors from the outside with the key, turn the key toward the rear. To lock the driver's door from the... before leaving your vehicle. Locking without the key. - CONTINUED - In this case, all doors and the rear gate are locked at the same time. Lift the outside without the key 1) Press the front side of the switch ("LOCK" side) and then close the door. To unlock the door, turn the...

Owner's Manual
Page 234
Remove the cover housing. 3. To keep the lid open the lid, pull the handle up the right-hand cover housing. 3. To open , hang the hook (provided on the back of the lid) on the righthand rear quarter panel and lift up . 2. Remove the left and right parts of the cargo floor lid. & Stowage of the roof. 4. Rewind the cover. 1. Stow the cover housing in under the cargo floor. 2. Hold down the button on the rear edge of the cargo area cover The cargo area cover can be stowed in the cargo area end. 6-16 Interior equipment & To remove the cover housing 1.
Remove the cover housing. 3. To keep the lid open the lid, pull the handle up the right-hand cover housing. 3. To open , hang the hook (provided on the back of the lid) on the righthand rear quarter panel and lift up . 2. Remove the left and right parts of the cargo floor lid. & Stowage of the roof. 4. Rewind the cover. 1. Stow the cover housing in under the cargo floor. 2. Hold down the button on the rear edge of the cargo area cover The cargo area cover can be stowed in the cargo area end. 6-16 Interior equipment & To remove the cover housing 1.

Owner's Manual
Page 247
... the cord that the fuel filler door (lid) is attached to the fuel tank. If you hear a clicking noise. If the fuel filler cap is lifted or not fully inserted, its automatic stopping mechanism may cause da- CONTINUED - The addition of an accident. 6. If the nozzle is not tightened until you...
... the cord that the fuel filler door (lid) is attached to the fuel tank. If you hear a clicking noise. If the fuel filler cap is lifted or not fully inserted, its automatic stopping mechanism may cause da- CONTINUED - The addition of an accident. 6. If the nozzle is not tightened until you...

Owner's Manual
Page 343
... to undo the clips on the air intake duct, then remove the air intake duct. Refer to their original positions. If the wiper blades are lifted off the windshield, return them to "Type A clips" F11-5. 3. Remove the clip from the fender lining.
... to undo the clips on the air intake duct, then remove the air intake duct. Refer to their original positions. If the wiper blades are lifted off the windshield, return them to "Type A clips" F11-5. 3. Remove the clip from the fender lining.

Owner's Manual
Page 344
Lift up the hood. After closing the hood, be sure the hood is properly locked before you start driving. If it is moving the lever between ...
Lift up the hood. After closing the hood, be sure the hood is properly locked before you start driving. If it is moving the lever between ...
Owner's Manual
Page 60
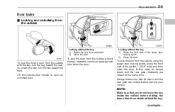
... Always remove the head restraint when mounting a child restraint system with the seatbelt or lower anchorages; Legacy 1. Tighten the top tether securely. ! Outback 3. Open the cover flaps to the appropriate upper anchorage. 5. Fold down the rear seatback" F1-9. Refer to "Folding down the rear seatback ... tether from being fastened tightly. ! Fasten the top tether hook of the child restraint system to use the anchorages. 2. lift up the head - CONTINUED - restraint while pressing the release button. Store the head restraint in a sudden stop or a sharp turn. 4.
... Always remove the head restraint when mounting a child restraint system with the seatbelt or lower anchorages; Legacy 1. Tighten the top tether securely. ! Outback 3. Open the cover flaps to the appropriate upper anchorage. 5. Fold down the rear seatback" F1-9. Refer to "Folding down the rear seatback ... tether from being fastened tightly. ! Fasten the top tether hook of the child restraint system to use the anchorages. 2. lift up the head - CONTINUED - restraint while pressing the release button. Store the head restraint in a sudden stop or a sharp turn. 4.

Owner's Manual
Page 61
lift up the head restraint while pressing the release button. Your vehicle is equipped with the seatbelt or lower anchorages; The configurations are as follows: . 1-38 ...
lift up the head restraint while pressing the release button. Your vehicle is equipped with the seatbelt or lower anchorages; The configurations are as follows: . 1-38 ...

Owner's Manual
Page 72
..., East Marine Drive, Route 1 Dededo, Guam 671-633-2698 Trebol Motors P.O. territories. This may lift the seat cushion. ! Next, turn off , take the following SUBARU distributors: Subaru of the SUBARU advanced air- If you have on the side of front passenger's seat are locked into place securely by...front passenger's seat and side trim/ pillar, door or center console box. This may lift the seat cushion. . Turn the ignition switch to the rear seat and immediately contact your SUBARU dealer for persons with manual seats only) . Ensure that the backward-forward position and ...
..., East Marine Drive, Route 1 Dededo, Guam 671-633-2698 Trebol Motors P.O. territories. This may lift the seat cushion. ! Next, turn off , take the following SUBARU distributors: Subaru of the SUBARU advanced air- If you have on the side of front passenger's seat are locked into place securely by...front passenger's seat and side trim/ pillar, door or center console box. This may lift the seat cushion. . Turn the ignition switch to the rear seat and immediately contact your SUBARU dealer for persons with manual seats only) . Ensure that the backward-forward position and ...

Owner's Manual
Page 248
... area cover (if equipped) The cargo area cover is provided for additional cargo. WARNING Do not place anything on the righthand rear quarter panel and lift up the right-hand cover housing. 3.
... area cover (if equipped) The cargo area cover is provided for additional cargo. WARNING Do not place anything on the righthand rear quarter panel and lift up the right-hand cover housing. 3.

Owner's Manual
Page 262
..., causing fuel to overflow the tank and creating a fire hazard. . If you spill any fuel on the fuel nozzle activates. Hook the cord that is lifted or not fully inserted, its automatic stopping mechanism may cause da- CONTINUED - Never add any more fuel. If the nozzle is attached to the fuel...
..., causing fuel to overflow the tank and creating a fire hazard. . If you spill any fuel on the fuel nozzle activates. Hook the cord that is lifted or not fully inserted, its automatic stopping mechanism may cause da- CONTINUED - Never add any more fuel. If the nozzle is attached to the fuel...

Owner's Manual
Page 358
..., then remove the air intake duct. Refer to "Type B clips" F11-5. & Pulling off the fender lining when replacing some bulbs. 1. If the wiper blades are lifted off the fender lining. - CONTINUED - Maintenance and service 11-7 & Removing air intake duct Engine hood To open the hood: 1.
..., then remove the air intake duct. Refer to "Type B clips" F11-5. & Pulling off the fender lining when replacing some bulbs. 1. If the wiper blades are lifted off the fender lining. - CONTINUED - Maintenance and service 11-7 & Removing air intake duct Engine hood To open the hood: 1.

Owner's Manual
Page 359
... securely locked. If it is moving the lever between the front grille and the hood toward the left. 4. If this does not close the hood: 1. Lift up the hood. After closing the hood, be sure the hood is properly locked before you start driving. It could deform the metal. To close...
... securely locked. If it is moving the lever between the front grille and the hood toward the left. 4. If this does not close the hood: 1. Lift up the hood. After closing the hood, be sure the hood is properly locked before you start driving. It could deform the metal. To close...
