
Owner's Manual
Page 4
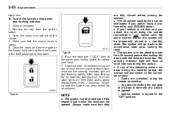
... 1: Seat, seatbelt and SRS airbags This chapter informs you can usually tell at retail by an authorized SUBARU dealer in this manual. SUBARU Limited Warranty . Emission Control Systems Warranty . Each chapter begins with HID headlights CAUTION High Intensity Discharge (...headlights NOTE This vehicle does not contain mercury devices or parts. & Warranties for the SRS airbags. All SUBARU vehicles distributed by Subaru Canada, Inc. Emissions Performance Warranty All warranty information, including details of coverage and exclusions, is composed of your vehicle, carefully read ...
... 1: Seat, seatbelt and SRS airbags This chapter informs you can usually tell at retail by an authorized SUBARU dealer in this manual. SUBARU Limited Warranty . Emission Control Systems Warranty . Each chapter begins with HID headlights CAUTION High Intensity Discharge (...headlights NOTE This vehicle does not contain mercury devices or parts. & Warranties for the SRS airbags. All SUBARU vehicles distributed by Subaru Canada, Inc. Emissions Performance Warranty All warranty information, including details of coverage and exclusions, is composed of your vehicle, carefully read ...
Owner's Manual
Page 11
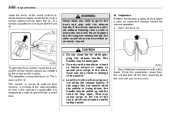
...some States/ Provinces, only hands-free phones may increase. Restrain a pet with a special traveling harness which can interfere with genuine SUBARU parts and accessories. Other types of your vehicle CAUTION Your vehicle should make periodic rest stops to the rear seat by routing a...system while driving. When possible, you should be impaired. 8 & Driving when tired or sleepy WARNING When you are tired or sleepy. performance problems resulting from driving. In addition, damage or & Driving vehicles equipped with others. Also, do not continue to drive but instead find...
...some States/ Provinces, only hands-free phones may increase. Restrain a pet with a special traveling harness which can interfere with genuine SUBARU parts and accessories. Other types of your vehicle CAUTION Your vehicle should make periodic rest stops to the rear seat by routing a...system while driving. When possible, you should be impaired. 8 & Driving when tired or sleepy WARNING When you are tired or sleepy. performance problems resulting from driving. In addition, damage or & Driving vehicles equipped with others. Also, do not continue to drive but instead find...

Owner's Manual
Page 41
Raise the seatback until it is securely locked. 2. Unlock the seatback by pulling the release knob and then fold the seatback down . In this case, perform the following steps to "Trunk lid (4-door)" F2-25. 2. Access the lock release strap from its original position, raise the seatback until it locks into ...
Raise the seatback until it is securely locked. 2. Unlock the seatback by pulling the release knob and then fold the seatback down . In this case, perform the following steps to "Trunk lid (4-door)" F2-25. 2. Access the lock release strap from its original position, raise the seatback until it locks into ...
Owner's Manual
Page 52
...left sides at the front of a lap/shoulder belt (except those areas or near the front seatbelt retractors, have the work performed by your SUBARU dealer as soon as possible. Installation of a tire of different size and construction from the tires specified on any circuit related .... & Precautions against vehicle modification Always consult your vehicle. Child restraint systems CAUTION Do not perform any equipment (bush bar, winches, snow plow, skid plate, etc.) other than genuine SUBARU accessory parts to the driver's door pillar or specified for the child's age and size. Do not...
...left sides at the front of a lap/shoulder belt (except those areas or near the front seatbelt retractors, have the work performed by your SUBARU dealer as soon as possible. Installation of a tire of different size and construction from the tires specified on any circuit related .... & Precautions against vehicle modification Always consult your vehicle. Child restraint systems CAUTION Do not perform any equipment (bush bar, winches, snow plow, skid plate, etc.) other than genuine SUBARU accessory parts to the driver's door pillar or specified for the child's age and size. Do not...
Owner's Manual
Page 89
... or both the right and left sides at the front of the SRS airbag, consult your nearest SUBARU dealer. NOTE In the following list, have the work performed by a collision, consult your SUBARU dealer as soon as possible. . For required servicing of the vehicle . Between the rear seat...the system inoperative, which may result in which may result in the following cases, contact your SUBARU dealer. . The fabric or leather of the system should be performed only by an authorized SUBARU dealer. CAUTION If you need service or repair in areas indicated in serious injury, no ...
... or both the right and left sides at the front of the SRS airbag, consult your nearest SUBARU dealer. NOTE In the following list, have the work performed by a collision, consult your SUBARU dealer as soon as possible. . For required servicing of the vehicle . Between the rear seat...the system inoperative, which may result in which may result in the following cases, contact your SUBARU dealer. . The fabric or leather of the system should be performed only by an authorized SUBARU dealer. CAUTION If you need service or repair in areas indicated in serious injury, no ...
Owner's Manual
Page 90
... the windshield, a side window, an assist grip, or any accessory parts on or near a deploying SRS curtain airbag. . Always consult your SUBARU dealer if you want to the driver's door pillar or specified for individual vehicle models in this Owner's Manual. . Installation of additional fabric or... leather on the vehicle placard attached to install any other than genuine SUBARU accessory parts to the dashboard . CAUTION Do not perform any equipment (bush bar, winches, snow plow, skid plate, etc.) other cabin surface that would be near...
... the windshield, a side window, an assist grip, or any accessory parts on or near a deploying SRS curtain airbag. . Always consult your SUBARU dealer if you want to the driver's door pillar or specified for individual vehicle models in this Owner's Manual. . Installation of additional fabric or... leather on the vehicle placard attached to install any other than genuine SUBARU accessory parts to the dashboard . CAUTION Do not perform any equipment (bush bar, winches, snow plow, skid plate, etc.) other cabin surface that would be near...
Owner's Manual
Page 95
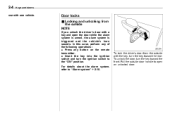
..." position. Pull the outside door handle to "Alarm system" F2-16. 2-4 Keys and doors use with a key and open an unlocked door. In this case, perform any button on the remote transmitter. . Door locks & Locking and unlocking from the outside NOTE If you unlock the driver's door with one vehicle. Insert...
..." position. Pull the outside door handle to "Alarm system" F2-16. 2-4 Keys and doors use with a key and open an unlocked door. In this case, perform any button on the remote transmitter. . Door locks & Locking and unlocking from the outside NOTE If you unlock the driver's door with one vehicle. Insert...
Owner's Manual
Page 103
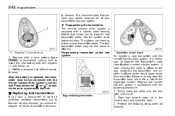
... is replaced, the transmitter must be the same or different. After the battery is equipped with the negative (−) side facing up Transmitter circuit board 3. Perform the following procedure: 1.
... is replaced, the transmitter must be the same or different. After the battery is equipped with the negative (−) side facing up Transmitter circuit board 3. Perform the following procedure: 1.

Owner's Manual
Page 104
... number of times as the leftmost digit of the procedure is completed, an electronic tone will sound for 30 seconds. . If you do not perform the operations in part 4 within 45 seconds, an error will not flash. If you complete step (2), an electronic tone will not sound. In... this event, perform the whole procedure again beginning with part 3 of the procedure. Type A NOTE . NOTE . When you do not perform steps (1) and (2) within 15 seconds, an error will occur and the electronic tone will sound...
... number of times as the leftmost digit of the procedure is completed, an electronic tone will sound for 30 seconds. . If you do not perform the operations in part 4 within 45 seconds, an error will not flash. If you complete step (2), an electronic tone will not sound. In... this event, perform the whole procedure again beginning with part 3 of the procedure. Type A NOTE . NOTE . When you do not perform steps (1) and (2) within 15 seconds, an error will occur and the electronic tone will sound...

Owner's Manual
Page 105
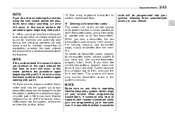
...lock switch when more than 5 seconds have finished entering the number, push the unlock side of the procedure for 30 seconds. . NOTE . Perform parts 5 and 6 of the lock switch within 5 seconds. 8. When you start entering the number using the lock switch before the electronic... An electronic tone will stop sounding when you finish entering the eighth digit, an electronic tone will occur. NOTE . In this event, perform the procedure again beginning with part 3. Type B 6. The electronic tone will sound. . If the interval between one push of the ...
...lock switch when more than 5 seconds have finished entering the number, push the unlock side of the procedure for 30 seconds. . NOTE . Perform parts 5 and 6 of the lock switch within 5 seconds. 8. When you start entering the number using the lock switch before the electronic... An electronic tone will stop sounding when you finish entering the eighth digit, an electronic tone will occur. NOTE . In this event, perform the procedure again beginning with part 3. Type B 6. The electronic tone will sound. . If the interval between one push of the ...
Owner's Manual
Page 106
..., it four times. Deleting old transmitter codes The control unit of your vehicle when programming transmitters. In this event, perform the procedure again beginning with part 4. Test every registered transmitter to four transmitter codes can be deleted from the ignition switch... wish to program another transmitter code into your vehicle. To delete old transmitter codes, program four transmitter codes into the system), perform the procedure beginning with part 3. 9. If you lose a transmitter, the lost transmitter codes should be programmed into the system....
..., it four times. Deleting old transmitter codes The control unit of your vehicle when programming transmitters. In this event, perform the procedure again beginning with part 4. Test every registered transmitter to four transmitter codes can be deleted from the ignition switch... wish to program another transmitter code into your vehicle. To delete old transmitter codes, program four transmitter codes into the system), perform the procedure beginning with part 3. 9. If you lose a transmitter, the lost transmitter codes should be programmed into the system....
Owner's Manual
Page 109
...transmitter's " alarm system armed, the system will flash at short intervals during the standby period, the system will start flashing rapidly. If your SUBARU dealer. . The system can be armed even if the engine hood and/or the windows are unlocked using the remote transmitter. - Any door ...to the surveillance state upon locking the trunk. . The system is a 4-door and you prefer. Close all windows. 2. Type A NOTE . Have it performed by your vehicle is in a standby state. 2-18 Keys and doors tically lock. ! To arm the system using the remote " button with the remote...
...transmitter's " alarm system armed, the system will flash at short intervals during the standby period, the system will start flashing rapidly. If your SUBARU dealer. . The system can be armed even if the engine hood and/or the windows are unlocked using the remote transmitter. - Any door ...to the surveillance state upon locking the trunk. . The system is a 4-door and you prefer. Close all windows. 2. Type A NOTE . Have it performed by your vehicle is in a standby state. 2-18 Keys and doors tically lock. ! To arm the system using the remote " button with the remote...
Owner's Manual
Page 117
... ambient light even for correct operation. 1. Do not use may cause cargo to open the trunk lid from the slit aperture of the handle. . Inspection Perform the following steps at least twice a year to secure your cargo in the trunk and play with a thin blade. If the cargo hits the handle...
... ambient light even for correct operation. 1. Do not use may cause cargo to open the trunk lid from the slit aperture of the handle. . Inspection Perform the following steps at least twice a year to secure your cargo in the trunk and play with a thin blade. If the cargo hits the handle...
Owner's Manual
Page 134
...alarm system, set engine speed may differ from the engine speed shown by the tachometer as a rough guide. . If the setting operation is performed with the engine switch turned off, the REV indicator light turns off and the setting operation is initially turned to the "ON" position. ...MT models - if equipped)/Hill start assist OFF indicator light (STI) : Door open and close the driver's door. If the setting operation is performed with the engine switch turned off, the REV indicator light turns off and the setting operation is finished. . spec. Use the engine speed shown ...
...alarm system, set engine speed may differ from the engine speed shown by the tachometer as a rough guide. . If the setting operation is performed with the engine switch turned off, the REV indicator light turns off and the setting operation is initially turned to the "ON" position. ...MT models - if equipped)/Hill start assist OFF indicator light (STI) : Door open and close the driver's door. If the setting operation is performed with the engine switch turned off, the REV indicator light turns off and the setting operation is finished. . spec. Use the engine speed shown ...

Owner's Manual
Page 166
... light begins to program. 4. DO NOT release the buttons until the HomeLink® indicator light flashes, first slowly then rapidly. In this case you to perform the additional steps that are already programmed for further programming or device testing in Canada" F3-46. 5. Simultaneously press and hold the programmed button and...
... light begins to program. 4. DO NOT release the buttons until the HomeLink® indicator light flashes, first slowly then rapidly. In this case you to perform the additional steps that are already programmed for further programming or device testing in Canada" F3-46. 5. Simultaneously press and hold the programmed button and...

Owner's Manual
Page 168
...® at www.homelink.com or call 1-800-355-3515. ! When the indicator light begins to flash (after approximately 20 seconds). Then release both buttons. 7. Performing this procedure erases the memory of the device between 1 and 3 inches (25 and 76 mm) away from the HomeLink® button you wish to flash...
...® at www.homelink.com or call 1-800-355-3515. ! When the indicator light begins to flash (after approximately 20 seconds). Then release both buttons. 7. Performing this procedure erases the memory of the device between 1 and 3 inches (25 and 76 mm) away from the HomeLink® button you wish to flash...

Owner's Manual
Page 180
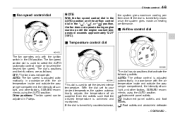
...side. 5. The air conditioner compressor automatically operates when the airflow control dial Set the air conditioner button to provide better defogging performance. & Air conditioner operation ! Defrosting or defogging set in the ON position may fog up the windows. Cooling or dehumidifying ...1) ON position For cooling and dehumidification of the passenger compartment, performing the following steps will allow air to the " " position. 2. Set the airflow control dial to flow through the instrument panel...
...side. 5. The air conditioner compressor automatically operates when the airflow control dial Set the air conditioner button to provide better defogging performance. & Air conditioner operation ! Defrosting or defogging set in the ON position may fog up the windows. Cooling or dehumidifying ...1) ON position For cooling and dehumidification of the passenger compartment, performing the following steps will allow air to the " " position. 2. Set the airflow control dial to flow through the instrument panel...
Owner's Manual
Page 182
..., the system automatically adjusts the temperature of sunlight, and other factors. If the dial is adjusted automatically in the ON position. SUBARU recommends using the AUTO position. : Instrument panel outlets : Instrument panel outlets and foot outlets : Foot outlets and windshield defroster -...With the dial set the desired interior temperature. AUTO: The fan speed is turned fully clockwise, the system gives maximum heating performance. & Airflow control dial & Temperature control dial The fan operates only with the air temperature inside and outside the passenger ...
..., the system automatically adjusts the temperature of sunlight, and other factors. If the dial is adjusted automatically in the ON position. SUBARU recommends using the AUTO position. : Instrument panel outlets : Instrument panel outlets and foot outlets : Foot outlets and windshield defroster -...With the dial set the desired interior temperature. AUTO: The fan speed is turned fully clockwise, the system gives maximum heating performance. & Airflow control dial & Temperature control dial The fan operates only with the air temperature inside and outside the passenger ...
Owner's Manual
Page 185
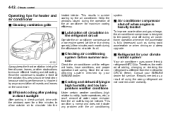
... by any problem with the windows open for CFC12 (freon). This condition is different from the air outlets may be kept clean because cooling performance is impaired by your SUBARU dealer. & Refrigerant for your SUBARU dealer for heater and air conditioner & Cleaning ventilation grille heated interior. 4-12 Climate control Operating tips for service.
... by any problem with the windows open for CFC12 (freon). This condition is different from the air outlets may be kept clean because cooling performance is impaired by your SUBARU dealer. & Refrigerant for your SUBARU dealer for heater and air conditioner & Cleaning ventilation grille heated interior. 4-12 Climate control Operating tips for service.
Owner's Manual
Page 201
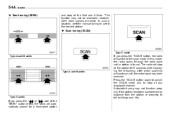
.... Automatic tuning may not be available, however, when radio signals are weak. The radio will stop at the station for a receivable station In such a situation, perform manual tuning to stop at any displayed channel. Scan tuning (SCAN) Type C audio Type A and B audio Type A and B audio Type C audio If you press the...
.... Automatic tuning may not be available, however, when radio signals are weak. The radio will stop at the station for a receivable station In such a situation, perform manual tuning to stop at any displayed channel. Scan tuning (SCAN) Type C audio Type A and B audio Type A and B audio Type C audio If you press the...
