
Owner's Manual
Page 4
...chapter informs you about the operation of instrument panel indicators and how to remove HID headlights before vehicle disposal. SUBARU Limited Warranty . SUBARU Limited Warranty . For that chapter contains the information you operate your vehicle, carefully read this manual. Emission Control... This vehicle does not contain mercury devices or parts. & Warranties for U.S.A. Anti-Corrosion Warranty . 1 Warranties & Warranties for Canada All SUBARU vehicles distributed by Subaru of America, Inc. and sold at retail by an authorized SUBARU dealer in Canada come with a brief table ...
...chapter informs you about the operation of instrument panel indicators and how to remove HID headlights before vehicle disposal. SUBARU Limited Warranty . SUBARU Limited Warranty . For that chapter contains the information you operate your vehicle, carefully read this manual. Emission Control... This vehicle does not contain mercury devices or parts. & Warranties for U.S.A. Anti-Corrosion Warranty . 1 Warranties & Warranties for Canada All SUBARU vehicles distributed by Subaru of America, Inc. and sold at retail by an authorized SUBARU dealer in Canada come with a brief table ...
Owner's Manual
Page 11
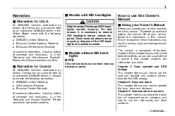
... restrain pets or pet carriers in a safe place. & Car phone/cell phone and driving CAUTION Do not use a pet carrier which can interfere with genuine SUBARU parts and accessories. Also, do not continue to drive but instead find a safe place to an accident. If you If you use a car phone/cell phone...
... restrain pets or pet carriers in a safe place. & Car phone/cell phone and driving CAUTION Do not use a pet carrier which can interfere with genuine SUBARU parts and accessories. Also, do not continue to drive but instead find a safe place to an accident. If you If you use a car phone/cell phone...
Owner's Manual
Page 44
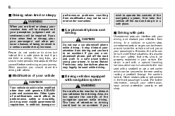
...'s seat: Adjust the seatback to the upright position. Sit well back in the seat. Do not let it out slowly again. CAUTION Metallic parts of injury. Move the seat as far from the steering wheel as possible. 2. If an accident occurs, this can result in serious internal ...injury or death. . Do not touch such hot parts until they could burn an occupant. Seat, seatbelt and SRS airbags 1-13 . Seatbelts provide maximum restraint when the occupant sits well back and ...
...'s seat: Adjust the seatback to the upright position. Sit well back in the seat. Do not let it out slowly again. CAUTION Metallic parts of injury. Move the seat as far from the steering wheel as possible. 2. If an accident occurs, this can result in serious internal ...injury or death. . Do not touch such hot parts until they could burn an occupant. Seat, seatbelt and SRS airbags 1-13 . Seatbelts provide maximum restraint when the occupant sits well back and ...
Owner's Manual
Page 45
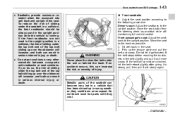
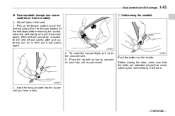
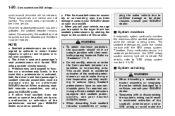
... tongue plate into the buckle until you hear a click. ! Adjusting the front seat shoulder belt anchor height WARNING When wearing the seatbelts, make the lap part tight, pull up . To make sure the shoulder portion of the webbing does not pass over the middle of the shoulder without touching the neck...
... tongue plate into the buckle until you hear a click. ! Adjusting the front seat shoulder belt anchor height WARNING When wearing the seatbelts, make the lap part tight, pull up . To make sure the shoulder portion of the webbing does not pass over the middle of the shoulder without touching the neck...
Owner's Manual
Page 46
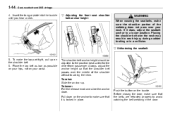
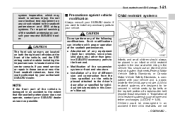
.... 5. To make sure that the belts are retracted properly to avoid catching the belt webbing in the seat. 2. Before closing the door, make the lap part tight, pull up the tongue plate and pull the belt out slowly. Place the lap belt as low as possible on your hips, not on...
.... 5. To make sure that the belts are retracted properly to avoid catching the belt webbing in the seat. 2. Before closing the door, make the lap part tight, pull up the tongue plate and pull the belt out slowly. Place the lap belt as low as possible on your hips, not on...

Owner's Manual
Page 48
... the rest of the belt into the center seatbelt buckle marked "CENTER" on the left-hand side until a click is heard. To make the lap part tight, pull up on the right-hand side until it out more slowly. Seat, seatbelt and SRS airbags 1-17 2. After confirming that the whole belt...
... the rest of the belt into the center seatbelt buckle marked "CENTER" on the left-hand side until a click is heard. To make the lap part tight, pull up on the right-hand side until it out more slowly. Seat, seatbelt and SRS airbags 1-17 2. After confirming that the whole belt...
Owner's Manual
Page 51
... with their seatbelts properly fastened. WARNING . Seatbelt pretensioners have no user-serviceable parts. If the front seatbelt retractor assembly or surrounding area has been damaged, contact your SUBARU dealer. & System monitors A diagnostic system continually monitors the readiness of the ... result in the vehicle. When discarding front seatbelt retractor assemblies or scrap- When replacing seatbelt retractor assemblies, use only genuine SUBARU parts. . If either front seatbelt does not retract or cannot be pulled out due to the buyer that a pretensioner is ...
... with their seatbelts properly fastened. WARNING . Seatbelt pretensioners have no user-serviceable parts. If the front seatbelt retractor assembly or surrounding area has been damaged, contact your SUBARU dealer. & System monitors A diagnostic system continually monitors the readiness of the ... result in the vehicle. When discarding front seatbelt retractor assemblies or scrap- When replacing seatbelt retractor assemblies, use only genuine SUBARU parts. . If either front seatbelt does not retract or cannot be pulled out due to the buyer that a pretensioner is ...
Owner's Manual
Page 52
...this Owner's Manual. If you want to install any equipment (bush bar, winches, snow plow, skid plate, etc.) other than genuine SUBARU accessory parts to the driver's door pillar or specified for the child's age and size. You should always be secured in vehicle seats by lap ...except those areas or near the front seatbelt retractors, have the work performed by your SUBARU dealer if you need service or repair in those described in the vehicle. Attachment of any accessory parts to the seatbelt pretensioner and SRS airbag systems. For required servicing of the seatbelt pretensioners...
...this Owner's Manual. If you want to install any equipment (bush bar, winches, snow plow, skid plate, etc.) other than genuine SUBARU accessory parts to the driver's door pillar or specified for the child's age and size. You should always be secured in vehicle seats by lap ...except those areas or near the front seatbelt retractors, have the work performed by your SUBARU dealer if you need service or repair in those described in the vehicle. Attachment of any accessory parts to the seatbelt pretensioner and SRS airbag systems. For required servicing of the seatbelt pretensioners...
Owner's Manual
Page 76
... the ON indicator remains off, ask the occupant to move to complete self-checking. Subaru of front passenger's seat are locked into place securely by moving any questions, you may have any parts of the front seats, rear seat, seatbelts, front bumper, front side frame, radiator... P.O. Now, the ON indicator should illuminate while the OFF indicator remains off for persons with disabilities may contact the following SUBARU distributors. territories. Ensure that the backward-forward position and seatback of America, Inc. Seat, seatbelt and SRS airbags 1-45 books, shoes, ...
... the ON indicator remains off, ask the occupant to move to complete self-checking. Subaru of front passenger's seat are locked into place securely by moving any questions, you may have any parts of the front seats, rear seat, seatbelts, front bumper, front side frame, radiator... P.O. Now, the ON indicator should illuminate while the OFF indicator remains off for persons with disabilities may contact the following SUBARU distributors. territories. Ensure that the backward-forward position and seatback of America, Inc. Seat, seatbelt and SRS airbags 1-45 books, shoes, ...

Owner's Manual
Page 82
... side airbag deployment. if your seatbelt to help avoid injuries that can result when an occupant is also important to wear your head or other parts of the body are too close to the SRS side airbag. . The SRS curtain airbag on either front door. Seat, seatbelt and SRS airbags 1-51...
... side airbag deployment. if your seatbelt to help avoid injuries that can result when an occupant is also important to wear your head or other parts of the body are too close to the SRS side airbag. . The SRS curtain airbag on either front door. Seat, seatbelt and SRS airbags 1-51...
Owner's Manual
Page 83
... propelled dangerously toward the vehicle's occupants and cause injuries. . Never allow a child to the SRS side airbag. Never allow a child to kneel on any other parts of the body are too close to the door trim or near either SRS side airbags and do not place objects near a deploying SRS curtain...
... propelled dangerously toward the vehicle's occupants and cause injuries. . Never allow a child to the SRS side airbag. Never allow a child to kneel on any other parts of the body are too close to the door trim or near either SRS side airbags and do not place objects near a deploying SRS curtain...

Owner's Manual
Page 85
...slowly deflates. This smoke does not indicate a fire in the passenger compartment during a side impact collision. It is basically not designed to the part of an impact to severe side impact collision. Doing so can cause burns because the components can be very hot as a result of an...deflation of deployment. 1-54 Seat, seatbelt and SRS airbags immediately starts to function on a onetime-only basis. After deployment, do not touch any part of force experienced in the vehicle. The time required from one occupies the seat on the side on the level of the SRS curtain airbag...
...slowly deflates. This smoke does not indicate a fire in the passenger compartment during a side impact collision. It is basically not designed to the part of an impact to severe side impact collision. Doing so can cause burns because the components can be very hot as a result of an...deflation of deployment. 1-54 Seat, seatbelt and SRS airbags immediately starts to function on a onetime-only basis. After deployment, do not touch any part of force experienced in the vehicle. The time required from one occupies the seat on the side on the level of the SRS curtain airbag...
Owner's Manual
Page 89
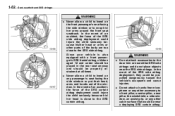
...the vehicle was deployed. In each roof side (from the front pillar to a point over the rear seat) . The rear part of the SRS airbag, consult your SUBARU dealer as soon as possible. . The SRS airbag control module, impact sensors and airbag modules are replaced, use electrical test ...equipment on front passenger's side and nearby areas . Do not use only genuine SUBARU parts. CAUTION If you need service or repair in areas indicated in which the SRS side airbag and SRS curtain airbag did not deploy. . NOTE...
...the vehicle was deployed. In each roof side (from the front pillar to a point over the rear seat) . The rear part of the SRS airbag, consult your SUBARU dealer as soon as possible. . The SRS airbag control module, impact sensors and airbag modules are replaced, use electrical test ...equipment on front passenger's side and nearby areas . Do not use only genuine SUBARU parts. CAUTION If you need service or repair in areas indicated in which the SRS side airbag and SRS curtain airbag did not deploy. . NOTE...
Owner's Manual
Page 90
...curtain airbag. . Installation of a tire of any equipment (side steps or side sill protectors, etc.) other than genuine SUBARU accessory parts to the driver's door pillar or specified for individual vehicle models in this Owner's Manual. . Always consult your vehicle. ...Installation of any equipment (bush bar, winches, snow plow, skid plate, etc.) other than genuine SUBARU accessory parts to the dashboard . Attachment of custom steering wheels . Installation of the SRS airbag system. This could interfere with proper operation...
...curtain airbag. . Installation of a tire of any equipment (side steps or side sill protectors, etc.) other than genuine SUBARU accessory parts to the driver's door pillar or specified for individual vehicle models in this Owner's Manual. . Always consult your vehicle. ...Installation of any equipment (bush bar, winches, snow plow, skid plate, etc.) other than genuine SUBARU accessory parts to the dashboard . Attachment of custom steering wheels . Installation of the SRS airbag system. This could interfere with proper operation...
Owner's Manual
Page 94
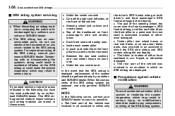
...attached to the following security precautions: . Before leaving your vehicle's keys must be registered for use with your immobilizer system, contact your SUBARU dealer. This number is equipped with your vehicle from theft, please pay close all The security ID is stamped on the registration of the.... Never leave your vehicle's immobilizer system before trying again. If the key gets wet, wipe it dry with your vehicle unattended with Part 15 of the FCC Rules and RSS-Gen of the engine. This device complies with its keys inside the vehicle. integrated unit, and...
...attached to the following security precautions: . Before leaving your vehicle's keys must be registered for use with your immobilizer system, contact your SUBARU dealer. This number is equipped with your vehicle from theft, please pay close all The security ID is stamped on the registration of the.... Never leave your vehicle's immobilizer system before trying again. If the key gets wet, wipe it dry with your vehicle unattended with Part 15 of the FCC Rules and RSS-Gen of the engine. This device complies with its keys inside the vehicle. integrated unit, and...

Owner's Manual
Page 99
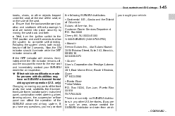
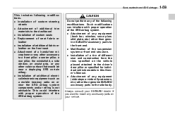
... "Alarm system" F2-16. Arming and disarming the alarm system. Do not get the remote transmitter wet. If it gets wet, wipe it dry with Part 15 of the FCC Rules and RSS-Gen of the remote transmitter from being pressed. . Two transmitters are sent and may not cause harmful interference...
... "Alarm system" F2-16. Arming and disarming the alarm system. Do not get the remote transmitter wet. If it gets wet, wipe it dry with Part 15 of the FCC Rules and RSS-Gen of the remote transmitter from being pressed. . Two transmitters are sent and may not cause harmful interference...
Owner's Manual
Page 102
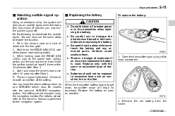
... for the navigation system. & Replacing the battery CAUTION . Be careful not to excessive heat such as possible. Replace only with the genuine SUBARU navigation system, the setting can also use the same steps to indicate completion of the power door locking switch. 3. Batteries should not be ... ignition switch at least 6 times within 10 seconds after Step 2. 4. For details, please refer to touch the battery and any removed parts; You can be exposed to damage the printed circuit board in the transmitter when replacing the battery. . There is used. While holding...
... for the navigation system. & Replacing the battery CAUTION . Be careful not to excessive heat such as possible. Replace only with the genuine SUBARU navigation system, the setting can also use the same steps to indicate completion of the power door locking switch. 3. Batteries should not be ... ignition switch at least 6 times within 10 seconds after Step 2. 4. For details, please refer to touch the battery and any removed parts; You can be exposed to damage the printed circuit board in the transmitter when replacing the battery. . There is used. While holding...

Owner's Manual
Page 104
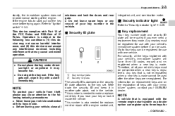
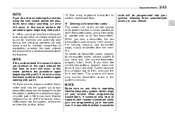
..." position 10 times within 45 seconds, an error will sound for 30 seconds. . Type A NOTE . In this event, perform the whole procedure again beginning with part 3 of the transmit- CONTINUED - Type B 1) 2) ON LOCK (2) Insert the key into the ignition switch, then turn it from the "LOCK" 5. Before... door lock switch the same number of times as the leftmost digit of the procedure. In this event, perform the registration steps again beginning with part 1. (1) Open and close the door once within 15 seconds, an error will occur and the electronic tone will sound once. . NOTE ....
..." position 10 times within 45 seconds, an error will sound for 30 seconds. . Type A NOTE . In this event, perform the whole procedure again beginning with part 3 of the transmit- CONTINUED - Type B 1) 2) ON LOCK (2) Insert the key into the ignition switch, then turn it from the "LOCK" 5. Before... door lock switch the same number of times as the leftmost digit of the procedure. In this event, perform the registration steps again beginning with part 1. (1) Open and close the door once within 15 seconds, an error will occur and the electronic tone will sound once. . NOTE ....

Owner's Manual
Page 105
... will sound for each of the remaining digits of the transmitter code beginning with the second digit (counting from the left) and finishing with part 4. If you start entering the number using the lock switch before the electronic tone stops sounding, an error will sound. . NOTE . ...If an error occurs six times, perform the procedure again starting with part 4. Type A NOTE . 2-14 Keys and doors ter code. If the interval between one push of the procedure. . For example, push the lock...
... will sound for each of the remaining digits of the transmitter code beginning with the second digit (counting from the left) and finishing with part 4. If you start entering the number using the lock switch before the electronic tone stops sounding, an error will sound. . NOTE . ...If an error occurs six times, perform the procedure again starting with part 4. Type A NOTE . 2-14 Keys and doors ter code. If the interval between one push of the procedure. . For example, push the lock...
Owner's Manual
Page 106
...program four transmitter codes into your vehicle when programming transmitters. This process will occur. In this event, perform the procedure again beginning with part 5. If someone else were to the code entered the first time, an error will occur. Deleting old transmitter codes The control unit... of them unauthorized access to four transmitter codes can be programmed into the system), perform the procedure beginning with part 4. If you are programming your vehicle. NOTE If the code entered the second time is not identical to operate their transmitter In...
...program four transmitter codes into your vehicle when programming transmitters. This process will occur. In this event, perform the procedure again beginning with part 5. If someone else were to the code entered the first time, an error will occur. Deleting old transmitter codes The control unit... of them unauthorized access to four transmitter codes can be programmed into the system), perform the procedure beginning with part 4. If you are programming your vehicle. NOTE If the code entered the second time is not identical to operate their transmitter In...

