
Owner's Manual
Page 155
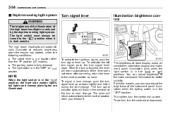
...the " or " " light switch is in the direction of the high beam headlights is finished, the lever will return automatically. To brighten, turn the control dial downward. The high beam headlights will automatically illuminate at reduced brightness when the engine has started, under the following ...position. To signal a lane change . To activate the left turn signal, push the turn signal lever up . You can also adjust the brightness of the instrument panel illumination for better visibility. Turn signal lever Illumination brightness control NOTE When the light switch is in the...
...the " or " " light switch is in the direction of the high beam headlights is finished, the lever will return automatically. To brighten, turn the control dial downward. The high beam headlights will automatically illuminate at reduced brightness when the engine has started, under the following ...position. To signal a lane change . To activate the left turn signal, push the turn signal lever up . You can also adjust the brightness of the instrument panel illumination for better visibility. Turn signal lever Illumination brightness control NOTE When the light switch is in the...

Owner's Manual
Page 156
... leveler can be used to adjust beam height to avoid such a condition. The HID headlights generate more light than conventional halogen headlights. Adjust the headlight beam level with the following dial positions according to the number of an oncoming vehicle may experience too much glare when your headlight beam height adjustment is turned fully upward, the illumination...
... leveler can be used to adjust beam height to avoid such a condition. The HID headlights generate more light than conventional halogen headlights. Adjust the headlight beam level with the following dial positions according to the number of an oncoming vehicle may experience too much glare when your headlight beam height adjustment is turned fully upward, the illumination...
Owner's Manual
Page 162
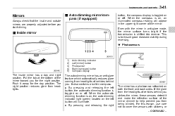
...button, the automatic dimming function is on or off . The night position reduces glare from being blinded. If the glare from the headlights of vehicles behind you for the day position. Photosensors & Inside mirror 1) 2) 3) 4) 5) Auto dimming indicator Left (mirror) button... Photosensor Right (compass) button Compass display The inside and outside mirrors are properly adjusted before you from headlights. By pressing and releasing the right The mirror has a photosensor attached on or off . This is shifted into reverse. The ...
...button, the automatic dimming function is on or off . The night position reduces glare from being blinded. If the glare from the headlights of vehicles behind you for the day position. Photosensors & Inside mirror 1) 2) 3) 4) 5) Auto dimming indicator Left (mirror) button... Photosensor Right (compass) button Compass display The inside and outside mirrors are properly adjusted before you from headlights. By pressing and releasing the right The mirror has a photosensor attached on or off . This is shifted into reverse. The ...
Owner's Manual
Page 163
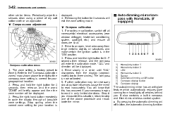
...the compass zone setting is in a circle until "CAL" disappears from the display (approximately two to an open, level area away from headlights of vehicles behind you encounter this has occurred if your geographical location. 2. Releasing the button for 6 - 7 seconds then release, ... ! Press and hold the right button for your compass begins to read inaccurately. The zone setting is now calibrated. 5. Compass zone adjustment displayed. 4. 3-42 Instruments and controls other similar items. Periodically wipe the sensors clean using a piece of the above to verify that...
...the compass zone setting is in a circle until "CAL" disappears from the display (approximately two to an open, level area away from headlights of vehicles behind you encounter this has occurred if your geographical location. 2. Releasing the button for 6 - 7 seconds then release, ... ! Press and hold the right button for your compass begins to read inaccurately. The zone setting is now calibrated. 5. Compass zone adjustment displayed. 4. 3-42 Instruments and controls other similar items. Periodically wipe the sensors clean using a piece of the above to verify that...

Owner's Manual
Page 164
... until the correct zone setting for 5 seconds will be displayed in the mirror compass window). 3. During nighttime driving, these sensors detect distracting glare from vehicle headlights behind you and automatically dim the mirror to enter the mirror housing and damage the mirror. ! Instruments and controls 3-43 is shifted into reverse. When... appear in the automatic dimming mode, the mirror surface turns bright if the transmission is toggled on both the front and back sides. Compass zone adjustment The mirror has a photosensor attached on or off .
... until the correct zone setting for 5 seconds will be displayed in the mirror compass window). 3. During nighttime driving, these sensors detect distracting glare from vehicle headlights behind you and automatically dim the mirror to enter the mirror housing and damage the mirror. ! Instruments and controls 3-43 is shifted into reverse. When... appear in the automatic dimming mode, the mirror surface turns bright if the transmission is toggled on both the front and back sides. Compass zone adjustment The mirror has a photosensor attached on or off .
Owner's Manual
Page 400
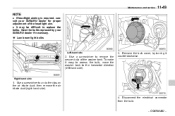
...-49 NOTE . Have the bulbs replaced by turning it easy to access the bulb, move the washer tank to remove the secured clip of the headlight aim. . Remove the bulb cover, by your SUBARU dealer for proper adjustment of the washer tank. If headlight aiming is required, consult your...
...-49 NOTE . Have the bulbs replaced by turning it easy to access the bulb, move the washer tank to remove the secured clip of the headlight aim. . Remove the bulb cover, by your SUBARU dealer for proper adjustment of the washer tank. If headlight aiming is required, consult your...
Owner's Manual
Page 442
... ...1-19 Turn signal light ...11-51 Front seats...1-2 Active head restraint...1-5 Forward and backward adjustment ...1-3 Head restraint adjustment ...1-4 Reclining ...1-3 Seat cushion height adjustment...1-4 Fuel ...7-3 Consumption indicator...3-30 Economy hints ...8-2 Filler lid and cap...7-4 Gauge...3-10 Requirements ... (Gross Vehicle Weight Rating)...8-13 H Hands-free system...5-47 Hazard warning flasher ...3-5, 9-2 Head restraint adjustment Front seat...1-4 Rear seat ...1-8 Headlight Beam leveler...3-35 Bulb replacement ...11-48 Bulb replacing ...11-48 Bulb wattage...12-10 Control switch...
... ...1-19 Turn signal light ...11-51 Front seats...1-2 Active head restraint...1-5 Forward and backward adjustment ...1-3 Head restraint adjustment ...1-4 Reclining ...1-3 Seat cushion height adjustment...1-4 Fuel ...7-3 Consumption indicator...3-30 Economy hints ...8-2 Filler lid and cap...7-4 Gauge...3-10 Requirements ... (Gross Vehicle Weight Rating)...8-13 H Hands-free system...5-47 Hazard warning flasher ...3-5, 9-2 Head restraint adjustment Front seat...1-4 Rear seat ...1-8 Headlight Beam leveler...3-35 Bulb replacement ...11-48 Bulb replacing ...11-48 Bulb wattage...12-10 Control switch...


