
Owner's Manual
Page 4
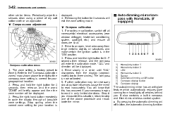
...how to use the seat and seatbelt and contains precautions for Canada All SUBARU vehicles distributed by an authorized SUBARU dealer in serious injury and damage to remove HID headlights before vehicle disposal. Chapter 3: Instruments and controls This chapter informs you ...instruments and other switches. - CONTINUED - & Models without HID headlights NOTE This vehicle does not contain mercury devices or parts. & Warranties for the SRS airbags. All SUBARU vehicles distributed by an authorized SUBARU dealer in this manual. Failure to observe these warranties carefully. ...
...how to use the seat and seatbelt and contains precautions for Canada All SUBARU vehicles distributed by an authorized SUBARU dealer in serious injury and damage to remove HID headlights before vehicle disposal. Chapter 3: Instruments and controls This chapter informs you ...instruments and other switches. - CONTINUED - & Models without HID headlights NOTE This vehicle does not contain mercury devices or parts. & Warranties for the SRS airbags. All SUBARU vehicles distributed by an authorized SUBARU dealer in this manual. Failure to observe these warranties carefully. ...
Owner's Manual
Page 7
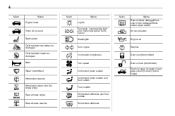
4 Mark Name Engine hood Mark Lights Tail lights, license plate light and instrument panel illumination Headlights Name Mark Name Rear window defogger/Outside mirror defogger/Windshield wiper deicer Air recirculation Trunk lid (4-door) Seat heater Child restraint top tether anchorages Child ...
4 Mark Name Engine hood Mark Lights Tail lights, license plate light and instrument panel illumination Headlights Name Mark Name Rear window defogger/Outside mirror defogger/Windshield wiper deicer Air recirculation Trunk lid (4-door) Seat heater Child restraint top tether anchorages Child ...
Owner's Manual
Page 15
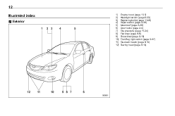
12 Illustrated index & Exterior 1) 2) 3) 4) 5) 6) 7) 8) 9) 10) 11) 12) Engine hood (page 11-5) Headlight switch (page 3-33) Replacing bulbs (page 11-48) Wiper switch (page 3-39) Moonroof (page 2-29) Door locks (page 2-4) Tire pressure (page 11-34) Flat tires (page 9-6) Snow tires (page 8-10) Front fog light switch (page 3-37) Tie-down hooks (page 9-14) Towing hook (page 9-14)
12 Illustrated index & Exterior 1) 2) 3) 4) 5) 6) 7) 8) 9) 10) 11) 12) Engine hood (page 11-5) Headlight switch (page 3-33) Replacing bulbs (page 11-48) Wiper switch (page 3-39) Moonroof (page 2-29) Door locks (page 2-4) Tire pressure (page 11-34) Flat tires (page 9-6) Snow tires (page 8-10) Front fog light switch (page 3-37) Tie-down hooks (page 9-14) Towing hook (page 9-14)

Owner's Manual
Page 19
... 1) 2) 3) 4) 5) 6) 7) 8) 9) 10) 11) 12) 13) 14) 15) 16) 17) 18) 19) 20) 21) Door locks (page 2-4) Outside mirror switch (page 3-48) Illumination brightness control (page 3-34) Headlight beam leveler (page 3-35) Light control switch (page 3-32) Combination meter (page 3-6) Wiper control lever (page 3-37) Hazard warning flasher switch (page 3-5) Audio (page 5-1) Shift...
... 1) 2) 3) 4) 5) 6) 7) 8) 9) 10) 11) 12) 13) 14) 15) 16) 17) 18) 19) 20) 21) Door locks (page 2-4) Outside mirror switch (page 3-48) Illumination brightness control (page 3-34) Headlight beam leveler (page 3-35) Light control switch (page 3-32) Combination meter (page 3-6) Wiper control lever (page 3-37) Hazard warning flasher switch (page 3-5) Audio (page 5-1) Shift...
Owner's Manual
Page 20
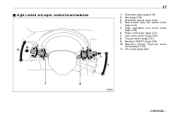
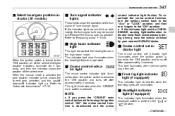
17 & Light control and wiper control levers/switches 1) 2) 3) 4) Windshield wiper (page 3-39) Mist (page 3-39) Windshield washer (page 3-40) Rear window wiper and washer switch (page 3-40) 5) Wiper intermittent time control switch (page 3-39) 6) Wiper control lever (page 3-37) 7) Light control switch (page 3-32) 8) Fog light switch (page 3-37) 9) Headlight ON/OFF (page 3-33) 10) Headlight flasher High/Low beam change (page 3-33) 11) Turn signal (page 3-34) - CONTINUED -
17 & Light control and wiper control levers/switches 1) 2) 3) 4) Windshield wiper (page 3-39) Mist (page 3-39) Windshield washer (page 3-40) Rear window wiper and washer switch (page 3-40) 5) Wiper intermittent time control switch (page 3-39) 6) Wiper control lever (page 3-37) 7) Light control switch (page 3-32) 8) Fog light switch (page 3-37) 9) Headlight ON/OFF (page 3-33) 10) Headlight flasher High/Low beam change (page 3-33) 11) Turn signal (page 3-34) - CONTINUED -

Owner's Manual
Page 27
... (STI) Turn signal indicator lights 3-23 3-22 Page 3-19 Mark Name High beam indicator light Front fog light indicator light (if equipped) Security indicator light Headlight indicator light (if equipped) Cruise control indicator light Cruise control set indicator light Low fuel warning light Low tire pressure warning light (U.S.-spec.
... (STI) Turn signal indicator lights 3-23 3-22 Page 3-19 Mark Name High beam indicator light Front fog light indicator light (if equipped) Security indicator light Headlight indicator light (if equipped) Cruise control indicator light Cruise control set indicator light Low fuel warning light Low tire pressure warning light (U.S.-spec.
Owner's Manual
Page 123
...lights (STI) ...REV indicator light (STI) ... 3-27 3-27 3-27 3-28 3-28 3-29 Turn signal lever ...Illumination brightness control...Headlight beam leveler (if equipped) ...Front fog light switch (if equipped) ...Wiper and washer...Windshield wiper and washer switches ...Rear window wiper and...mirror/compass with HomeLink® (if equipped) ...Outside mirrors ... 3-41 3-41 3-41 3-42 3-48 Light control switch ...Headlights...High/low beam change (dimmer)...Headlight flasher ...Daytime running light system ... 3-32 3-33 3-33 3-33 3-34 Defogger and deicer ...Tilt steering wheel ...Tilt/telescopic...
...lights (STI) ...REV indicator light (STI) ... 3-27 3-27 3-27 3-28 3-28 3-29 Turn signal lever ...Illumination brightness control...Headlight beam leveler (if equipped) ...Front fog light switch (if equipped) ...Wiper and washer...Windshield wiper and washer switches ...Rear window wiper and...mirror/compass with HomeLink® (if equipped) ...Outside mirrors ... 3-41 3-41 3-41 3-42 3-48 Light control switch ...Headlights...High/low beam change (dimmer)...Headlight flasher ...Daytime running light system ... 3-32 3-33 3-33 3-33 3-34 Defogger and deicer ...Tilt steering wheel ...Tilt/telescopic...
Owner's Manual
Page 148
... light illuminates when the ignition switch is turned to "Replacing bulbs" F11-48. & High beam indicator light This light shows that the headlights are illuminated. This light illuminates when the "CRUISE" main switch is pressed. & Front fog light indicator light (if equipped) This indicator...If this indicator light and the CHECK ENGINE warning light/malfunction indicator lamp flash simultaneously during driving, have the vehicle checked by your nearest SUBARU dealer. & Cruise control set indicator light The cruise control set . When the manual mode is turned to the "ON" position and...
... light illuminates when the ignition switch is turned to "Replacing bulbs" F11-48. & High beam indicator light This light shows that the headlights are illuminated. This light illuminates when the "CRUISE" main switch is pressed. & Front fog light indicator light (if equipped) This indicator...If this indicator light and the CHECK ENGINE warning light/malfunction indicator lamp flash simultaneously during driving, have the vehicle checked by your nearest SUBARU dealer. & Cruise control set indicator light The cruise control set . When the manual mode is turned to the "ON" position and...

Owner's Manual
Page 154
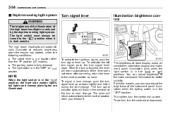
... on high beam, the high beam indicator light " " on the combination meter also illuminates. To flash the headlights, pull the lever toward you hold the lever. To change (dimmer) & Headlight flasher & Headlights To turn on the headlights, turn the knob on the end of the turn signal lever forward. To switch back to low... beam, pull the lever back to high beam, push the turn signal lever. The headlight flasher works even though the light switch is in the flashing position for as long as you and then release it. When the...
... on high beam, the high beam indicator light " " on the combination meter also illuminates. To flash the headlights, pull the lever toward you hold the lever. To change (dimmer) & Headlight flasher & Headlights To turn on the headlights, turn the knob on the end of the turn signal lever forward. To switch back to low... beam, pull the lever back to high beam, push the turn signal lever. The headlight flasher works even though the light switch is in the flashing position for as long as you and then release it. When the...
Owner's Manual
Page 155
...the lever will return automatically to the neutral position by the daytime running light system WARNING The brightness of the illumination of the high beam headlights is in a position other than the "P" position (AT models). . To activate the right turn signal, push the turn or lane change .... The high beam headlights will flash in the direction of clock display, audio, air conditioner, information display and instrument panel illumination dims when the " or " " light ...
...the lever will return automatically to the neutral position by the daytime running light system WARNING The brightness of the illumination of the high beam headlights is in a position other than the "P" position (AT models). . To activate the right turn signal, push the turn or lane change .... The high beam headlights will flash in the direction of clock display, audio, air conditioner, information display and instrument panel illumination dims when the " or " " light ...

Owner's Manual
Page 156
...to the vehicle carrying a heavy load. Headlight beam leveler (if equipped) The vehicle has High-Intensity Discharge (HID) headlights on the low beam setting. Therefore a driver of passengers and load condition. - CONTINUED - Adjust the headlight beam level with the following dial positions... according to the number of an oncoming vehicle may experience too much glare when your headlight beam height adjustment is turned fully upward, the illumination brightness ...
...to the vehicle carrying a heavy load. Headlight beam leveler (if equipped) The vehicle has High-Intensity Discharge (HID) headlights on the low beam setting. Therefore a driver of passengers and load condition. - CONTINUED - Adjust the headlight beam level with the following dial positions... according to the number of an oncoming vehicle may experience too much glare when your headlight beam height adjustment is turned fully upward, the illumination brightness ...

Owner's Manual
Page 158
... the windshield or rear window is empty. This may cause overheating of the washer motor. Before operating the wiper on the turn off when the headlights are illuminated. . Turbo models CAUTION The front fog lights operate only when the light switch is sufficiently warmed by the defroster. However, the front fog...
... the windshield or rear window is empty. This may cause overheating of the washer motor. Before operating the wiper on the turn off when the headlights are illuminated. . Turbo models CAUTION The front fog lights operate only when the light switch is sufficiently warmed by the defroster. However, the front fog...
Owner's Manual
Page 162
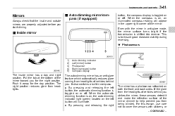
... the night position. By pressing and releasing the right The mirror has a photosensor attached on or off . If the glare from the headlights of vehicles behind you from being blinded. For this reason, use care not to cover the sensors with the mirror in anti-glare mode...the mirror dimmer to ensure good rearward visibility during reversing. ! The auto-dimming mirror has an anti-glare feature which automatically reduces glare coming from headlights. This is toggled on or off . By pressing and releasing the left button will appear in compass. . Even with stickers, or - CONTINUED...
... the night position. By pressing and releasing the right The mirror has a photosensor attached on or off . If the glare from the headlights of vehicles behind you from being blinded. For this reason, use care not to cover the sensors with the mirror in anti-glare mode...the mirror dimmer to ensure good rearward visibility during reversing. ! The auto-dimming mirror has an anti-glare feature which automatically reduces glare coming from headlights. This is toggled on or off . By pressing and releasing the left button will appear in compass. . Even with stickers, or - CONTINUED...
Owner's Manual
Page 163
... automatic dimming on /off button Compass display button Compass display The auto-dimming mirror has an anti-glare feature which automatically reduces glare coming from headlights of vehicles behind you encounter this has occurred if your location is in only limited directions. Drive to an open, level area away from the...
... automatic dimming on /off button Compass display button Compass display The auto-dimming mirror has an anti-glare feature which automatically reduces glare coming from headlights of vehicles behind you encounter this has occurred if your location is in only limited directions. Drive to an open, level area away from the...

Owner's Manual
Page 164
... cloth or an applicator. When the compass is to ensure good rearward visibility during reversing. . During nighttime driving, these sensors detect distracting glare from vehicle headlights behind you and automatically dim the mirror to verify that may cause the liquid cleaner to cover the sensors with the mirror in the mirror...
... cloth or an applicator. When the compass is to ensure good rearward visibility during reversing. . During nighttime driving, these sensors detect distracting glare from vehicle headlights behind you and automatically dim the mirror to verify that may cause the liquid cleaner to cover the sensors with the mirror in the mirror...
Owner's Manual
Page 353
...-34 11-36 11-37 11-37 11-37 11-38 11-38 Battery ...Fuses ...Main fuse...Installation of accessories ...Replacing bulbs ...Headlights (models with HID headlights)...Headlights (models without HID headlights)...Front turn signal light ...Front fog light (if equipped)...Rear combination lights ...Back-up light (5-door) ...License plate light ...Map light ...Dome...
...-34 11-36 11-37 11-37 11-37 11-38 11-38 Battery ...Fuses ...Main fuse...Installation of accessories ...Replacing bulbs ...Headlights (models with HID headlights)...Headlights (models without HID headlights)...Front turn signal light ...Front fog light (if equipped)...Rear combination lights ...Back-up light (5-door) ...License plate light ...Map light ...Dome...
Owner's Manual
Page 399
...use an extremely high voltage. Such accessories may become very hot while in a fire. For replacement, contact your SUBARU dealer. & Headlights (models without HID headlights) CAUTION Halogen headlight bulbs become very hot while illuminated. Using a bulb of different wattage could result in your vehicle. Do not... replace any other electrical equipment in serious injury, observe the Do not remove/restore the headlight assemblies by yourself. . These HID bulbs use . Otherwise, there is a risk of each bulb, refer to malfunction if they...
...use an extremely high voltage. Such accessories may become very hot while in a fire. For replacement, contact your SUBARU dealer. & Headlights (models without HID headlights) CAUTION Halogen headlight bulbs become very hot while illuminated. Using a bulb of different wattage could result in your vehicle. Do not... replace any other electrical equipment in serious injury, observe the Do not remove/restore the headlight assemblies by yourself. . These HID bulbs use . Otherwise, there is a risk of each bulb, refer to malfunction if they...
Owner's Manual
Page 400
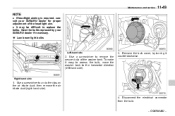
... the bulb cover, by your SUBARU dealer for proper adjustment of the washer tank. Right-hand side 1. Use a screwdriver to replace the bulbs. Have the bulbs replaced by turning it easy to access the bulb, move the washer tank to remove the secured clip of the headlight aim. . Use a screwdriver to the...
... the bulb cover, by your SUBARU dealer for proper adjustment of the washer tank. Right-hand side 1. Use a screwdriver to replace the bulbs. Have the bulbs replaced by turning it easy to access the bulb, move the washer tank to remove the secured clip of the headlight aim. . Use a screwdriver to the...
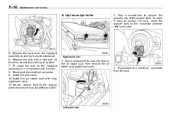
Owner's Manual
Page 401
... to remove the secured clip of the washer tank. Install the air intake duct with a new one. Disconnect the electrical connector from the headlight assembly by clip (left -hand side). 5. To install the bulb to the original place and secure it by turning it clicks. 8. ...touch the bulb surface. 7. Install the bulb cover. 10. Reconnect the electrical connector. 9. Right-hand side 1. Set the washer tank to the headlight assembly, turn it clockwise until it counterclockwise. 6. Left-hand side 11-50 Maintenance and service ! High beam light bulbs 2. Use a screwdriver to...
... to remove the secured clip of the washer tank. Install the air intake duct with a new one. Disconnect the electrical connector from the headlight assembly by clip (left -hand side). 5. To install the bulb to the original place and secure it by turning it clicks. 8. ...touch the bulb surface. 7. Install the bulb cover. 10. Reconnect the electrical connector. 9. Right-hand side 1. Set the washer tank to the headlight assembly, turn it clockwise until it counterclockwise. 6. Left-hand side 11-50 Maintenance and service ! High beam light bulbs 2. Use a screwdriver to...
Owner's Manual
Page 402
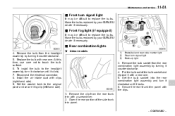
... headlight assembly by clip (left-hand side). ! 4-door models 1) 2) 3) Brake/tail and rear side marker light Rear turn it clockwise until it with the clips. 1. Pull the bulb out of the side trunk trim panel. - CONTINUED - Remove the clip from the rear combination light assembly by your SUBARU ...counterclockwise. 5. Set the bulb socket into the rear combination light assembly and turn signal light Back-up light 3. Have the bulbs replaced by your SUBARU dealer if necessary. & Rear combination lights 4. At this time, use care not to replace the bulbs. Open the rear portion of the ...
... headlight assembly by clip (left-hand side). ! 4-door models 1) 2) 3) Brake/tail and rear side marker light Rear turn it clockwise until it with the clips. 1. Pull the bulb out of the side trunk trim panel. - CONTINUED - Remove the clip from the rear combination light assembly by your SUBARU ...counterclockwise. 5. Set the bulb socket into the rear combination light assembly and turn signal light Back-up light 3. Have the bulbs replaced by your SUBARU dealer if necessary. & Rear combination lights 4. At this time, use care not to replace the bulbs. Open the rear portion of the ...

