
Owner's Manual
Page 15
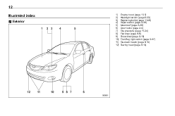
12 Illustrated index & Exterior 1) 2) 3) 4) 5) 6) 7) 8) 9) 10) 11) 12) Engine hood (page 11-5) Headlight switch (page 3-33) Replacing bulbs (page 11-48) Wiper switch (page 3-39) Moonroof (page 2-29) Door locks (page 2-4) Tire pressure (page 11-34) Flat tires (page 9-6) Snow tires (page 8-10) Front fog light switch (page 3-37) Tie-down hooks (page 9-14) Towing hook (page 9-14)
12 Illustrated index & Exterior 1) 2) 3) 4) 5) 6) 7) 8) 9) 10) 11) 12) Engine hood (page 11-5) Headlight switch (page 3-33) Replacing bulbs (page 11-48) Wiper switch (page 3-39) Moonroof (page 2-29) Door locks (page 2-4) Tire pressure (page 11-34) Flat tires (page 9-6) Snow tires (page 8-10) Front fog light switch (page 3-37) Tie-down hooks (page 9-14) Towing hook (page 9-14)
Owner's Manual
Page 134
... light (STI) : SPORT mode indicator light (AT models) - CONTINUED - & Deactivating the REV alarm system To deactivate the REV indicator light and buzzer functions of the bulbs.
... light (STI) : SPORT mode indicator light (AT models) - CONTINUED - & Deactivating the REV alarm system To deactivate the REV indicator light and buzzer functions of the bulbs.
Owner's Manual
Page 135
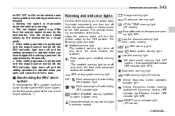
Driver's warning light (non-turbo models) ! If the driver's and/or front passenger's seatbelt(s) are unfastened. Consult your authorized SUBARU dealer for 6 seconds, to warn that the seatbelt(s) is/are /is not fastened, a chime will flash for repair. NOTE .... With the ignition switch turned to the "ON" position, this device reminds the driver and front passenger to illuminate, it indicates a burned-out bulb or a malfunction of the corresponding system. 3-14 Instruments and controls : Cruise control indicator light : Cruise control set indicator light : Shift-up indicator light...
Driver's warning light (non-turbo models) ! If the driver's and/or front passenger's seatbelt(s) are unfastened. Consult your authorized SUBARU dealer for 6 seconds, to warn that the seatbelt(s) is/are /is not fastened, a chime will flash for repair. NOTE .... With the ignition switch turned to the "ON" position, this device reminds the driver and front passenger to illuminate, it indicates a burned-out bulb or a malfunction of the corresponding system. 3-14 Instruments and controls : Cruise control indicator light : Cruise control set indicator light : Shift-up indicator light...
Owner's Manual
Page 148
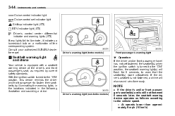
... light and the CHECK ENGINE warning light/malfunction indicator lamp flash simultaneously during driving, have the vehicle checked by your nearest SUBARU dealer. & Cruise control set indicator light The cruise control set . This indicator light also illuminates when the headlight flasher is turned... to "Replacing bulbs" F11-48. & High beam indicator light This light shows that the headlights are illuminated. This light illuminates when the "CRUISE" ...
... light and the CHECK ENGINE warning light/malfunction indicator lamp flash simultaneously during driving, have the vehicle checked by your nearest SUBARU dealer. & Cruise control set indicator light The cruise control set . This indicator light also illuminates when the headlight flasher is turned... to "Replacing bulbs" F11-48. & High beam indicator light This light shows that the headlights are illuminated. This light illuminates when the "CRUISE" ...

Owner's Manual
Page 348
... Do not use a coarse-grained compound. Clean the vehicle (including the aluminum wheels) with sea water, exposed to use organic solvents when washing the bulb lenses. Keep a good distance of some electrical parts. ! Use a good quality polish and wax and apply them , completely wash off . . It... Do not use a neutral cleaning agent, and later rinse thoroughly with a fine-grained compound. Frequent polishing with wax to contact your SUBARU dealer or an auto paint specialist. If the appearance of the paint has diminished to loss of the original luster and also quickens the...
... Do not use a coarse-grained compound. Clean the vehicle (including the aluminum wheels) with sea water, exposed to use organic solvents when washing the bulb lenses. Keep a good distance of some electrical parts. ! Use a good quality polish and wax and apply them , completely wash off . . It... Do not use a neutral cleaning agent, and later rinse thoroughly with a fine-grained compound. Frequent polishing with wax to contact your SUBARU dealer or an auto paint specialist. If the appearance of the paint has diminished to loss of the original luster and also quickens the...
Owner's Manual
Page 353
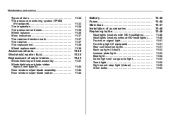
...-33 11-34 11-34 11-36 11-37 11-37 11-37 11-38 11-38 Battery ...Fuses ...Main fuse...Installation of accessories ...Replacing bulbs ...Headlights (models with HID headlights)...Headlights (models without HID headlights)...Front turn signal light ...Front fog light (if equipped)...Rear combination lights ...Back-up light... (5-door) ...License plate light ...Map light ...Dome light and cargo area light ...Trunk light ...High mount stop light (4-door) ...Other bulbs ... 11-45 11-46 11-47 11-48 11-48 11-48 11-48 11-51 11-51 11-51 11-53 11-53 11...
...-33 11-34 11-34 11-36 11-37 11-37 11-37 11-38 11-38 Battery ...Fuses ...Main fuse...Installation of accessories ...Replacing bulbs ...Headlights (models with HID headlights)...Headlights (models without HID headlights)...Front turn signal light ...Front fog light (if equipped)...Rear combination lights ...Back-up light... (5-door) ...License plate light ...Map light ...Dome light and cargo area light ...Trunk light ...High mount stop light (4-door) ...Other bulbs ... 11-45 11-46 11-47 11-48 11-48 11-48 11-48 11-51 11-51 11-51 11-53 11-53 11...
Owner's Manual
Page 399
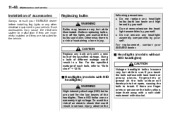
... bulb to "Bulb chart" F12-10. For replacement, contact your SUBARU dealer. & Headlights (models without HID headlights) CAUTION Halogen headlight bulbs become very hot while illuminated. These HID bulbs use . Before replacing bulbs, turn off the lights and wait until the bulbs cool down. Using a bulb of... . 11-48 Maintenance and service Installation of accessories Always consult your SUBARU dealer before installing fog lights or any bulb only with bare hands or greasy gloves, fingerprints or grease on the bulb surface, wipe them away with a soft cloth moistened with alcohol. ...
... bulb to "Bulb chart" F12-10. For replacement, contact your SUBARU dealer. & Headlights (models without HID headlights) CAUTION Halogen headlight bulbs become very hot while illuminated. These HID bulbs use . Before replacing bulbs, turn off the lights and wait until the bulbs cool down. Using a bulb of... . 11-48 Maintenance and service Installation of accessories Always consult your SUBARU dealer before installing fog lights or any bulb only with bare hands or greasy gloves, fingerprints or grease on the bulb surface, wipe them away with a soft cloth moistened with alcohol. ...
Owner's Manual
Page 400
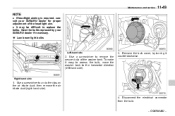
... the secured clip of the headlight aim. . Low beam light bulbs Left-hand side 2. Remove the bulb cover, by your SUBARU dealer for proper adjustment of the washer tank. Use a screwdriver to replace the bulbs. Use a screwdriver to the horizontal direction (left-hand side). 3. Have the bulbs replaced by turning it easy to access the...
... the secured clip of the headlight aim. . Low beam light bulbs Left-hand side 2. Remove the bulb cover, by your SUBARU dealer for proper adjustment of the washer tank. Use a screwdriver to replace the bulbs. Use a screwdriver to the horizontal direction (left-hand side). 3. Have the bulbs replaced by turning it easy to access the...
Owner's Manual
Page 401
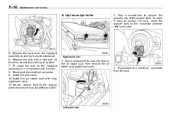
... this time, do not touch the bulb surface. 7. Use a screwdriver to remove the secured clip of the washer tank. High beam light bulbs 2. To make it easy to access the bulb, move the washer tank to the horizontal direction (left -hand side). Right-hand side 1. 11-50 Maintenance... and service ! Left-hand side To install the bulb to the original place and secure it by turning it clicks. 8. Reconnect the electrical connector. 9. Disconnect the electrical connector from the headlight ...
... this time, do not touch the bulb surface. 7. Use a screwdriver to remove the secured clip of the washer tank. High beam light bulbs 2. To make it easy to access the bulb, move the washer tank to the horizontal direction (left -hand side). Right-hand side 1. 11-50 Maintenance... and service ! Left-hand side To install the bulb to the original place and secure it by turning it clicks. 8. Reconnect the electrical connector. 9. Disconnect the electrical connector from the headlight ...
Owner's Manual
Page 402
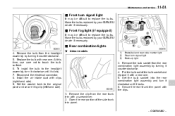
... from the rear combination light assembly by turning it by your SUBARU dealer if necessary. & Rear combination lights 4. Pull the bulb out of the side trunk trim panel. - CONTINUED - Remove the bulb from the rear trunk trim with new one . 5. Set the washer tank to the original...signal light Back-up light 3. Have the bulbs replaced by your SUBARU dealer if necessary. & Front fog light (if equipped) It may be difficult to replace the bulbs. Open the rear portion of the bulb socket and replace it clicks. 7. Replace the bulb with a screwdriver. 2. Remove the clip ...
... from the rear combination light assembly by turning it by your SUBARU dealer if necessary. & Rear combination lights 4. Pull the bulb out of the side trunk trim panel. - CONTINUED - Remove the bulb from the rear trunk trim with new one . 5. Set the washer tank to the original...signal light Back-up light 3. Have the bulbs replaced by your SUBARU dealer if necessary. & Front fog light (if equipped) It may be difficult to replace the bulbs. Open the rear portion of the bulb socket and replace it clicks. 7. Replace the bulb with a screwdriver. 2. Remove the clip ...

Owner's Manual
Page 403
... from the Slide the rear combination light assembly rearward and remove it from the rear combination light assembly by turning it counterclockwise. 4. Pull the bulb out of the bulb socket and replace it locks. 7. Tighten the upper and lower screws. 2. Put the rear combination light assembly into the rear combination light assembly... side marker light Rear turn it clockwise until it with the guide on the vehicle. 3. 11-52 Maintenance and service ! 5-door models vehicle. 1. Set the bulb socket into place while aligning the clip with a new one. 5.
... from the Slide the rear combination light assembly rearward and remove it from the rear combination light assembly by turning it counterclockwise. 4. Pull the bulb out of the bulb socket and replace it locks. 7. Tighten the upper and lower screws. 2. Put the rear combination light assembly into the rear combination light assembly... side marker light Rear turn it clockwise until it with the guide on the vehicle. 3. 11-52 Maintenance and service ! 5-door models vehicle. 1. Set the bulb socket into place while aligning the clip with a new one. 5.

Owner's Manual
Page 404
... rear gate. 1. Maintenance and service 11-53 & Back-up light (5-door) 2. Insert a finger into the right side of the bulb socket and replace it clockwise. 5. Turn the bulb socket counterclockwise - CONTINUED - Pull the bulb out of the license plate light cover, then press once to the left and pull out to the light... shown in the illustration, and pry the light cover off from the rear gate trim. 3. Apply a flat-head screwdriver to remove the cover. 2. Turn the bulb socket counterclockwise and remove it. & License plate light 1.
... rear gate. 1. Maintenance and service 11-53 & Back-up light (5-door) 2. Insert a finger into the right side of the bulb socket and replace it clockwise. 5. Turn the bulb socket counterclockwise - CONTINUED - Pull the bulb out of the license plate light cover, then press once to the left and pull out to the light... shown in the illustration, and pry the light cover off from the rear gate trim. 3. Apply a flat-head screwdriver to remove the cover. 2. Turn the bulb socket counterclockwise and remove it. & License plate light 1.

Owner's Manual
Page 405
... the lens. 1. Remove the lens by prying the edge of the lens with a flat-head screwdriver. 2. Pull the bulb out of the socket. 3. Turn the bulb until the flat surfaces at its ends are aligned vertically. Remove the lens by prying the edge of the lens with a flat-head ...screwdriver. Pull the bulb straight downward to remove it. 3. Pull the bulb out of the socket. 4. Reinstall the lens. 1. 11-54 Maintenance and service and pull out the socket. 3. Install a new...
... the lens. 1. Remove the lens by prying the edge of the lens with a flat-head screwdriver. 2. Pull the bulb out of the socket. 3. Turn the bulb until the flat surfaces at its ends are aligned vertically. Remove the lens by prying the edge of the lens with a flat-head ...screwdriver. Pull the bulb straight downward to remove it. 3. Pull the bulb out of the socket. 4. Reinstall the lens. 1. 11-54 Maintenance and service and pull out the socket. 3. Install a new...
Owner's Manual
Page 406
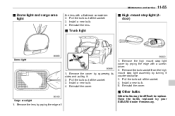
...by squeezing its sides and pulling it counterclockwise. 3. Have the bulbs replaced by turning it . 2. Pull the bulb out of Install a new bulb. 4. Install a new bulb. 5. Reinstall the cover. & Other bulbs Cargo area light Other bulbs may be difficult to replace. Remove the lens by prying ... Pull the bulb out of the socket. 4. Install a new bulb. 4. Maintenance and service 11-55 & Dome light and cargo area light the lens with a screwdriver. 2. Reinstall the lens. & High mount stop light assembly by your SUBARU dealer if necessary. 1. Remove the bulb socket from the...
...by squeezing its sides and pulling it counterclockwise. 3. Have the bulbs replaced by turning it . 2. Pull the bulb out of Install a new bulb. 4. Install a new bulb. 5. Reinstall the cover. & Other bulbs Cargo area light Other bulbs may be difficult to replace. Remove the lens by prying ... Pull the bulb out of the socket. 4. Install a new bulb. 4. Maintenance and service 11-55 & Dome light and cargo area light the lens with a screwdriver. 2. Reinstall the lens. & High mount stop light assembly by your SUBARU dealer if necessary. 1. Remove the bulb socket from the...

Owner's Manual
Page 408
Specifications Specifications ...Dimensions...Engine ...Electrical system...Capacities ...Tires ...Wheel alignment ... 12-2 12-2 12-3 12-3 12-4 12-5 12-5 Fuses and circuits ...Fuse panel located in the passenger compartment ...Fuse panel located in the engine compartment ... 12-6 12-6 12-8 Bulb chart...Vehicle identification ... 12-10 12-13 12
Specifications Specifications ...Dimensions...Engine ...Electrical system...Capacities ...Tires ...Wheel alignment ... 12-2 12-2 12-3 12-3 12-4 12-5 12-5 Fuses and circuits ...Fuse panel located in the passenger compartment ...Fuse panel located in the engine compartment ... 12-6 12-6 12-8 Bulb chart...Vehicle identification ... 12-10 12-13 12

Owner's Manual
Page 417
12-10 Specifications Bulb chart NOTE Lights from A to D are the LED (Light Emitting Diode) type. Consult your SUBARU dealer for replacement.
12-10 Specifications Bulb chart NOTE Lights from A to D are the LED (Light Emitting Diode) type. Consult your SUBARU dealer for replacement.
Owner's Manual
Page 418
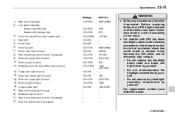
... 12V-21/5W 12V-5W 12V-5W 12V-21W 12V-21W 12V-5W Bulb No. 9005 (HB3) D2S H11 1157NA - - 9006 (HB4) (W5W) .../5W) - 168 (WY21W) 7440 168 (W5W WARNING . Before replacing bulbs, turn signal light (if equipped) - CONTINUED - Bulbs may become very hot while illuminated. Otherwise, there is a risk of... result in serious injury because the HID bulbs use an extremely high voltage. - Do not replace any headlight bulbs (both low beam and high beam)...door, if equipped) Side turn off the lights and wait until the bulbs cool down. Not doing so carries the risk of sustaining a burn ...
... 12V-21/5W 12V-5W 12V-5W 12V-21W 12V-21W 12V-5W Bulb No. 9005 (HB3) D2S H11 1157NA - - 9006 (HB4) (W5W) .../5W) - 168 (WY21W) 7440 168 (W5W WARNING . Before replacing bulbs, turn signal light (if equipped) - CONTINUED - Bulbs may become very hot while illuminated. Otherwise, there is a risk of... result in serious injury because the HID bulbs use an extremely high voltage. - Do not replace any headlight bulbs (both low beam and high beam)...door, if equipped) Side turn off the lights and wait until the bulbs cool down. Not doing so carries the risk of sustaining a burn ...

Owner's Manual
Page 419
12-12 Specifications CAUTION Replace any bulb only with a new bulb of different wattage could result in a fire. Using a bulb of the specified wattage.
12-12 Specifications CAUTION Replace any bulb only with a new bulb of different wattage could result in a fire. Using a bulb of the specified wattage.
Owner's Manual
Page 440
...-29 Reserve distance ...11-30 Brake system ...7-30 Warning light ...3-22 Braking ...7-30 Tips...7-30 Breaking-in of new brake pads and linings ...11-31 Bulb Chart ...12-10 Replacing...11-48 C Capacities ...12-4 Cargo area Cover ...6-12 Light...6-2, 11-55 Tie-down hooks ...6-13 Catalytic converter ...8-3 Center Console ...6-5 Ventilators ...4-3 Center...
...-29 Reserve distance ...11-30 Brake system ...7-30 Warning light ...3-22 Braking ...7-30 Tips...7-30 Breaking-in of new brake pads and linings ...11-31 Bulb Chart ...12-10 Replacing...11-48 C Capacities ...12-4 Cargo area Cover ...6-12 Light...6-2, 11-55 Tie-down hooks ...6-13 Catalytic converter ...8-3 Center Console ...6-5 Ventilators ...4-3 Center...
Owner's Manual
Page 442
... Flat tires ...9-6 Floor mat ...6-11 Fluid level Automatic transmission ...11-23 Brake ...11-27 Clutch...11-28 Power steering ...11-25 Fog light Bulb ...11-51 Indicator light...3-27 Switch ...3-37 Folding mirror switch ...3-49 Front Differential gear oil ...11-24 Fog light ...3-37, 11-51 Fog ... Weight Rating)...8-13 H Hands-free system...5-47 Hazard warning flasher ...3-5, 9-2 Head restraint adjustment Front seat...1-4 Rear seat ...1-8 Headlight Beam leveler...3-35 Bulb replacement ...11-48 Bulb replacing ...11-48 Bulb wattage...12-10 Control switch ...3-32 Flasher...3-33 Indicator light ...3-27
... Flat tires ...9-6 Floor mat ...6-11 Fluid level Automatic transmission ...11-23 Brake ...11-27 Clutch...11-28 Power steering ...11-25 Fog light Bulb ...11-51 Indicator light...3-27 Switch ...3-37 Folding mirror switch ...3-49 Front Differential gear oil ...11-24 Fog light ...3-37, 11-51 Fog ... Weight Rating)...8-13 H Hands-free system...5-47 Hazard warning flasher ...3-5, 9-2 Head restraint adjustment Front seat...1-4 Rear seat ...1-8 Headlight Beam leveler...3-35 Bulb replacement ...11-48 Bulb replacing ...11-48 Bulb wattage...12-10 Control switch ...3-32 Flasher...3-33 Indicator light ...3-27
