
Owner's Manual
Page 212
... mirror ... 6-4 6-4 Storage compartment ...Glove box ...Center console...Coin tray (if equipped) ... 6-4 6-5 6-5 6-5 Floor mat (if equipped)...Shopping bag hook (5-door)...Cargo area cover (5-door - if equipped)...Using the cover ...To remove the cover ...To install the cover housing ... 6-11 6-11 6-12 6-12 6-12 6-13 Cup holders ...Front passenger's cup holder ...Rear passenger's cup holder (if equipped...
... mirror ... 6-4 6-4 Storage compartment ...Glove box ...Center console...Coin tray (if equipped) ... 6-4 6-5 6-5 6-5 Floor mat (if equipped)...Shopping bag hook (5-door)...Cargo area cover (5-door - if equipped)...Using the cover ...To remove the cover ...To install the cover housing ... 6-11 6-11 6-12 6-12 6-12 6-13 Cup holders ...Front passenger's cup holder ...Rear passenger's cup holder (if equipped...

Owner's Manual
Page 223
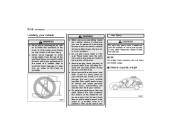
...and an object on the extended cover. You should hold the rear gate open. 2. To rewind it, unhook it will rewind automatically. 6-12 Interior equipment Cargo area cover (5-door - if equipped) The cargo area cover is provided for additional cargo. Push the bar to scratch the... rear gate stays while extending and rewinding the cover. Rewind the cover. & Using the cover CAUTION Be careful not to the right ...
...and an object on the extended cover. You should hold the rear gate open. 2. To rewind it, unhook it will rewind automatically. 6-12 Interior equipment Cargo area cover (5-door - if equipped) The cargo area cover is provided for additional cargo. Push the bar to scratch the... rear gate stays while extending and rewinding the cover. Rewind the cover. & Using the cover CAUTION Be careful not to the right ...

Owner's Manual
Page 224
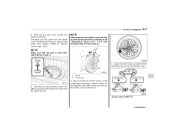
... is equipped with a cargo net or ropes. When using the tie-down hooks, turn them down hooks are designed only for securing light cargo. The cargo area is 44 lbs (20 kg) per hook. 2. Shorten the bar. Interior equipment 6-13 & To install the cover housing 1. Cargo tie-down hooks (5-door... - if equipped) CAUTION The cargo tie-down out of the retainers. When not in...
... is equipped with a cargo net or ropes. When using the tie-down hooks, turn them down hooks are designed only for securing light cargo. The cargo area is 44 lbs (20 kg) per hook. 2. Shorten the bar. Interior equipment 6-13 & To install the cover housing 1. Cargo tie-down hooks (5-door... - if equipped) CAUTION The cargo tie-down out of the retainers. When not in...
Owner's Manual
Page 289
... being thrown around inside the vehicle. Also, overloading can change the way your vehicle. . Do not place anything on the roof. Keep luggage or cargo low, as close to the floor as possible. If you can break, or it more prone to tip over. . NOTE For better fuel economy,... loads on the rear shelf behind the rear seatback (for 4-door) or the extended cargo area cover (for 5-door). CAUTION Do not carry spray cans, containers with flammable or corrosive liquids or any other cargo higher than the top of the seatback because it from shooting forward and causing serious injury...
... being thrown around inside the vehicle. Also, overloading can change the way your vehicle. . Do not place anything on the roof. Keep luggage or cargo low, as close to the floor as possible. If you can break, or it more prone to tip over. . NOTE For better fuel economy,... loads on the rear shelf behind the rear seatback (for 4-door) or the extended cargo area cover (for 5-door). CAUTION Do not carry spray cans, containers with flammable or corrosive liquids or any other cargo higher than the top of the seatback because it from shooting forward and causing serious injury...
Owner's Manual
Page 300
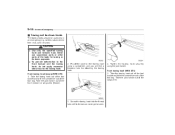
... a flat-head screwdriver into the notch on the opposite side of the valve hole and pry the wheel cover to "Maintenance tools" F9-4. Loosen the wheel nuts using it . The tools and the spare tire are stored under the floor of emergency 9-7 5. NOTE Make ... not remove the nuts. 1) 2) Notch Valve hole 6. Take out the jack, jack handle and wheel nut wrench. In case of the trunk (4-door) or the cargo area (5-door).
... a flat-head screwdriver into the notch on the opposite side of the valve hole and pry the wheel cover to "Maintenance tools" F9-4. Loosen the wheel nuts using it . The tools and the spare tire are stored under the floor of emergency 9-7 5. NOTE Make ... not remove the nuts. 1) 2) Notch Valve hole 6. Take out the jack, jack handle and wheel nut wrench. In case of the trunk (4-door) or the cargo area (5-door).
Owner's Manual
Page 307
... front bumper and the towing hook, do not apply excessive lateral load to free a stuck vehicle from mud, sand or snow). Pry off the cover on the front bumper using the jack handle. Use only the specified towing hook and tie-down purposes. . Never use suspension parts or other parts... of the tool bag. Take the jack handle out of the cargo area. 3. Front towing hook (WRX STI): 1. Tighten the towing hook securely using a screwdriver, and you will find a threaded hole for towing or tie-down ...
... front bumper and the towing hook, do not apply excessive lateral load to free a stuck vehicle from mud, sand or snow). Pry off the cover on the front bumper using the jack handle. Use only the specified towing hook and tie-down purposes. . Never use suspension parts or other parts... of the tool bag. Take the jack handle out of the cargo area. 3. Front towing hook (WRX STI): 1. Tighten the towing hook securely using a screwdriver, and you will find a threaded hole for towing or tie-down ...
Owner's Manual
Page 309
...jack handle out of the tool bag. After towing, remove the towing hook from Fit the towing hook cover on the rear bumper using the jack handle. Tighten the towing hook securely using a screwdriver, and you... out of the tool bucket and take the screwdriver out of the trunk (4-door) or cargo area (5-door). The front tie-down hooks: 3. Front tie-down hooks are located between each of emergency... Rear towing hook: 1. Pry off the cover on the bumper. 9-16 In case of the front tires and the front bumper. 4. the vehicle...
...jack handle out of the tool bag. After towing, remove the towing hook from Fit the towing hook cover on the rear bumper using the jack handle. Tighten the towing hook securely using a screwdriver, and you... out of the tool bucket and take the screwdriver out of the trunk (4-door) or cargo area (5-door). The front tie-down hooks: 3. Front tie-down hooks are located between each of emergency... Rear towing hook: 1. Pry off the cover on the bumper. 9-16 In case of the front tires and the front bumper. 4. the vehicle...
Owner's Manual
Page 311
... transmission failure occurs, transport your vehicle on a flatbed truck. . Transmission damage could result if the vehicle is turned off, it from inside the cargo area. Remove the access cover at the bottom-center of emergency towed. 4. must be locked. . Because the engine is towed with the engine running . Always use a flat-head...
... transmission failure occurs, transport your vehicle on a flatbed truck. . Transmission damage could result if the vehicle is turned off, it from inside the cargo area. Remove the access cover at the bottom-center of emergency towed. 4. must be locked. . Because the engine is towed with the engine running . Always use a flat-head...
Owner's Manual
Page 374
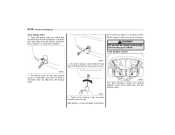
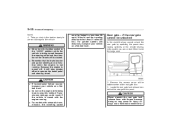
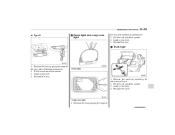
Pull the bulb out of the socket. 3. Pull the bulb out of the socket. 3. Reinstall the lens. Remove the cover by prying the edge of the lens with a flat-head screwdriver. 2. Cargo area light 1. Reinstall the cover. Install a new bulb. 4. Pull the bulb out of - CONTINUED - Install a new bulb. 4. Maintenance and service 11-55...
Pull the bulb out of the socket. 3. Pull the bulb out of the socket. 3. Reinstall the lens. Remove the cover by prying the edge of the lens with a flat-head screwdriver. 2. Cargo area light 1. Reinstall the cover. Install a new bulb. 4. Pull the bulb out of - CONTINUED - Install a new bulb. 4. Maintenance and service 11-55...

Owner's Manual
Page 410
... light ...3-24 Braking ...7-31 Tips...7-31 Breaking-in of new brake pads and linings ...11-32 Bulb Chart ...12-10 Replacing...11-48 C Capacities ...12-4 Cargo area Cover ...6-12 Light...6-2, 11-55 Tie-down hooks ...6-13 Catalytic converter ...8-3 Center Console ...6-5 Ventilators ...4-3 Center and side ventilators...4-3 Changing Coolant...11-15 Flat tire ...9-6 Oil...
... light ...3-24 Braking ...7-31 Tips...7-31 Breaking-in of new brake pads and linings ...11-32 Bulb Chart ...12-10 Replacing...11-48 C Capacities ...12-4 Cargo area Cover ...6-12 Light...6-2, 11-55 Tie-down hooks ...6-13 Catalytic converter ...8-3 Center Console ...6-5 Ventilators ...4-3 Center and side ventilators...4-3 Changing Coolant...11-15 Flat tire ...9-6 Oil...

