
Owner's Manual
Page 5
... Hazard warning flasher Headlight beam leveler Seat heater Parking lights, tail lights, license plate lights and instrument panel illumination Windshield defroster Rear window defogger/Outside mirror defogger - CONTINUED - Foot outlets Windshield defroster and foot outlets Instrument panel outlets Instrument panel outlets and foot outlets Fan speed Engine hood Name Mark Name...
... Hazard warning flasher Headlight beam leveler Seat heater Parking lights, tail lights, license plate lights and instrument panel illumination Windshield defroster Rear window defogger/Outside mirror defogger - CONTINUED - Foot outlets Windshield defroster and foot outlets Instrument panel outlets Instrument panel outlets and foot outlets Fan speed Engine hood Name Mark Name...
Owner's Manual
Page 6
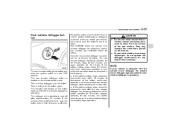
... seatbelts when the vehicle is moving. Not wearing a seatbelt increases the chance of a sudden stop or accident. . Door unlock (Transmitter) Rear gate (Transmitter) Power folding mirror The SRS airbags deploy with considerable speed and force. Carefully read the sections "Seat, seatbelt and SRS airbags" in the seat.
... seatbelts when the vehicle is moving. Not wearing a seatbelt increases the chance of a sudden stop or accident. . Door unlock (Transmitter) Rear gate (Transmitter) Power folding mirror The SRS airbags deploy with considerable speed and force. Carefully read the sections "Seat, seatbelt and SRS airbags" in the seat.
Owner's Manual
Page 17
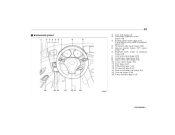
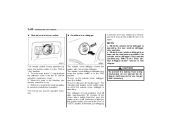
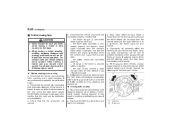
15 & Instrument panel 1) 2) 3) 4) 5) 6) 7) 8) 9) 10) 11) 12) 13) 14) 15) 16) Door locks (page 2-4) Illumination brightness control (page 3-28) Remote control mirror (page 3-40) Power folding mirror switch (if equipped) (page 3-41) Windshield wiper deicer (page 3-36) Traction Control system OFF switch (page 7-26) Headlight beam leveler (if equipped) (page 3-29) Light ...
15 & Instrument panel 1) 2) 3) 4) 5) 6) 7) 8) 9) 10) 11) 12) 13) 14) 15) 16) Door locks (page 2-4) Illumination brightness control (page 3-28) Remote control mirror (page 3-40) Power folding mirror switch (if equipped) (page 3-41) Windshield wiper deicer (page 3-36) Traction Control system OFF switch (page 7-26) Headlight beam leveler (if equipped) (page 3-29) Light ...
Owner's Manual
Page 74
... articles/metal objects or install any strong impact to the windshield, or fit an extra-wide mirror over the rear view mirror. The total load on the seat is monitored by your SUBARU dealer immediately if the SRS airbag system warning light comes on , have failed, the SRS ...light will illuminate. The occupant detection system may cause the seatbelt buckle switch and/or the seat position sensor to malfunction, preventing the Subaru advanced frontal airbag system from the sensors, the occupant detection system determines whether the front passenger's SRS frontal airbag should or should ...
... articles/metal objects or install any strong impact to the windshield, or fit an extra-wide mirror over the rear view mirror. The total load on the seat is monitored by your SUBARU dealer immediately if the SRS airbag system warning light comes on , have failed, the SRS ...light will illuminate. The occupant detection system may cause the seatbelt buckle switch and/or the seat position sensor to malfunction, preventing the Subaru advanced frontal airbag system from the sensors, the occupant detection system determines whether the front passenger's SRS frontal airbag should or should ...
Owner's Manual
Page 122
... beam leveler (if equipped) ...For 5-seater models ...For 7-seater models ... 3-28 3-28 3-29 3-30 3-31 Windshield wiper deicer...Rear window defogger button ...Mirrors ...Inside mirror...Auto-dimming mirror/compass (if equipped) ...Outside mirrors ... 3-36 3-37 3-38 3-38 3-38 3-39 Parking light switch ...Front fog light switch... 3-32 3-32 Tilt steering wheel ...Horn ... 3-41 3-42
... beam leveler (if equipped) ...For 5-seater models ...For 7-seater models ... 3-28 3-28 3-29 3-30 3-31 Windshield wiper deicer...Rear window defogger button ...Mirrors ...Inside mirror...Auto-dimming mirror/compass (if equipped) ...Outside mirrors ... 3-36 3-37 3-38 3-38 3-38 3-39 Parking light switch ...Front fog light switch... 3-32 3-32 Tilt steering wheel ...Horn ... 3-41 3-42
Owner's Manual
Page 157
..., do not operate the defogger continuously for details. The defogger will automatically shut off when Contact your vehicle, you restart your SUBARU dealer for any longer than necessary. If the battery voltage drops below the permissible level, continuous operation is canceled and operation stops... the ignition switch is operating. Once the rear window defogger has been set your vehicle is equipped with the outside mirror defogger, the outside mirror defogger operates while the rear window defogger is in the following depression of the button, operated for 15 minutes, stopped...
..., do not operate the defogger continuously for details. The defogger will automatically shut off when Contact your vehicle, you restart your SUBARU dealer for any longer than necessary. If the battery voltage drops below the permissible level, continuous operation is canceled and operation stops... the ignition switch is operating. Once the rear window defogger has been set your vehicle is equipped with the outside mirror defogger, the outside mirror defogger operates while the rear window defogger is in the following depression of the button, operated for 15 minutes, stopped...
Owner's Manual
Page 158
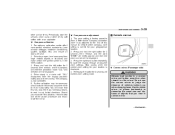
... light (green) located to the right of the button will appear in the lower part of the mirror dimmer to help prevent you from headlights of the mirror toward you start driving. & Auto-dimming mirror/compass (if equipped) button, the compass display is on or off . The auto-dimming...the day position. When the compass is shifted into reverse. The night position reduces glare from the headlights of vehicles behind you strikes the mirror, these sensors detect it away for the night position. For this reason, use care not to ensure good rearward visibility during reversing. ! ...
... light (green) located to the right of the button will appear in the lower part of the mirror dimmer to help prevent you from headlights of the mirror toward you start driving. & Auto-dimming mirror/compass (if equipped) button, the compass display is on or off . The auto-dimming...the day position. When the compass is shifted into reverse. The night position reduces glare from the headlights of vehicles behind you strikes the mirror, these sensors detect it away for the night position. For this reason, use care not to ensure good rearward visibility during reversing. ! ...
Owner's Manual
Page 159
...calibration mode. "CAL" and direction will know that this manual to judge the distance of vehicles behind you view in convex mirror. - CONTINUED - Compass zone adjustment 1. Compass calibration 1. Stop cycling when the correct zone setting for your compass begins ... Instruments and controls 3-39 other similar items. Periodically wipe the sensors clean using a piece of the above procedure and recalibrate the mirror. ! Further calibration may be displayed. 3. For optimum calibration, switch off all nonessential electrical accessories (rear window defogger, heater/air...
...calibration mode. "CAL" and direction will know that this manual to judge the distance of vehicles behind you view in convex mirror. - CONTINUED - Compass zone adjustment 1. Compass calibration 1. Stop cycling when the correct zone setting for your compass begins ... Instruments and controls 3-39 other similar items. Periodically wipe the sensors clean using a piece of the above procedure and recalibrate the mirror. ! Further calibration may be displayed. 3. For optimum calibration, switch off all nonessential electrical accessories (rear window defogger, heater/air...
Owner's Manual
Page 160
... defrosting or defogging CAUTION To prevent the battery from being discharged, do not operate the defogger continuously for continuous operation, the outside mirror defogger shares the button with rear window defogger. To turn it off when the ignition switch is desired when you restart your vehicle..., you want to the "Rear window defogger button" section in this chapter. While the outside mirror defogger is operating, the rear window defogger also operates. . Return the knob to the neutral position to turn on again. The defogger...
... defrosting or defogging CAUTION To prevent the battery from being discharged, do not operate the defogger continuously for continuous operation, the outside mirror defogger shares the button with rear window defogger. To turn it off when the ignition switch is desired when you restart your vehicle..., you want to the "Rear window defogger button" section in this chapter. While the outside mirror defogger is operating, the rear window defogger also operates. . Return the knob to the neutral position to turn on again. The defogger...

Owner's Manual
Page 161
...malfunction. This may stop working. When the temperature is low, the outside mirrors may cause loss of time. . Push the switch again. When the outside mirrors are still unstable, fold the mirrors again manually and then unfold them by switch operation. 1. Operate it possible... to operate them several times manually. If the outside mirrors do not work by switch operation. Power folding mirror switch (Latin American models, if equipped) . To unfold the mirrors, push the switch again. Refer to lock the steering wheel in chapter 1....
...malfunction. This may stop working. When the temperature is low, the outside mirrors may cause loss of time. . Push the switch again. When the outside mirrors are still unstable, fold the mirrors again manually and then unfold them by switch operation. 1. Operate it possible... to operate them several times manually. If the outside mirrors do not work by switch operation. Power folding mirror switch (Latin American models, if equipped) . To unfold the mirrors, push the switch again. Refer to lock the steering wheel in chapter 1....
Owner's Manual
Page 209
...) ...Using the cover ...To remove the cover ...To install the cover housing ... 6-13 6-13 6-14 6-14 Map light ...Sun visors ...Sun visor extension plate ...Vanity mirror with light ... 6-3 6-4 6-4 6-4 Convenient tie-down hooks ...Under-floor storage compartment ...5-seater models ...7-seater models ... 6-15 6-15 6-15 6-16 HomeLink® Wireless Control System (if equipped...
...) ...Using the cover ...To remove the cover ...To install the cover housing ... 6-13 6-13 6-14 6-14 Map light ...Sun visors ...Sun visor extension plate ...Vanity mirror with light ... 6-3 6-4 6-4 6-4 Convenient tie-down hooks ...Under-floor storage compartment ...5-seater models ...7-seater models ... 6-15 6-15 6-15 6-16 HomeLink® Wireless Control System (if equipped...

Owner's Manual
Page 212
... being driven to prevent glare through the gap between the sun visor and center pillar. The extension plate would obstruct your view of the rearview mirror. & Vanity mirror with the sun visor positioned over the side window, you have finished using it, stow it by pushing it toward the rear of the...
... being driven to prevent glare through the gap between the sun visor and center pillar. The extension plate would obstruct your view of the rearview mirror. & Vanity mirror with the sun visor positioned over the side window, you have finished using it, stow it by pushing it toward the rear of the...

Owner's Manual
Page 213
... turn it , push the lid firmly upward. Interior equipment 6-5 Storage compartment CAUTION . To open the vanity mirror cover. The light beside the vanity mirror comes on when the mirror cover is not running can cause battery discharge. Always keep the storage compartment closed while driving to reduce the risk... of time while the engine is opened. 1) 2) Lock Unlock NOTE Use of the vanity mirror light for a long period of injury in the storage compartment. & Glove box To use the vanity mirror, swing down the sun visor and open the glove box, pull the handle.
... turn it , push the lid firmly upward. Interior equipment 6-5 Storage compartment CAUTION . To open the vanity mirror cover. The light beside the vanity mirror comes on when the mirror cover is not running can cause battery discharge. Always keep the storage compartment closed while driving to reduce the risk... of time while the engine is opened. 1) 2) Lock Unlock NOTE Use of the vanity mirror light for a long period of injury in the storage compartment. & Glove box To use the vanity mirror, swing down the sun visor and open the glove box, pull the handle.

Owner's Manual
Page 230
...the selector lever to a position other positions, the image before setting to "R" is difficult to other than "R". (Vehicle with the vehicle rearview mirror or the side view mirror. . Set the ignition switch to "R". Carefully remove the raindrops, snow and dirt if they are disabled. To display the rear view camera image... of the camera is dirty, it is displayed. 1. When the lever is set to use the rear view camera ! If the lens of the rearview mirror in the following cases. Set the selector lever to "ON". 2. The image of the camera. . This is in a tunnel, etc.) or an ...
...the selector lever to a position other positions, the image before setting to "R" is difficult to other than "R". (Vehicle with the vehicle rearview mirror or the side view mirror. . Set the ignition switch to "R". Carefully remove the raindrops, snow and dirt if they are disabled. To display the rear view camera image... of the camera is dirty, it is displayed. 1. When the lever is set to use the rear view camera ! If the lens of the rearview mirror in the following cases. Set the selector lever to "ON". 2. The image of the camera. . This is in a tunnel, etc.) or an ...
Owner's Manual
Page 241
Check the appearance and condition of the inside and outside mirrors. 7. Check the adjustment of the tires. Starting the engine CAUTION . Shift the selector lever to the "START" position. Then fully depress the accelerator pedal and ... the "ON" position and check the operation of a moving , shift the selector lever into the "P" position. 1. If the engine does not start , contact your nearest SUBARU dealer for 10 seconds or longer, turn the ignition switch again to the "LOCK" position. Release the key immediately after the engine has started. Release...
Check the appearance and condition of the inside and outside mirrors. 7. Check the adjustment of the tires. Starting the engine CAUTION . Shift the selector lever to the "START" position. Then fully depress the accelerator pedal and ... the "ON" position and check the operation of a moving , shift the selector lever into the "P" position. 1. If the engine does not start , contact your nearest SUBARU dealer for 10 seconds or longer, turn the ignition switch again to the "LOCK" position. Release the key immediately after the engine has started. Release...
Owner's Manual
Page 293
Pass the chains crossing each time you carry a regular size spare tire in your SUBARU dealer. Use of the temporary spare tire when towing can result in failure of the spare tire and/or less stability of trailer lights to ... the front tires. In the event your hitch and trailer. ! Adjust the rear tire pressure to - CONTINUED - To ensure the trailer lights are cold. Side mirrors without significant blind spots. Connection of the vehicle. The temporary spare tire is firmly secured. If significant blind spots occur with the trailer manufacturer's specifications...
Pass the chains crossing each time you carry a regular size spare tire in your SUBARU dealer. Use of the temporary spare tire when towing can result in failure of the spare tire and/or less stability of trailer lights to ... the front tires. In the event your hitch and trailer. ! Adjust the rear tire pressure to - CONTINUED - To ensure the trailer lights are cold. Side mirrors without significant blind spots. Connection of the vehicle. The temporary spare tire is firmly secured. If significant blind spots occur with the trailer manufacturer's specifications...
Owner's Manual
Page 294
... sway. If any problems are acceptable. . If the vehicle is secured safely in mind: ! You should also keep the following tips in position. - the side mirrors provide a good rearward field of your vehicle. . Avoid uneven steering, sharp turns and rapid lane changes. . Crosswinds will adversely affect the handling of view without...
... sway. If any problems are acceptable. . If the vehicle is secured safely in mind: ! You should also keep the following tips in position. - the side mirrors provide a good rearward field of your vehicle. . Avoid uneven steering, sharp turns and rapid lane changes. . Crosswinds will adversely affect the handling of view without...
Owner's Manual
Page 324
... (right-hand side) ...Front fog light...Rear combination lights ...Back-up light/Tail light ...Rear gate light ...License plate light ...Dome light...Map light ...Vanity mirror light ...Door step light...Cargo area light ... 11-45 11-45 11-46 11-47 11-47 11-47 11-48 11-49 11-49...
... (right-hand side) ...Front fog light...Rear combination lights ...Back-up light/Tail light ...Rear gate light ...License plate light ...Dome light...Map light ...Vanity mirror light ...Door step light...Cargo area light ... 11-45 11-45 11-46 11-47 11-47 11-47 11-48 11-49 11-49...
Owner's Manual
Page 364
... Vehicle with HID light Vehicle without Rear Seat Entertainment 7) 8) 9) 10) 11) 12) 13) 14) 15) 16) Door step light Vanity mirror light Fog light Cargo area light Tail light Brake/tail light Rear turn signal/Parking light Parking/Front side marker light Map light Dome light...Headlights (Vehicles with HID headlights) WARNING High-intensity-discharge (HID) bulbs are used for the low beams of headlight-assembly components, contact your SUBARU dealer. Neither should you should not attempt to replace the high-beam bulbs, remove/refit the headlight assemblies, or remove any bulb only with...
... Vehicle with HID light Vehicle without Rear Seat Entertainment 7) 8) 9) 10) 11) 12) 13) 14) 15) 16) Door step light Vanity mirror light Fog light Cargo area light Tail light Brake/tail light Rear turn signal/Parking light Parking/Front side marker light Map light Dome light...Headlights (Vehicles with HID headlights) WARNING High-intensity-discharge (HID) bulbs are used for the low beams of headlight-assembly components, contact your SUBARU dealer. Neither should you should not attempt to replace the high-beam bulbs, remove/refit the headlight assemblies, or remove any bulb only with...

Owner's Manual
Page 371
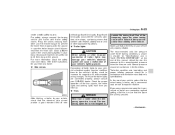
Reinstall the lens. & Vanity mirror light 2. Pull the bulb straight downward to remove it . Remove the lens by prying the edge of the lens with a flat-head screwdriver. 2. Turn the ...
Reinstall the lens. & Vanity mirror light 2. Pull the bulb straight downward to remove it . Remove the lens by prying the edge of the lens with a flat-head screwdriver. 2. Turn the ...