Owner's Manual
Page 12
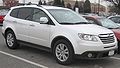
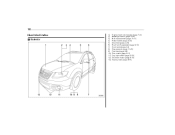
10 Illustrated index & Exterior 1) 2) 3) 4) 5) 6) 7) 8) 9) 10) 11) 12) 13) Engine hood lock release (page 11-4) Headlight switch (page 3-26) Bulb replacement (page 11-41) Wiper switch (page 3-34) Moonroof (page 2-23) Roof rail (if equipped) (page 8-13) Door locks (page 2-4) Tire pressure (page 11-25) Flat tires (page 9-6) Tire chains (page 8-11) Fog light switch (page 3-32) Tie-down hooks (page 9-15) Towing hook (page 9-15)
10 Illustrated index & Exterior 1) 2) 3) 4) 5) 6) 7) 8) 9) 10) 11) 12) 13) Engine hood lock release (page 11-4) Headlight switch (page 3-26) Bulb replacement (page 11-41) Wiper switch (page 3-34) Moonroof (page 2-23) Roof rail (if equipped) (page 8-13) Door locks (page 2-4) Tire pressure (page 11-25) Flat tires (page 9-6) Tire chains (page 8-11) Fog light switch (page 3-32) Tie-down hooks (page 9-15) Towing hook (page 9-15)
Owner's Manual
Page 129
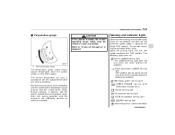
...turned to the "ON" position. Apply the parking brake and turn the ignition switch to "In case of the warning and indicator lights come on momentarily and then go out when the ignition switch is not sufficiently warmed up should be avoided. : Vehicle Dynamics Control operation... the pointer of the temperature gauge reaches near the middle of the bulbs. Warning and indicator lights Several of emergency" in the "ON" position. The following lights come on : : Driver's seatbelt warning light (The seatbelt warning light goes out only when the driver fastens the seatbelt.) : Front passenger...
...turned to the "ON" position. Apply the parking brake and turn the ignition switch to "In case of the warning and indicator lights come on momentarily and then go out when the ignition switch is not sufficiently warmed up should be avoided. : Vehicle Dynamics Control operation... the pointer of the temperature gauge reaches near the middle of the bulbs. Warning and indicator lights Several of emergency" in the "ON" position. The following lights come on : : Driver's seatbelt warning light (The seatbelt warning light goes out only when the driver fastens the seatbelt.) : Front passenger...

Owner's Manual
Page 130
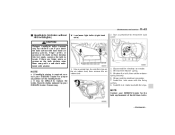
Consult your authorized SUBARU dealer Front passenger's warning light ! NOTE Driver's warning light . With the ignition switch turned to the "ON" position, this device reminds the driver and front passenger to fasten their seatbelts by illuminating the warning lights in the locations indicated in the following illustrations and sounding a chime. : All-Wheel Drive warning light : Low...
Consult your authorized SUBARU dealer Front passenger's warning light ! NOTE Driver's warning light . With the ignition switch turned to the "ON" position, this device reminds the driver and front passenger to fasten their seatbelts by illuminating the warning lights in the locations indicated in the following illustrations and sounding a chime. : All-Wheel Drive warning light : Low...
Owner's Manual
Page 140
... current gear position and the upshift/downshift indicator illuminates. (Refer to the "Automatic transmission" section in chapter 7.) NOTE . Contact your nearest SUBARU dealer immediately. In the event that the headlights are in the high beam mode. When the selector lever is moved to the manual gate,... that an unauthorized key (for example, an unauthorized duplicate) is deactivated and the "CRUISE" indicator light flashes. If the indicator lights do not blink or blink rapidly, the turn signal bulb may be burned out. When manual mode is turned to the "ON" position and goes out after the ...
... current gear position and the upshift/downshift indicator illuminates. (Refer to the "Automatic transmission" section in chapter 7.) NOTE . Contact your nearest SUBARU dealer immediately. In the event that the headlights are in the high beam mode. When the selector lever is moved to the manual gate,... that an unauthorized key (for example, an unauthorized duplicate) is deactivated and the "CRUISE" indicator light flashes. If the indicator lights do not blink or blink rapidly, the turn signal bulb may be burned out. When manual mode is turned to the "ON" position and goes out after the ...
Owner's Manual
Page 324
... 11-33 11-33 11-34 11-35 11-35 Battery...Fuses ...Main fuse ...Installation of accessories...Replacing bulbs ...Headlights (Vehicles with HID headlights) ...Headlights (Vehicles without HID headlights) ...Parking light (right-hand side)... 11-37 11-38 11-39 11-40 11-41 11-42 11-43 11-...44 Front turn signal light (right-hand side) ...Front fog light...Rear combination lights ...Back-up light/Tail light ...Rear gate light ...License plate light ...Dome light...Map light ...Vanity mirror light ...Door step light...Cargo area light ... 11-45 11-45 11-46 11-47 11-47 11-47...
... 11-33 11-33 11-34 11-35 11-35 Battery...Fuses ...Main fuse ...Installation of accessories...Replacing bulbs ...Headlights (Vehicles with HID headlights) ...Headlights (Vehicles without HID headlights) ...Parking light (right-hand side)... 11-37 11-38 11-39 11-40 11-41 11-42 11-43 11-...44 Front turn signal light (right-hand side) ...Front fog light...Rear combination lights ...Back-up light/Tail light ...Rear gate light ...License plate light ...Dome light...Map light ...Vanity mirror light ...Door step light...Cargo area light ... 11-45 11-45 11-46 11-47 11-47 11-47...
Owner's Manual
Page 364
.../refit the headlight assemblies, or remove any bulb only with a new bulb of the headlights. 11-42 Maintenance and service Wattage 1) 2) High beam headlight Low beam headlight Vehicle with HID light Vehicle without HID light 3) 4) 5) 6) Front turn signal/Parking light Parking/Front side marker light Map light Dome light Vehicles with HID headlights) WARNING High-intensity-discharge (HID...
.../refit the headlight assemblies, or remove any bulb only with a new bulb of the headlights. 11-42 Maintenance and service Wattage 1) 2) High beam headlight Low beam headlight Vehicle with HID light Vehicle without HID light 3) 4) 5) 6) Front turn signal/Parking light Parking/Front side marker light Map light Dome light Vehicles with HID headlights) WARNING High-intensity-discharge (HID...
Owner's Manual
Page 365
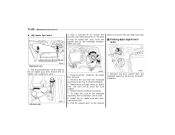
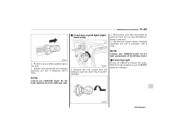
Low beam light bulbs (right-hand side) 2. If headlight aiming is required, consult your SUBARU dealer for proper adjustment of the left-hand side. - CONTINUED - Disconnect the electrical connector. 4. Reconnect the electrical connector. 7. NOTE Contact your SUBARU dealer for the bulb replacement of the headlight aim. ....the air intake duct, then remove the air intake duct. 3. NOTE . Have the bulbs replaced by your SUBARU dealer if necessary. 1. Remove the retainer spring. 5. Install the bulb cover with the clips. Use a screwdriver to break. It may be difficult to undo...
Low beam light bulbs (right-hand side) 2. If headlight aiming is required, consult your SUBARU dealer for proper adjustment of the left-hand side. - CONTINUED - Disconnect the electrical connector. 4. Reconnect the electrical connector. 7. NOTE Contact your SUBARU dealer for the bulb replacement of the headlight aim. ....the air intake duct, then remove the air intake duct. 3. NOTE . Have the bulbs replaced by your SUBARU dealer if necessary. 1. Remove the retainer spring. 5. Install the bulb cover with the clips. Use a screwdriver to break. It may be difficult to undo...
Owner's Manual
Page 366
... the electrical connector from the headlight assembly by turning it counterclockwise. 5. To install the bulb to the horizontal direction. (left -hand side) & Parking light (right-hand side) Right-hand side 1. Remove the bulb socket from the headlight assembly by clip. (left -hand side) place and secure it by turning it clicks. 8. 11-44...
... the electrical connector from the headlight assembly by turning it counterclockwise. 5. To install the bulb to the horizontal direction. (left -hand side) & Parking light (right-hand side) Right-hand side 1. Remove the bulb socket from the headlight assembly by clip. (left -hand side) place and secure it by turning it clicks. 8. 11-44...
Owner's Manual
Page 367
... may be difficult to replace the bulbs. Set the bulb socket into the headlight assembly and turn signal light (righthand side) 2. Install a new bulb. 3. NOTE Contact your SUBARU dealer for the bulb replacement of the left -hand side. & Front fog light 2. Install a new bulb. 3. NOTE Contact your SUBARU dealer if necessary. 1. Remove the bulb from the headlight assembly by turning...
... may be difficult to replace the bulbs. Set the bulb socket into the headlight assembly and turn signal light (righthand side) 2. Install a new bulb. 3. NOTE Contact your SUBARU dealer for the bulb replacement of the left -hand side. & Front fog light 2. Install a new bulb. 3. NOTE Contact your SUBARU dealer if necessary. 1. Remove the bulb from the headlight assembly by turning...

Owner's Manual
Page 368
... locks. 6. Using a Phillips screwdriver, remove the upper and lower screws. Then, slide Reinstall the rear combination light assembly by inserting the tip of the vehicle side. 7. Install a new bulb. 5. 11-46 Maintenance and service & Rear combination lights the rear combination lamp assembly rearward and remove it from the socket by turning it counterclockwise...
... locks. 6. Using a Phillips screwdriver, remove the upper and lower screws. Then, slide Reinstall the rear combination light assembly by inserting the tip of the vehicle side. 7. Install a new bulb. 5. 11-46 Maintenance and service & Rear combination lights the rear combination lamp assembly rearward and remove it from the socket by turning it counterclockwise...

Owner's Manual
Page 369
... the rear gate. & License plate light 1. Use a flat-head screwdriver to remove the light cover from the rear gate trim. 1) 2) Tail light Back-up light/Tail light 2. Pull the bulb out of the bulb socket and replace it with a new one . 4. Install the bulb socket by turning it . 3. Pull the bulb out of the bulb socket and replace it with...
... the rear gate. & License plate light 1. Use a flat-head screwdriver to remove the light cover from the rear gate trim. 1) 2) Tail light Back-up light/Tail light 2. Pull the bulb out of the bulb socket and replace it with a new one . 4. Install the bulb socket by turning it . 3. Pull the bulb out of the bulb socket and replace it with...

Owner's Manual
Page 370
... 11-48 Maintenance and service 1. Set the bulb socket into the gap between the license plate light assembly and the rear gate. 2. Wrap a flat-head screwdriver in vinyl tape or cloth, insert it counterclockwise. 4. Pull the bulb out of the lens with Rear Seat Entertainment ...Vehicles without Rear Seat Entertainment 1. Vehicles with a flat-head screwdriver. Remove the bulb socket from the license plate light assembly by prying the edge of the socket. Remove...
... 11-48 Maintenance and service 1. Set the bulb socket into the gap between the license plate light assembly and the rear gate. 2. Wrap a flat-head screwdriver in vinyl tape or cloth, insert it counterclockwise. 4. Pull the bulb out of the lens with Rear Seat Entertainment ...Vehicles without Rear Seat Entertainment 1. Vehicles with a flat-head screwdriver. Remove the bulb socket from the license plate light assembly by prying the edge of the socket. Remove...

Owner's Manual
Page 371
... at its ends are aligned vertically. Remove the lens by prying the edge of the lens with a flat-head screwdriver. 2. Reinstall the lens. & Vanity mirror light 2. Install a new bulb. 3. Pull the bulb - CONTINUED - Reinstall the lens. 1. Remove the lens by prying the edge of the lens with a flat-head screwdriver. 1. Pull the...
... at its ends are aligned vertically. Remove the lens by prying the edge of the lens with a flat-head screwdriver. 2. Reinstall the lens. & Vanity mirror light 2. Install a new bulb. 3. Pull the bulb - CONTINUED - Reinstall the lens. 1. Remove the lens by prying the edge of the lens with a flat-head screwdriver. 1. Pull the...

Owner's Manual
Page 372
.... Reinstall the lens. & Door step light It may be difficult to replace the bulbs. Remove the lens from the cargo area light assembly. Have the bulbs replaced by prying the edge of the light with a flathead screwdriver. 2. Remove the cargo area light assembly by your SUBARU dealer if necessary. 1. Pull the bulb out of the socket. 11-50...
.... Reinstall the lens. & Door step light It may be difficult to replace the bulbs. Remove the lens from the cargo area light assembly. Have the bulbs replaced by prying the edge of the light with a flathead screwdriver. 2. Remove the cargo area light assembly by your SUBARU dealer if necessary. 1. Pull the bulb out of the socket. 11-50...

Owner's Manual
Page 380
HB3 Vanity mirror light Door step light Rear gate light 12-8 Specifications Bulb chart Description High beam headlight Low beam headlight Vehicles with HID light Vehicles without HID light Fog light Front turn signal/Parking light Parking/Front side marker light Rear combination light Rear turn signal light Brake/tail Tail light Back-up light License plate light Cargo area light Dome light Vehicles with Rear Seat...
HB3 Vanity mirror light Door step light Rear gate light 12-8 Specifications Bulb chart Description High beam headlight Low beam headlight Vehicles with HID light Vehicles without HID light Fog light Front turn signal/Parking light Parking/Front side marker light Rear combination light Rear turn signal light Brake/tail Tail light Back-up light License plate light Cargo area light Dome light Vehicles with Rear Seat...
Owner's Manual
Page 398
...system ...4-5 Automatic transmission ...7-12 Capacities ...12-3 Fluid...11-15 MANUAL mode ...7-15 Selector lever ...7-13 Shift lock release ...7-17 Temperature warning light (AT OIL TEMP)...3-13 Automatic/Emergency Locking Retractor (A/ELR) ...1-17 B Battery ...11-37 Jump starting ...9-11 Replacement (Remote keyless entry system......7-19 Brake pedal Free play...11-21 Reserve distance...11-22 Brake system...7-19 Warning light...3-16 Braking ...7-18 Tips ...7-18 Breaking-in of new brake pads and linings...11-22 Bulb Chart ...12-8 Replacing ...11-41 C Capacities ...12-3 Cargo area Cover...6-13
...system ...4-5 Automatic transmission ...7-12 Capacities ...12-3 Fluid...11-15 MANUAL mode ...7-15 Selector lever ...7-13 Shift lock release ...7-17 Temperature warning light (AT OIL TEMP)...3-13 Automatic/Emergency Locking Retractor (A/ELR) ...1-17 B Battery ...11-37 Jump starting ...9-11 Replacement (Remote keyless entry system......7-19 Brake pedal Free play...11-21 Reserve distance...11-22 Brake system...7-19 Warning light...3-16 Braking ...7-18 Tips ...7-18 Breaking-in of new brake pads and linings...11-22 Bulb Chart ...12-8 Replacing ...11-41 C Capacities ...12-3 Cargo area Cover...6-13
Owner's Manual
Page 403
... (keyless entry system)...2-11 Replacing bulbs ...11-41 Backup light/Tail light ...11-47 Cargo area light ...11-50 Clearance light ...11-44 Dome light ...11-48 Door step light ...11-50 Front fog light ...11-45 Front turn signal light...11-45 Headlight ...11-42 License plate light ...11-47 Map light...11-49 Rear combination light ...11-46 Rear gate...
... (keyless entry system)...2-11 Replacing bulbs ...11-41 Backup light/Tail light ...11-47 Cargo area light ...11-50 Clearance light ...11-44 Dome light ...11-48 Door step light ...11-50 Front fog light ...11-45 Front turn signal light...11-45 Headlight ...11-42 License plate light ...11-47 Map light...11-49 Rear combination light ...11-46 Rear gate...


