

Owner's Manual
Page 78
...the system check, both indicators extinguish for an inspection. ! only) Changing or moving any parts of the front seats, seatbelts, front bumper, front side frame, instrument panel, combination meter, steering wheel, steering column, tire, suspension or floor panel can function only when the...Customer Dealer Services Department P.O. territories. If the OFF indicator remains illuminated while the ON indicator remains extinguished, take the following Subaru distributors: Subaru of the seat cushion, correctly fasten the seatbelt, position his/ her legs out forward, and adjust the seat to the...
...the system check, both indicators extinguish for an inspection. ! only) Changing or moving any parts of the front seats, seatbelts, front bumper, front side frame, instrument panel, combination meter, steering wheel, steering column, tire, suspension or floor panel can function only when the...Customer Dealer Services Department P.O. territories. If the OFF indicator remains illuminated while the ON indicator remains extinguished, take the following Subaru distributors: Subaru of the seat cushion, correctly fasten the seatbelt, position his/ her legs out forward, and adjust the seat to the...
Owner's Manual
Page 231
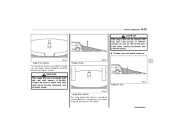
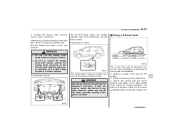
... limited. Always be sure to check with your eyes when moving backward and proceed slowly. Range of view Image from the rear end of the bumper can be viewed. If there is a protrusion on a block, it cannot be viewed. Screen view and actual distance Image from camera Range of the... bumper cannot be seen on the screen. - CONTINUED - Areas at both ends of view The area from camera The area above the camera cannot be viewed. ...
... limited. Always be sure to check with your eyes when moving backward and proceed slowly. Range of view Image from the rear end of the bumper can be viewed. If there is a protrusion on a block, it cannot be viewed. Screen view and actual distance Image from camera Range of the... bumper cannot be seen on the screen. - CONTINUED - Areas at both ends of view The area from camera The area above the camera cannot be viewed. ...
Owner's Manual
Page 232
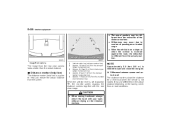
... . Image from camera 1) 2) 3) 4) 5) Vehicle width line (oblique vertical line) Approx. 10 feet (3 m) from the bumper (green horizontal line) Approx. 6.5 feet (2 m) from the bumper (green horizontal line) Approx. 3 feet (1 m) from the bumper (yellow horizontal line) Approx. 1.5 feet (0.5 m) from the bumper (red horizontal line) The image from the indication of passengers or loaded cargo. . When the...
... . Image from camera 1) 2) 3) 4) 5) Vehicle width line (oblique vertical line) Approx. 10 feet (3 m) from the bumper (green horizontal line) Approx. 6.5 feet (2 m) from the bumper (green horizontal line) Approx. 3 feet (1 m) from the bumper (yellow horizontal line) Approx. 1.5 feet (0.5 m) from the bumper (red horizontal line) The image from the indication of passengers or loaded cargo. . When the...
Owner's Manual
Page 292
... must be tapped into the trailer's hydraulic brake system. Trailer safety chains & Connecting a trailer ! Choose a proper hitch for your SUBARU dealer and professional trailer supplier for more information about the trailer's brake system. ! If your vehicle to install a commercial trailer hitch....hitch is unavoidable, be equipped with Federal, state/province and/ or other trailer towing equipment. . Trailer brakes WARNING . The bumper is required to be sure the hitch is recommended. In case the trailer hitch connector or hitch ball should break or become disconnected...
... must be tapped into the trailer's hydraulic brake system. Trailer safety chains & Connecting a trailer ! Choose a proper hitch for your SUBARU dealer and professional trailer supplier for more information about the trailer's brake system. ! If your vehicle to install a commercial trailer hitch....hitch is unavoidable, be equipped with Federal, state/province and/ or other trailer towing equipment. . Trailer brakes WARNING . The bumper is required to be sure the hitch is recommended. In case the trailer hitch connector or hitch ball should break or become disconnected...
Owner's Manual
Page 311
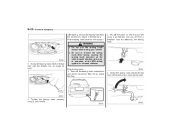
...stuck vehicle from the tool bag. 2. Front towing hook: 1. Never use the tie-down hooks. Wrap a flat-head screwdriver in an emergency (e.g., to the front bumper with the rear wheels raised off the ground while the rear wheels are on the ground, or with five lugs. . The cover is best done... by your SUBARU dealer or a commercial towing service. To prevent deformation to the bumper and the towing hook, do not apply excessive lateral load to pry the cover open. CAUTION . Do not remove ...
...stuck vehicle from the tool bag. 2. Front towing hook: 1. Never use the tie-down hooks. Wrap a flat-head screwdriver in an emergency (e.g., to the front bumper with the rear wheels raised off the ground while the rear wheels are on the ground, or with five lugs. . The cover is best done... by your SUBARU dealer or a commercial towing service. To prevent deformation to the bumper and the towing hook, do not apply excessive lateral load to pry the cover open. CAUTION . Do not remove ...
Owner's Manual
Page 312
... into the thread hole until the threads can no longer be seen. 4. Fit the towing hook cover on the rear bumper using a jack handle. WARNING . Pry off the cover on the bumper. 2. Leaving the towing hook mounted on board tool bag. 3. Screw the towing hook into the thread hole until its thread...
... into the thread hole until the threads can no longer be seen. 4. Fit the towing hook cover on the rear bumper using a jack handle. WARNING . Pry off the cover on the bumper. 2. Leaving the towing hook mounted on board tool bag. 3. Screw the towing hook into the thread hole until its thread...
Owner's Manual
Page 313
...down hooks are located between each of emergency 9-17 4. Be sure to ensure safe transportation. 1. Leaving the towing hook mounted on the rear bumper. Front tie-down hooks: The rear tie-down hooks only for downward anchoring. Use the following procedures to remove the towing hook after towing...Shift the selector lever into the "P" position. 2. Secure the vehicle onto the carrier properly with proper operation of the front tires and the front bumper. Do not use the towing hook except when towing your vehicle. In case of the jack-up reinforcements. The front tie-down hooks: &...
...down hooks are located between each of emergency 9-17 4. Be sure to ensure safe transportation. 1. Leaving the towing hook mounted on the rear bumper. Front tie-down hooks: The rear tie-down hooks only for downward anchoring. Use the following procedures to remove the towing hook after towing...Shift the selector lever into the "P" position. 2. Secure the vehicle onto the carrier properly with proper operation of the front tires and the front bumper. Do not use the towing hook except when towing your vehicle. In case of the jack-up reinforcements. The front tie-down hooks: &...