
Owner's Manual
Page 78
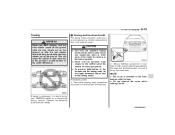
... on the side of the Subaru advanced airbag system. Now, the ON indicator should illuminate while the OFF indicator remains extinguished. If the OFF indicator still illuminates while the ON indicator remains extinguished, ask the occupant to move to the rear seat and immediately contact your .... If you are currently no articles, books, shoes, or other U.S. If you have any parts of the front seats, seatbelts, front bumper, front side frame, instrument panel, combination meter, steering wheel, steering column, tire, suspension or floor panel can function only when the ignition...
... on the side of the Subaru advanced airbag system. Now, the ON indicator should illuminate while the OFF indicator remains extinguished. If the OFF indicator still illuminates while the ON indicator remains extinguished, ask the occupant to move to the rear seat and immediately contact your .... If you are currently no articles, books, shoes, or other U.S. If you have any parts of the front seats, seatbelts, front bumper, front side frame, instrument panel, combination meter, steering wheel, steering column, tire, suspension or floor panel can function only when the ignition...
Owner's Manual
Page 231
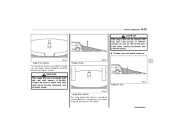
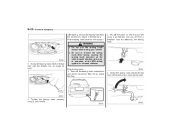
... Range of view The area from camera The area above the camera cannot be seen on the screen. - CONTINUED - Areas at both ends of the bumper can be viewed. If there is a protrusion on a block, it cannot be viewed. Always be sure to check with the... rear view camera is limited. Range of view Image from the rear end of the bumper cannot be viewed. Interior equipment 6-23 CAUTION The range that can be sure to check with the rear view camera is limited. CAUTION The range that can be...
... Range of view The area from camera The area above the camera cannot be seen on the screen. - CONTINUED - Areas at both ends of the bumper can be viewed. If there is a protrusion on a block, it cannot be viewed. Always be sure to check with the... rear view camera is limited. Range of view Image from the rear end of the bumper cannot be viewed. Interior equipment 6-23 CAUTION The range that can be sure to check with the rear view camera is limited. CAUTION The range that can be...
Owner's Manual
Page 232
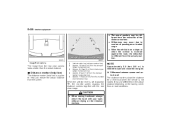
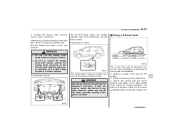
...Vehicle width line (oblique vertical line) Approx. 10 feet (3 m) from the bumper (green horizontal line) Approx. 6.5 feet (2 m) from the bumper (green horizontal line) Approx. 3 feet (1 m) from the bumper (yellow horizontal line) Approx. 1.5 feet (0.5 m) from the bumper (red horizontal line) The image from the screen. NOTE Approximately 2.6 feet (0.8... vehicle is a guide to number of the distance markers. . When moving backward, always check the back with the rear view image. 6-24 Interior equipment . It may be different from the indication of passengers or loaded cargo. . The...
...Vehicle width line (oblique vertical line) Approx. 10 feet (3 m) from the bumper (green horizontal line) Approx. 6.5 feet (2 m) from the bumper (green horizontal line) Approx. 3 feet (1 m) from the bumper (yellow horizontal line) Approx. 1.5 feet (0.5 m) from the bumper (red horizontal line) The image from the screen. NOTE Approximately 2.6 feet (0.8... vehicle is a guide to number of the distance markers. . When moving backward, always check the back with the rear view image. 6-24 Interior equipment . It may be different from the indication of passengers or loaded cargo. . The...
Owner's Manual
Page 292
...rear bumper. Adequate size trailer brakes are recommended, and must be equipped with a professional hitch supplier to coupling damage or hitch ball damage. For all of the hitch manufacturer's instructions for your vehicle. Check that the hitch mounting bolts and nuts are tight. Your SUBARU...453 kg), the trailer is recommended. could create a traffic safety hazard if the trailer separates from your SUBARU dealer. Please ask your SUBARU dealer and professional trailer supplier for your vehicle and trailer. Do not directly connect your trailer's hydraulic brake ...
...rear bumper. Adequate size trailer brakes are recommended, and must be equipped with a professional hitch supplier to coupling damage or hitch ball damage. For all of the hitch manufacturer's instructions for your vehicle. Check that the hitch mounting bolts and nuts are tight. Your SUBARU...453 kg), the trailer is recommended. could create a traffic safety hazard if the trailer separates from your SUBARU dealer. Please ask your SUBARU dealer and professional trailer supplier for your vehicle and trailer. Do not directly connect your trailer's hydraulic brake ...
Owner's Manual
Page 311
... screwdriver in an emergency (e.g., to pry the cover open. Do not remove the cover while holding the slit. If towing is best done by your SUBARU dealer or a commercial towing service. Front towing hook: 1. This will cause the vehicle to spin away due to the operation or deterioration of the ...center differential. & Towing and tie-down hook closest to the front bumper with the rear wheels raised off the ground while the front wheels are on the ground, or with five lugs. . In case of emergency 9-15 Towing ...
... screwdriver in an emergency (e.g., to pry the cover open. Do not remove the cover while holding the slit. If towing is best done by your SUBARU dealer or a commercial towing service. Front towing hook: 1. This will cause the vehicle to spin away due to the operation or deterioration of the ...center differential. & Towing and tie-down hook closest to the front bumper with the rear wheels raised off the ground while the front wheels are on the ground, or with five lugs. . In case of emergency 9-15 Towing ...
Owner's Manual
Page 312
Pry off the cover on the bumper. 2. Rear towing hook: 1. Screw the towing hook into the thread hole until the threads can no longer be seen. 4. Do not use the towing hook except ... . Tighten the towing hook securely using a screwdriver, and you will find a threaded hole for attaching the towing hook. Fit the towing hook cover on the rear bumper using a jack handle. Screw the towing hook into the thread hole until its thread can no longer be seen. 3. 9-16 In case of emergency After...
Pry off the cover on the bumper. 2. Rear towing hook: 1. Screw the towing hook into the thread hole until the threads can no longer be seen. 4. Do not use the towing hook except ... . Tighten the towing hook securely using a screwdriver, and you will find a threaded hole for attaching the towing hook. Fit the towing hook cover on the rear bumper using a jack handle. Screw the towing hook into the thread hole until its thread can no longer be seen. 3. 9-16 In case of emergency After...
Owner's Manual
Page 313
... pedal firmly. 3. After towing, remove the towing hook from the vehicle and stow it in a frontal collision. Front tie-down hooks: The rear tie-down hooks are used to anchor the vehicle in any other direction, cables may slip off the hooks, possibly causing a dangerous situation. This... the towing hook except when towing your vehicle. Leaving the towing hook mounted on the rear bumper. Secure the vehicle onto the carrier properly with proper operation of the front tires and the front bumper. Tighten the towing hook securely using a wheel nut wrench. The front tie-down hooks...
... pedal firmly. 3. After towing, remove the towing hook from the vehicle and stow it in a frontal collision. Front tie-down hooks: The rear tie-down hooks are used to anchor the vehicle in any other direction, cables may slip off the hooks, possibly causing a dangerous situation. This... the towing hook except when towing your vehicle. Leaving the towing hook mounted on the rear bumper. Secure the vehicle onto the carrier properly with proper operation of the front tires and the front bumper. Tighten the towing hook securely using a wheel nut wrench. The front tie-down hooks...

