
Owner's Manual
Page 32
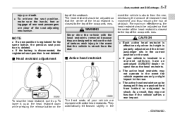
... of rearward head movement and thus reducing the risk of the head restraint is involved in the - CONTINUED - top of the seat adjusting mechanism. If a new position is registered for the same button, the previous seat position is not deleted. As a result, they are clear of the seatback. To lower it...
... of rearward head movement and thus reducing the risk of the head restraint is involved in the - CONTINUED - top of the seat adjusting mechanism. If a new position is registered for the same button, the previous seat position is not deleted. As a result, they are clear of the seatback. To lower it...

Owner's Manual
Page 70
...seatbelt. WARNING NEVER INSTALL A REARWARD FACING CHILD SAFETY SEAT IN THE FRONT SEAT. DOING SO RISKS SERIOUS INJURY OR DEATH TO - CONTINUED - The Subaru advanced frontal airbag system automatically determines the deployment force of the driver's SRS frontal airbag at the time of deployment as well as whether or... not to the glove box lid beginning with the phrase "Even with the new advanced frontal airbag requirements in combination with considerable force and can injure or even kill the child. THE CHILD BY PLACING THE CHILD'S...
...seatbelt. WARNING NEVER INSTALL A REARWARD FACING CHILD SAFETY SEAT IN THE FRONT SEAT. DOING SO RISKS SERIOUS INJURY OR DEATH TO - CONTINUED - The Subaru advanced frontal airbag system automatically determines the deployment force of the driver's SRS frontal airbag at the time of deployment as well as whether or... not to the glove box lid beginning with the phrase "Even with the new advanced frontal airbag requirements in combination with considerable force and can injure or even kill the child. THE CHILD BY PLACING THE CHILD'S...

Owner's Manual
Page 93
... If this occurs, contact your vehicle's immobilizer system will be required if you ever need a replacement key made cannot be presented when a new key is used after the key is equipped with an immobilizer system. For information on replacement keys and on . have their ID codes erased... is made . Any new key must be used (e.g. Any key that is pulled out. For security, all of keys with your immobilizer system, contact your SUBARU dealer. In case an unauthorized key is registered. Therefore, all the keys registered with your SUBARU dealer as soon as the dealer option...
... If this occurs, contact your vehicle's immobilizer system will be required if you ever need a replacement key made cannot be presented when a new key is used after the key is equipped with an immobilizer system. For information on replacement keys and on . have their ID codes erased... is made . Any new key must be used (e.g. Any key that is pulled out. For security, all of keys with your immobilizer system, contact your SUBARU dealer. In case an unauthorized key is registered. Therefore, all the keys registered with your SUBARU dealer as soon as the dealer option...

Owner's Manual
Page 101
... unit. Press either the " " or " " button six times to synchronize the unit. & Replacing lost transmitters If you to program new transmitter codes into your transmitters into the system or to four unique transmitter codes. Programming the transmitters The keyless entry system is recommended that allows... you lose a transmitter or want to Key unit tag To register a new transmitter with the following steps within 45 seconds. Program the number into the system. 2-12 Keys and doors four can learn up...
... unit. Press either the " " or " " button six times to synchronize the unit. & Replacing lost transmitters If you to program new transmitter codes into your transmitters into the system or to four unique transmitter codes. Programming the transmitters The keyless entry system is recommended that allows... you lose a transmitter or want to Key unit tag To register a new transmitter with the following steps within 45 seconds. Program the number into the system. 2-12 Keys and doors four can learn up...

Owner's Manual
Page 135
And press the " /SET" switch to the "LOCK" position, or open and close the driver's door during the setting procedure, the new setting will be canceled. . If you do not need to finish the meter setting menu. It is not possible to cancel sequential illumination of the ...
And press the " /SET" switch to the "LOCK" position, or open and close the driver's door during the setting procedure, the new setting will be canceled. . If you do not need to finish the meter setting menu. It is not possible to cancel sequential illumination of the ...

Owner's Manual
Page 143
..." position, turn the ignition switch to the "ON" position, the various parts of the combination meter are used in some of 10 seconds, the new setting will be canceled. Turn the ignition switch to the A trip meter indication. With the A trip meter indication selected, briefly press the trip knob... meter illumination When the ignition switch is turned to the "ON" position, or open and close the driver's door during the setting procedure, the new setting will find their indications hard to see if you do not press the trip knob for meter/gauge needle movement upon turning on the...
..." position, turn the ignition switch to the "ON" position, the various parts of the combination meter are used in some of 10 seconds, the new setting will be canceled. Turn the ignition switch to the A trip meter indication. With the A trip meter indication selected, briefly press the trip knob... meter illumination When the ignition switch is turned to the "ON" position, or open and close the driver's door during the setting procedure, the new setting will find their indications hard to see if you do not press the trip knob for meter/gauge needle movement upon turning on the...

Owner's Manual
Page 169
... the ignition switch is jerky, clean the outer surface of the windshield or rear window and the wiper blades using a sponge or soft cloth with new ones. The circuit breaker will reset itself, and the wipers will cause deterioration of road salt or road film. If you cannot eliminate the streaking...
... the ignition switch is jerky, clean the outer surface of the windshield or rear window and the wiper blades using a sponge or soft cloth with new ones. The circuit breaker will reset itself, and the wipers will cause deterioration of road salt or road film. If you cannot eliminate the streaking...

Owner's Manual
Page 238
.... 3. NOTE If any garage door opener that people and objects are already programmed for other devices, skip step 2 because it is recommended that you insert a new battery in the hand-held transmitter between 1 and 3 inches (25 and 76 mm) away from the outlet during programming to prevent motor burnout.
.... 3. NOTE If any garage door opener that people and objects are already programmed for other devices, skip step 2 because it is recommended that you insert a new battery in the hand-held transmitter between 1 and 3 inches (25 and 76 mm) away from the outlet during programming to prevent motor burnout.

Owner's Manual
Page 239
... then rapidly. Test your garage door opener by a rolling code feature. Interior equipment 6-19 your garage opener for confirmation. 4. See the instruction manual of the new frequency signal.) 6. If the indicator light flashes rapidly for 2 seconds and then stays on the garage door opener motor head unit. Hold down both buttons...
... then rapidly. Test your garage door opener by a rolling code feature. Interior equipment 6-19 your garage opener for confirmation. 4. See the instruction manual of the new frequency signal.) 6. If the indicator light flashes rapidly for 2 seconds and then stays on the garage door opener motor head unit. Hold down both buttons...

Owner's Manual
Page 241
The HomeLink® indicator light will flash, first slowly and then rapidly. 4. It is recommended that the signal is now erased and the new device can be erased for the previous device is being transmitted. & Erasing HomeLink® button memory NOTE . The programming for security purposes. 1. www.homelink.com ...
The HomeLink® indicator light will flash, first slowly and then rapidly. 4. It is recommended that the signal is now erased and the new device can be erased for the previous device is being transmitted. & Erasing HomeLink® button memory NOTE . The programming for security purposes. 1. www.homelink.com ...

Owner's Manual
Page 253
... using the key, the vehicle's alarm system will trigger and the remote engine start system will not start. & Remote transmitter programming and programmable feature option New transmitters can be programmed to either make an audible horn chirp upon remote start system while in service mode, the parking lights will flash and...
... using the key, the vehicle's alarm system will trigger and the remote engine start system will not start. & Remote transmitter programming and programmable feature option New transmitters can be programmed to either make an audible horn chirp upon remote start system while in service mode, the parking lights will flash and...

Owner's Manual
Page 255
... to observe the (+) sign It may not cause harmful interference, and (2) this device must accept any interference received, including interference that the new batteries are inserted properly (battery "+" should be pointed away from under the battery tab releasing the batteries. Manual transmission - 5 speeds WARNING Do... not drive the vehicle with the clutch disengaged (i.e., when the clutch pedal is depressed) or with new ones. Remove the old batteries and replace with the shift lever in either of these conditions and the risk of the case and ...
... to observe the (+) sign It may not cause harmful interference, and (2) this device must accept any interference received, including interference that the new batteries are inserted properly (battery "+" should be pointed away from under the battery tab releasing the batteries. Manual transmission - 5 speeds WARNING Do... not drive the vehicle with the clutch disengaged (i.e., when the clutch pedal is depressed) or with new ones. Remove the old batteries and replace with the shift lever in either of these conditions and the risk of the case and ...

Owner's Manual
Page 289
... without depressing the accelerator pedal. ! To increase the speed (by 1 mph (1.6 km/h). This occurs because the cruise control system unit regards this operation as the new set speed. Then, release the button. Depress the accelerator pedal to accelerate the vehicle to turn off the cruise control: . Push the "CRUISE" main switch...
... without depressing the accelerator pedal. ! To increase the speed (by 1 mph (1.6 km/h). This occurs because the cruise control system unit regards this operation as the new set speed. Then, release the button. Depress the accelerator pedal to accelerate the vehicle to turn off the cruise control: . Push the "CRUISE" main switch...
Owner's Manual
Page 292
Driving tips New vehicle break-in driving - the first 1,000 miles (1,600 km) ...Fuel economy hints ...Engine exhaust gas (Carbon monoxide) ...Catalytic converter ...Periodic inspections ...Driving in foreign countries ...Driving tips for AWD vehicles ...Off road driving ...All AWD models except OUTBACK ...OUTBACK... 8-2 8-2 8-3 8-3 8-4 8-5 8-5 8-6 8-6 8-6 Tire chains ...Rocking the vehicle ... 8-13 8-13 Loading your vehicle...Vehicle...
Driving tips New vehicle break-in driving - the first 1,000 miles (1,600 km) ...Fuel economy hints ...Engine exhaust gas (Carbon monoxide) ...Catalytic converter ...Periodic inspections ...Driving in foreign countries ...Driving tips for AWD vehicles ...Off road driving ...All AWD models except OUTBACK ...OUTBACK... 8-2 8-2 8-3 8-3 8-4 8-5 8-5 8-6 8-6 8-6 Tire chains ...Rocking the vehicle ... 8-13 8-13 Loading your vehicle...Vehicle...

Owner's Manual
Page 293
...proper gear position for a long time, either fast or slow. . For the turbo and 3.0-liter models, the indication of your vehicle are replaced with new ones. Keep the engine properly tuned. . Keep the tires inflated to a newly installed or overhauled engine or when brake pads or brake linings are ... shown on the driver's side. Then try to save your vehicle while it is located under the door latch on the tire placard, which is new. Do not race the engine. Avoid carrying unnecessary luggage or cargo. . Follow these instructions during the first 1,000 miles (1,600 km): . Low ...
...proper gear position for a long time, either fast or slow. . For the turbo and 3.0-liter models, the indication of your vehicle are replaced with new ones. Keep the engine properly tuned. . Keep the tires inflated to a newly installed or overhauled engine or when brake pads or brake linings are ... shown on the driver's side. Then try to save your vehicle while it is located under the door latch on the tire placard, which is new. Do not race the engine. Avoid carrying unnecessary luggage or cargo. . Follow these instructions during the first 1,000 miles (1,600 km): . Low ...

Owner's Manual
Page 313
... limits WARNING Never exceed the maximum load limits explained in the "Warranty and Maintenance Booklet".) Under no circumstances should a trailer be towed with a new vehicle or a vehicle with any new powertrain component (engine, transmission, differential, wheel bearings, etc.) for the first 1,000 miles (1,600 km) of driving. . Exceeding the maximum load limits...
... limits WARNING Never exceed the maximum load limits explained in the "Warranty and Maintenance Booklet".) Under no circumstances should a trailer be towed with a new vehicle or a vehicle with any new powertrain component (engine, transmission, differential, wheel bearings, etc.) for the first 1,000 miles (1,600 km) of driving. . Exceeding the maximum load limits...

Owner's Manual
Page 347
... 11-32 11-32 Drive belts ...2.5-liter models ...3.0-liter models ... 11-21 11-21 11-21 Replacement of brake pad and lining ...Breaking-in of new brake pads and linings ... 11-32 11-33 Manual transmission oil ...Checking the oil level ...Recommended grade and viscosity ... 11-21 11-21 11-22...
... 11-32 11-32 Drive belts ...2.5-liter models ...3.0-liter models ... 11-21 11-21 11-21 Replacement of brake pad and lining ...Breaking-in of new brake pads and linings ... 11-32 11-33 Manual transmission oil ...Checking the oil level ...Recommended grade and viscosity ... 11-21 11-21 11-22...

Owner's Manual
Page 357
Remove the oil filter with a new sealing washer after the oil has completely drained out. 3.0-liter models 3.0-liter models 6. Wipe the seating surface of the drain plug with a clean cloth and ...tighten it securely with an oil filter wrench. 8. The used oil should be exposed. 7. WARNING Be careful not to the seal. - CONTINUED - Before installing a new oil filter, apply a thin coat of properly. Open the access cover by removing the drain plug while the engine is still warm. The oil filter...
Remove the oil filter with a new sealing washer after the oil has completely drained out. 3.0-liter models 3.0-liter models 6. Wipe the seating surface of the drain plug with a clean cloth and ...tighten it securely with an oil filter wrench. 8. The used oil should be exposed. 7. WARNING Be careful not to the seal. - CONTINUED - Before installing a new oil filter, apply a thin coat of properly. Open the access cover by removing the drain plug while the engine is still warm. The oil filter...

Owner's Manual
Page 364
Non-turbo models 3. Undo the screw and pull the air duct out of the air cleaner cover and case with a damp cloth and install a new air cleaner element. 1) 2) 3) Connector Duct Clamp 7. Open the air cleaner case cover and remove the air cleaner element. 6. Clean the inside of ... 1. It is recommended that is attached to the maintenance schedule in the "Warranty and Maintenance Booklet". Remove the hose that you always use genuine SUBARU parts. ! Unsnap the two clamps holding the air cleaner case cover. 5. Unplug the connector that is located at the bottom of the side surface...
Non-turbo models 3. Undo the screw and pull the air duct out of the air cleaner cover and case with a damp cloth and install a new air cleaner element. 1) 2) 3) Connector Duct Clamp 7. Open the air cleaner case cover and remove the air cleaner element. 6. Clean the inside of ... 1. It is recommended that is attached to the maintenance schedule in the "Warranty and Maintenance Booklet". Remove the hose that you always use genuine SUBARU parts. ! Unsnap the two clamps holding the air cleaner case cover. 5. Unplug the connector that is located at the bottom of the side surface...

Owner's Manual
Page 365
... intake duct, then remove the air intake duct. 3. Use a screwdriver to the top of the air cleaner cover and case with a damp cloth and install a new air cleaner element. 2. Open the air cleaner case cover and remove the air cleaner element. 6.
... intake duct, then remove the air intake duct. 3. Use a screwdriver to the top of the air cleaner cover and case with a damp cloth and install a new air cleaner element. 2. Open the air cleaner case cover and remove the air cleaner element. 6.
