
Owner's Manual
Page 1
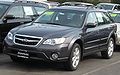
...details concerning repairs or adjustments, please contact the dealer from whom you purchased your SUBARU in excellent condition and to all models and covers all the information necessary to keep your SUBARU or the nearest SUBARU dealer. C * copyright 2007 FUJI HEAVY INDUSTRIES LTD. FUJI HEAVY INDUSTRIES LTD.,...will need the information found in this manual carefully so that you to make the same or similar changes on choosing a SUBARU vehicle. Foreword Congratulations on vehicles previously sold. We urge you may be for minimizing emission pollutants. reserves the right to...
...details concerning repairs or adjustments, please contact the dealer from whom you purchased your SUBARU in excellent condition and to all models and covers all the information necessary to keep your SUBARU or the nearest SUBARU dealer. C * copyright 2007 FUJI HEAVY INDUSTRIES LTD. FUJI HEAVY INDUSTRIES LTD.,...will need the information found in this manual carefully so that you to make the same or similar changes on choosing a SUBARU vehicle. Foreword Congratulations on vehicles previously sold. We urge you may be for minimizing emission pollutants. reserves the right to...

Owner's Manual
Page 19
models (with SI-DRIVE) 1) 2) 3) Temperature gauge (page 3-7) Tachometer (page 3-6) Shift-up indicator light (MT models) (page 3-38) 4) Speedometer (page 3-6) 5) Fuel gauge (page 3-6) 6) Trip meter A/B selection and trip meter reset knob (page 3-10) 7) ECO gauge (page 3-8) 8) Selector lever and gear position indicator (AT models) (page 3-39) 9) Multi-information display (page 3-9) 10) S# PREP indicator light (page 3-38) - CONTINUED - U.S.-spec. 17 & Combination meter !
models (with SI-DRIVE) 1) 2) 3) Temperature gauge (page 3-7) Tachometer (page 3-6) Shift-up indicator light (MT models) (page 3-38) 4) Speedometer (page 3-6) 5) Fuel gauge (page 3-6) 6) Trip meter A/B selection and trip meter reset knob (page 3-10) 7) ECO gauge (page 3-8) 8) Selector lever and gear position indicator (AT models) (page 3-39) 9) Multi-information display (page 3-9) 10) S# PREP indicator light (page 3-38) - CONTINUED - U.S.-spec. 17 & Combination meter !

Owner's Manual
Page 20
models (without SI-DRIVE) 1) 2) 3) 4) 5) 6) 7) 8) 9) Temperature gauge (page 3-27) Tachometer (page 3-26) Speedometer (page 3-24) Fuel gauge (page 3-26) Trip meter A/B selection and trip meter reset knob (page 3-25) Low fuel warning light (page 3-27) Trip meter and odometer (page 3-25) Selector lever position indicator (page 3-39) Gear position indicator (page 3-39) 18 ! U.S.-spec.
models (without SI-DRIVE) 1) 2) 3) 4) 5) 6) 7) 8) 9) Temperature gauge (page 3-27) Tachometer (page 3-26) Speedometer (page 3-24) Fuel gauge (page 3-26) Trip meter A/B selection and trip meter reset knob (page 3-25) Low fuel warning light (page 3-27) Trip meter and odometer (page 3-25) Selector lever position indicator (page 3-39) Gear position indicator (page 3-39) 18 ! U.S.-spec.

Owner's Manual
Page 21
19 ! models (with SI-DRIVE) 1) 2) 3) Temperature gauge (page 3-7) Tachometer (page 3-6) Shift-up indicator light (MT models) (page 3-38) 4) Speedometer (page 3-6) 5) Fuel gauge (page 3-6) 6) Trip meter A/B selection and trip meter reset knob (page 3-10) 7) ECO gauge (page 3-8) 8) Selector lever and gear position indicator (AT models) (page 3-39) 9) Multi-information display (page 3-9) 10) S# PREP indicator light (page 3-38) - CONTINUED - Canada-spec.
19 ! models (with SI-DRIVE) 1) 2) 3) Temperature gauge (page 3-7) Tachometer (page 3-6) Shift-up indicator light (MT models) (page 3-38) 4) Speedometer (page 3-6) 5) Fuel gauge (page 3-6) 6) Trip meter A/B selection and trip meter reset knob (page 3-10) 7) ECO gauge (page 3-8) 8) Selector lever and gear position indicator (AT models) (page 3-39) 9) Multi-information display (page 3-9) 10) S# PREP indicator light (page 3-38) - CONTINUED - Canada-spec.

Owner's Manual
Page 22
20 ! Canada-spec. models (without SI-DRIVE) 1) 2) 3) 4) 5) 6) 7) 8) 9) Temperature gauge (page 3-27) Tachometer (page 3-26) Speedometer (page 3-24) Fuel gauge (page 3-26) Trip meter A/B selection and trip meter reset knob (page 3-25) Low fuel warning light (page 3-27) Trip meter and odometer (page 3-25) Selector lever position indicator (page 3-39) Gear position indicator (page 3-39)
20 ! Canada-spec. models (without SI-DRIVE) 1) 2) 3) 4) 5) 6) 7) 8) 9) Temperature gauge (page 3-27) Tachometer (page 3-26) Speedometer (page 3-24) Fuel gauge (page 3-26) Trip meter A/B selection and trip meter reset knob (page 3-25) Low fuel warning light (page 3-27) Trip meter and odometer (page 3-25) Selector lever position indicator (page 3-39) Gear position indicator (page 3-39)
Owner's Manual
Page 23
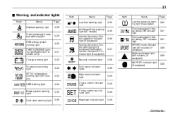
... system warning light CHECK ENGINE warning light/Malfunction indicator lamp Charge warning light Oil pressure warning light AT OIL temperature warning light (AT models) / ABS warning light Brake system warning light Door open warning light Page 3-29 Mark / Name Low fuel warning light All-Wheel... Drive warning light (AT models) Vehicle Dynamics Control operation indicator light (if equipped) Vehicle Dynamics Control warning light (if equipped)/Vehicle Dynamics Control OFF indicator light (if...
... system warning light CHECK ENGINE warning light/Malfunction indicator lamp Charge warning light Oil pressure warning light AT OIL temperature warning light (AT models) / ABS warning light Brake system warning light Door open warning light Page 3-29 Mark / Name Low fuel warning light All-Wheel... Drive warning light (AT models) Vehicle Dynamics Control operation indicator light (if equipped) Vehicle Dynamics Control warning light (if equipped)/Vehicle Dynamics Control OFF indicator light (if...
Owner's Manual
Page 30
...possibility of loss of vehicle control and of the seat . Shift the shift lever in the "P" position (AT models) or the parking brake lever is applied (MT models). 1. Register the seat position with button "1" or "2" and retrieve the seat position by pressing either button. The... position of personal injury. . Before registering the seat position, confirm that the shift lever is in the "P" position (AT models) or apply the parking brake (MT models). 2. Angle of the adjusting mechanism. . Before adjusting the seat, make sure the hands, feet and possessions of rear seat...
...possibility of loss of vehicle control and of the seat . Shift the shift lever in the "P" position (AT models) or the parking brake lever is applied (MT models). 1. Register the seat position with button "1" or "2" and retrieve the seat position by pressing either button. The... position of personal injury. . Before registering the seat position, confirm that the shift lever is in the "P" position (AT models) or apply the parking brake (MT models). 2. Angle of the adjusting mechanism. . Before adjusting the seat, make sure the hands, feet and possessions of rear seat...
Owner's Manual
Page 31
... button of your seat position to avoid the possibility of loss of vehicle control and of the seat position is applied (MT models). When any trouble or malfunction occurs during the retrieval of the seat position, stop the retrieval of seat position WARNING . Retrieval... of the seat position using the control switch for manual adjustment. 1. Shift the shift lever in the "P" position (AT models) or the parking brake lever is complete. . Perform the seat position retrieval before driving. To retrieve the seat position, make sure the hands...
... button of your seat position to avoid the possibility of loss of vehicle control and of the seat position is applied (MT models). When any trouble or malfunction occurs during the retrieval of the seat position, stop the retrieval of seat position WARNING . Retrieval... of the seat position using the control switch for manual adjustment. 1. Shift the shift lever in the "P" position (AT models) or the parking brake lever is complete. . Perform the seat position retrieval before driving. To retrieve the seat position, make sure the hands...
Owner's Manual
Page 35
To return the seatback to be used at the lowest position. Wagon models & Head restraint adjustment WARNING Never drive the vehicle with the head restraints removed because they are designed to reduce the risk of serious neck injury ... key into place and make sure that it is struck from the rear. ! Unlock the seatback by turning 1-10 Seat, seatbelt and SRS airbags ! Sedan models the key counterclockwise, and then fold the seatback down .
To return the seatback to be used at the lowest position. Wagon models & Head restraint adjustment WARNING Never drive the vehicle with the head restraints removed because they are designed to reduce the risk of serious neck injury ... key into place and make sure that it is struck from the rear. ! Unlock the seatback by turning 1-10 Seat, seatbelt and SRS airbags ! Sedan models the key counterclockwise, and then fold the seatback down .

Owner's Manual
Page 41
...any accessory such as possible on the front passenger's seat. The chime will be always used in this Owner's Manual. (Models equipped with their backward-forward position and seatback not being locked into place securely by moving the seat back and forth...(s) for unfastened seatbelt(s) will alternate between flashing and steady illumination at 15-second intervals. When the ignition switch is a passenger on your SUBARU dealer. Ensure that there is no article is twisted or reversed. For further details about canceling the warning operation, please contact your hips...
...any accessory such as possible on the front passenger's seat. The chime will be always used in this Owner's Manual. (Models equipped with their backward-forward position and seatback not being locked into place securely by moving the seat back and forth...(s) for unfastened seatbelt(s) will alternate between flashing and steady illumination at 15-second intervals. When the ignition switch is a passenger on your SUBARU dealer. Ensure that there is no article is twisted or reversed. For further details about canceling the warning operation, please contact your hips...

Owner's Manual
Page 45
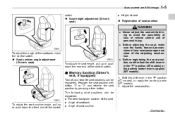
Rear center seatbelt is stowed in the recess by pulling the connector (tongue) plate. Sedan models WARNING Be sure to fasten both tongue plates to the connector's buckle on the rear shelf behind the rear seat head restraint. 1-20 Seat, seatbelt ... slot in the recess on the right-hand side), it cannot properly restrain the wearer in position in an accident, possibly resulting in the Wagon models Sedan models Wagon models Rear center seatbelt is used only as a shoulder belt (with the connector's tongue plate not fastened to the respective buckles.
Rear center seatbelt is stowed in the recess by pulling the connector (tongue) plate. Sedan models WARNING Be sure to fasten both tongue plates to the connector's buckle on the rear shelf behind the rear seat head restraint. 1-20 Seat, seatbelt ... slot in the recess on the right-hand side), it cannot properly restrain the wearer in position in an accident, possibly resulting in the Wagon models Sedan models Wagon models Rear center seatbelt is used only as a shoulder belt (with the connector's tongue plate not fastened to the respective buckles.
Owner's Manual
Page 47
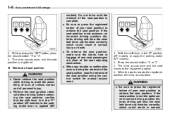
... webbing end and guide it back into the retractor while it in the connector (buckle) on the left-hand side) to roll up . Wagon models 2. Neatly store the tongue plate in the recess and then insert the connector (tongue) plate into the slot in , and the connector (tongue)... plate will disconnect from the buckle. Sedan models Insert a key or other hard pointed object into the slot. Allow the retractor to unfasten the seatbelt. 1. Unfastening the seatbelt Push the release button...
... webbing end and guide it back into the retractor while it in the connector (buckle) on the left-hand side) to roll up . Wagon models 2. Neatly store the tongue plate in the recess and then insert the connector (tongue) plate into the slot in , and the connector (tongue)... plate will disconnect from the buckle. Sedan models Insert a key or other hard pointed object into the slot. Allow the retractor to unfasten the seatbelt. 1. Unfastening the seatbelt Push the release button...
Owner's Manual
Page 48
... maintenance To clean the seatbelts, use a mild soap and lukewarm water. Replace the seatbelts even if only minor damage is found. CAUTION . Wagon models Have the seatbelt fully rolled up the seatbelt too quickly. Keep the belts free of polishes, oils, chemicals and particularly battery acid. . Do not allow ...
... maintenance To clean the seatbelts, use a mild soap and lukewarm water. Replace the seatbelts even if only minor damage is found. CAUTION . Wagon models Have the seatbelt fully rolled up the seatbelt too quickly. Keep the belts free of polishes, oils, chemicals and particularly battery acid. . Do not allow ...

Owner's Manual
Page 52
... seatbelt pretensioners. . Seat, seatbelt and SRS airbags 1-27 & Precautions against vehicle modification Always consult your SUBARU dealer if you want to install any accessory parts to your vehicle and is appropriate for individual vehicle models in the vehicle. According to accident statistics, children are designed to the front end. . Children could... the rear seat while riding in the vehicle. All child restraint systems are safer when properly restrained in the rear seating positions than genuine SUBARU accessory parts to be endangered in the front seating positions.
... seatbelt pretensioners. . Seat, seatbelt and SRS airbags 1-27 & Precautions against vehicle modification Always consult your SUBARU dealer if you want to install any accessory parts to your vehicle and is appropriate for individual vehicle models in the vehicle. According to accident statistics, children are designed to the front end. . Children could... the rear seat while riding in the vehicle. All child restraint systems are safer when properly restrained in the rear seating positions than genuine SUBARU accessory parts to be endangered in the front seating positions.

Owner's Manual
Page 72
...the head restraint removed. . Do not apply any of impact. front passenger's seat such as an audio amplifier) other than a genuine SUBARU accessory under the front passenger's seat. . If any strong impact to the WARNING Do not attach accessories to "Manual seat" in ...Subaru advanced frontal airbag system. ! Do not place a magnet near the seatbelt buckle and the seatbelt retractor. . Have the system inspected by kicking. . If liquid is normal. Do not remove or disassemble the front passenger's seat. . Failure to fail. . The inflator operates in this Owner's Manual. (Models...
...the head restraint removed. . Do not apply any of impact. front passenger's seat such as an audio amplifier) other than a genuine SUBARU accessory under the front passenger's seat. . If any strong impact to the WARNING Do not attach accessories to "Manual seat" in ...Subaru advanced frontal airbag system. ! Do not place a magnet near the seatbelt buckle and the seatbelt retractor. . Have the system inspected by kicking. . If liquid is normal. Do not remove or disassemble the front passenger's seat. . Failure to fail. . The inflator operates in this Owner's Manual. (Models...
Owner's Manual
Page 74
The seat is in the seatback pocket. . REAR seats are locked into place securely by moving the seat back and forth. (Models equipped with a booster seat and a small child is occupied by a child who have outgrown a child restraint system be killed or severely injured should the front ...
The seat is in the seatback pocket. . REAR seats are locked into place securely by moving the seat back and forth. (Models equipped with a booster seat and a small child is occupied by a child who have outgrown a child restraint system be killed or severely injured should the front ...

Owner's Manual
Page 76
... made for an inspection. ! If you have on Subaru advanced frontal airbag system operation (U.S. only) Changing or moving the seat back and forth. (Models equipped with disabilities may contact the following Subaru distributors: Subaru of the Subaru advanced airbag system. territories. Operation 1) 2) Driver's ... while the ON indicator remains extinguished, ask the occupant to move to complete self-checking. If you are currently no Subaru distributors in the "ON" position. Following the system check, both indicators extinguish for 2 seconds. Seat, seatbelt and ...
... made for an inspection. ! If you have on Subaru advanced frontal airbag system operation (U.S. only) Changing or moving the seat back and forth. (Models equipped with disabilities may contact the following Subaru distributors: Subaru of the Subaru advanced airbag system. territories. Operation 1) 2) Driver's ... while the ON indicator remains extinguished, ask the occupant to move to complete self-checking. If you are currently no Subaru distributors in the "ON" position. Following the system check, both indicators extinguish for 2 seconds. Seat, seatbelt and ...

Owner's Manual
Page 89
... an assist grip, or any other cabin surface that would be made to the driver's door pillar or specified for individual vehicle models in serious injury, no modifications should be near the SRS airbag system components and/or wiring is not advisable. Installation of additional ...parts on the front seat . CAUTION Do not perform any equipment (bush bar, winches, snow plow, skid plate, etc.) other than genuine SUBARU accessory parts. . Such modifications can interfere with proper operation of the suspension system or front end structure. . 1-64 Seat, seatbelt and SRS...
... an assist grip, or any other cabin surface that would be made to the driver's door pillar or specified for individual vehicle models in serious injury, no modifications should be near the SRS airbag system components and/or wiring is not advisable. Installation of additional ...parts on the front seat . CAUTION Do not perform any equipment (bush bar, winches, snow plow, skid plate, etc.) other than genuine SUBARU accessory parts. . Such modifications can interfere with proper operation of the suspension system or front end structure. . 1-64 Seat, seatbelt and SRS...

Owner's Manual
Page 120
...warning light/Malfunction indicator lamp ...Charge warning light...Oil pressure warning light ...AT OIL TEMPerature warning light (AT models) ...Low tire pressure warning light (U.S.-spec. models) ...ABS warning light...Brake system warning light...Low fuel warning light ...Door open warning light ...All-Wheel... Drive warning light (AT models) ...Vehicle Dynamics Control operation indicator light (if equipped)...Vehicle Dynamics Control warning light (if equipped)/Vehicle Dynamics Control OFF...
...warning light/Malfunction indicator lamp ...Charge warning light...Oil pressure warning light ...AT OIL TEMPerature warning light (AT models) ...Low tire pressure warning light (U.S.-spec. models) ...ABS warning light...Brake system warning light...Low fuel warning light ...Door open warning light ...All-Wheel... Drive warning light (AT models) ...Vehicle Dynamics Control operation indicator light (if equipped)...Vehicle Dynamics Control warning light (if equipped)/Vehicle Dynamics Control OFF...
Owner's Manual
Page 121
... ...Rear window wiper and washer switch (Station wagon) ... 3-47 3-47 3-48 3-48 3-49 3-50 3-52 Clock (Vehicle without Navigation System) ...Information display (2.5-liter non-turbo model without Navigation System) ...Outside temperature indicator ...Current fuel consumption ...Average fuel consumption ... 3-40 3-41 3-41 3-43 3-43 Windshield wiper deicer (if equipped)...Rear window defogger...
... ...Rear window wiper and washer switch (Station wagon) ... 3-47 3-47 3-48 3-48 3-49 3-50 3-52 Clock (Vehicle without Navigation System) ...Information display (2.5-liter non-turbo model without Navigation System) ...Outside temperature indicator ...Current fuel consumption ...Average fuel consumption ... 3-40 3-41 3-41 3-43 3-43 Windshield wiper deicer (if equipped)...Rear window defogger...
