
Owner's Manual
Page 12
10 Illustrated index & Exterior 1) 2) 3) 4) 5) 6) 7) 8) 9) 10) 11) Engine hood (page 11-5) Headlight switch (page 3-28) Replacing bulbs (page 11-46) Wiper switch (page 3-32) Door locks (page 2-4) Tire pressure (page 11-33) Flat tires (page 9-4) Tire chains (page 8-11) Front fog light switch (page 3-30) Tie-down hooks (page 9-13) Towing hook (page 9-13)
10 Illustrated index & Exterior 1) 2) 3) 4) 5) 6) 7) 8) 9) 10) 11) Engine hood (page 11-5) Headlight switch (page 3-28) Replacing bulbs (page 11-46) Wiper switch (page 3-32) Door locks (page 2-4) Tire pressure (page 11-33) Flat tires (page 9-4) Tire chains (page 8-11) Front fog light switch (page 3-30) Tie-down hooks (page 9-13) Towing hook (page 9-13)
Owner's Manual
Page 121
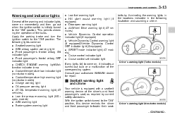
...)/Vehicle Dynamics Control OFF indicator light (if equipped) . SPORT mode indicator light (AT models) . Oil pressure warning light . ABS warning light . Consult your authorized SUBARU dealer for repair. Front passenger's frontal airbag OFF indicator light . Low tire pressure warning light (U.S.spec. All-Wheel Drive warning light (AT vehicles) . Seatbelt warning light . CHECK ENGINE warning light/Malfunction indicator lamp . Coolant temperature...
...)/Vehicle Dynamics Control OFF indicator light (if equipped) . SPORT mode indicator light (AT models) . Oil pressure warning light . ABS warning light . Consult your authorized SUBARU dealer for repair. Front passenger's frontal airbag OFF indicator light . Low tire pressure warning light (U.S.spec. All-Wheel Drive warning light (AT vehicles) . Seatbelt warning light . CHECK ENGINE warning light/Malfunction indicator lamp . Coolant temperature...

Owner's Manual
Page 132
...SPORT mode indicator light (AT vehicles) This light comes on when the ignition switch is turned to the "SPORT mode" section in the high beam mode. If this occurs, contact your SUBARU dealer as soon as possible. Replace the bulb as soon as possible. This indicator light also comes on... when the headlight flasher is operated. & Cruise control indicator light The cruise control indicator light comes on when the ignition switch is turned...
...SPORT mode indicator light (AT vehicles) This light comes on when the ignition switch is turned to the "SPORT mode" section in the high beam mode. If this occurs, contact your SUBARU dealer as soon as possible. Replace the bulb as soon as possible. This indicator light also comes on... when the headlight flasher is operated. & Cruise control indicator light The cruise control indicator light comes on when the ignition switch is turned...

Owner's Manual
Page 294
...-36 11-37 Battery ...Fuses ...Main fuse...Installation of accessories ...Replacing bulbs ...Headlight...Front turn signal light and parking light...Front fog light (if equipped)...Rear combination lights ...Back-up light (5-door) ...License plate light ...Dome light, map light and cargo area light ...Trunk light ...High mount stop light ...Other bulbs ... 11-42 11-43 11-45 11-45 11-46 11-47...
...-36 11-37 Battery ...Fuses ...Main fuse...Installation of accessories ...Replacing bulbs ...Headlight...Front turn signal light and parking light...Front fog light (if equipped)...Rear combination lights ...Back-up light (5-door) ...License plate light ...Dome light, map light and cargo area light ...Trunk light ...High mount stop light ...Other bulbs ... 11-42 11-43 11-45 11-45 11-46 11-47...

Owner's Manual
Page 338
C: The high mount stop light and brake/tail light of the 4-door models is built in the rear spoiler (if equipped). 11-46 Maintenance and service Replacing bulbs A, B: The high mount stop light of the 5-door models are the LED (Light Emitting Diode) type. Consult your SUBARU dealer for replacement. Consult your SUBARU dealer for replacement.
C: The high mount stop light and brake/tail light of the 4-door models is built in the rear spoiler (if equipped). 11-46 Maintenance and service Replacing bulbs A, B: The high mount stop light of the 5-door models are the LED (Light Emitting Diode) type. Consult your SUBARU dealer for replacement. Consult your SUBARU dealer for replacement.

Owner's Manual
Page 339
... the bulbs replaced by your SUBARU dealer for proper adjustment of the specified wattage. Maintenance and service 11-47 Wattage 1) 2) 3) 4) 5) 6) 7) 8) 9) 10) 11) 12) 13) 14) 15) 16) High beam headlight Low beam headlight Front turn signal/Parking and front side marker light Map light Dome light Front fog light Trunk room light (4-door) High mount stop light (4-door...
... the bulbs replaced by your SUBARU dealer for proper adjustment of the specified wattage. Maintenance and service 11-47 Wattage 1) 2) 3) 4) 5) 6) 7) 8) 9) 10) 11) 12) 13) 14) 15) 16) High beam headlight Low beam headlight Front turn signal/Parking and front side marker light Map light Dome light Front fog light Trunk room light (4-door) High mount stop light (4-door...
Owner's Manual
Page 340
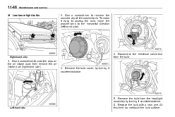
...secured clip of the washer tank. Remove the bulb cover, by turning it counterclockwise. 6. Remove the bulb from the bulb. 1. Replace the bulb with a new one. To make it counterclockwise. At this time, do not touch the bulb surface. Disconnect the electrical connector from the ...headlight assembly by turning it easy to access the bulb, move the washer tank to the horizontal direction (left-hand side). Right-hand side 4. 11-48 Maintenance and service ! Left-hand side 5. Low beam light bulbs 2.
...secured clip of the washer tank. Remove the bulb cover, by turning it counterclockwise. 6. Remove the bulb from the bulb. 1. Replace the bulb with a new one. To make it counterclockwise. At this time, do not touch the bulb surface. Disconnect the electrical connector from the ...headlight assembly by turning it easy to access the bulb, move the washer tank to the horizontal direction (left-hand side). Right-hand side 4. 11-48 Maintenance and service ! Left-hand side 5. Low beam light bulbs 2.

Owner's Manual
Page 341
... undo the clips on the air intake duct, then remove the air intake duct (right-hand side). 4. High beam light bulbs 3. Set the washer tank to the headlight assembly, turn it clockwise until it clicks. 8. Maintenance and service 11-49 7. Reconnect the electrical connector. 9. Right... connector. 8. Install the air intake duct with new one. Set the washer tank to touch the bulb surface. 6. Left-hand side 2. Replace the bulb with clips (right-hand side). 11. To install the bulb to the original place and secure it by turning it by clip (left -hand side). Install the...
... undo the clips on the air intake duct, then remove the air intake duct (right-hand side). 4. High beam light bulbs 3. Set the washer tank to the headlight assembly, turn it clockwise until it clicks. 8. Maintenance and service 11-49 7. Reconnect the electrical connector. 9. Right... connector. 8. Install the air intake duct with new one. Set the washer tank to touch the bulb surface. 6. Left-hand side 2. Replace the bulb with clips (right-hand side). 11. To install the bulb to the original place and secure it by turning it by clip (left -hand side). Install the...
Owner's Manual
Page 342
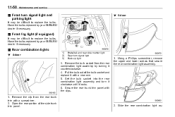
... panel with a screwdriver. 2. Slide the rear combination light as- Remove the clip from the rear combination light assembly by your SUBARU dealer if necessary. ! 5-door & Front fog light (if equipped) It may be difficult to replace the bulbs. Have the bulbs replaced by your SUBARU dealer if necessary. & Rear combination lights ! 4-door 1) 2) 3) Brake/tail and rear side marker...
... panel with a screwdriver. 2. Slide the rear combination light as- Remove the clip from the rear combination light assembly by your SUBARU dealer if necessary. ! 5-door & Front fog light (if equipped) It may be difficult to replace the bulbs. Have the bulbs replaced by your SUBARU dealer if necessary. & Rear combination lights ! 4-door 1) 2) 3) Brake/tail and rear side marker...
Owner's Manual
Page 343
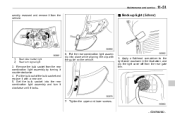
...light assembly into the rear combination light assembly and turn signal light 6. Remove the bulb socket from the rear gate trim. 7. Pull the bulb out of the bulb socket and replace it with the guide on the vehicle. 3. Tighten the upper and lower screws. - CONTINUED - Set the bulb ...socket into place while aligning the clip with a new one. 5. Apply a flat-head screwdriver to the light cover as shown in the illustration, and pry the light cover off from the rear combination light assembly by turning it counterclockwise. 4. Maintenance ...
...light assembly into the rear combination light assembly and turn signal light 6. Remove the bulb socket from the rear gate trim. 7. Pull the bulb out of the bulb socket and replace it with the guide on the vehicle. 3. Tighten the upper and lower screws. - CONTINUED - Set the bulb ...socket into place while aligning the clip with a new one. 5. Apply a flat-head screwdriver to the light cover as shown in the illustration, and pry the light cover off from the rear combination light assembly by turning it counterclockwise. 4. Maintenance ...
Owner's Manual
Page 344
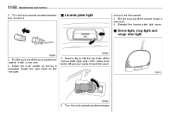
... the right side of the socket. Reinstall the license plate light cover. & Dome light, map light and cargo area light 3. Turn the bulb socket counterclockwise and remove it. & License plate light and pull out the socket. 3. Turn the bulb socket counterclockwise Pull the bulb out of the license plate light cover, then press once to the left and pull...
... the right side of the socket. Reinstall the license plate light cover. & Dome light, map light and cargo area light 3. Turn the bulb socket counterclockwise and remove it. & License plate light and pull out the socket. 3. Turn the bulb socket counterclockwise Pull the bulb out of the license plate light cover, then press once to the left and pull...

Owner's Manual
Page 345
... & Trunk light & High mount stop light assembly by turning it . 2. Remove the bulb socket from the high mount stop light ! 4-door 1. Pull the bulb out of the socket. Pull the bulb out of the lens with a screwdriver. 2. Reinstall the lens. & Other bulbs Other bulbs may be difficult to replace. Install a new bulb. 3. Remove the cover by your SUBARU dealer if...
... & Trunk light & High mount stop light assembly by turning it . 2. Remove the bulb socket from the high mount stop light ! 4-door 1. Pull the bulb out of the socket. Pull the bulb out of the lens with a screwdriver. 2. Reinstall the lens. & Other bulbs Other bulbs may be difficult to replace. Install a new bulb. 3. Remove the cover by your SUBARU dealer if...

Owner's Manual
Page 355
... (left side) Bulb chart Description Headlight Low beam headlight High beam headlight Front fog light Front turn signal/Parking and front side marker light Rear combination light Rear turn signal light (4-door) Brake/tail and rear side marker light (4-door) Back-up light (4-door) Rear side marker light (5-door) Rear turn signal light (5-door) Back-up light (5-door) High mount...
... (left side) Bulb chart Description Headlight Low beam headlight High beam headlight Front fog light Front turn signal/Parking and front side marker light Rear combination light Rear turn signal light (4-door) Brake/tail and rear side marker light (4-door) Back-up light (4-door) Rear side marker light (5-door) Rear turn signal light (5-door) Back-up light (5-door) High mount...

Owner's Manual
Page 372
...system...4-13 Air flow selection...4-2 Alarm system ...2-14 All-Wheel Drive warning light ...3-21 Aluminum wheel cleaning...10-3 Aluminum wheels...11-37 Antenna system...5-2 ......7-24 Arming the system ...2-15 Armrest...1-6 Ashtray ...6-8 AT OIL TEMPerature warning light ...3-18 Audio control button ...5-26 Audio set ...5-5 Auto-dimming mirror/compass...20 MANUAL mode ...7-19 Selector lever ...7-17 Shift lock release ...7-22 Temperature warning light (AT OIL TEMP)...3-18 Automatic/Emergency Locking Retractor (A/ELR) ...1-10 B Battery...light...3-20 Braking ...7-23 Tips ...7-23 Breaking-in of new brake ...
...system...4-13 Air flow selection...4-2 Alarm system ...2-14 All-Wheel Drive warning light ...3-21 Aluminum wheel cleaning...10-3 Aluminum wheels...11-37 Antenna system...5-2 ......7-24 Arming the system ...2-15 Armrest...1-6 Ashtray ...6-8 AT OIL TEMPerature warning light ...3-18 Audio control button ...5-26 Audio set ...5-5 Auto-dimming mirror/compass...20 MANUAL mode ...7-19 Selector lever ...7-17 Shift lock release ...7-22 Temperature warning light (AT OIL TEMP)...3-18 Automatic/Emergency Locking Retractor (A/ELR) ...1-10 B Battery...light...3-20 Braking ...7-23 Tips ...7-23 Breaking-in of new brake ...
Owner's Manual
Page 377
...bulbs ...11-46 Backup light/Tail light ...11-51 Cargo area light ...11-52 Dome light ...11-52 Front fog light ...11-50 Front turn signal light...11-50 Headlight...11-47 High mount stop light ...11-53 License plate light...11-52 Map light ...11-52 Parking light...11-50 Rear combination light ...11-50 Trunk light...driving...4 Symbol...2 Warnings ...2 Seat Fabric ...10-5 Heater...1-5 Seatbelt...4 Maintenance ...1-19 Pretensioners...1-19 Safety tips ...1-9 Warning light and chime ...1-11, 3-13 Seatbelts ...1-9 Security ID plate...2-3 Selector lever...7-17 Position indicator ...3-24 Shift lock ...
...bulbs ...11-46 Backup light/Tail light ...11-51 Cargo area light ...11-52 Dome light ...11-52 Front fog light ...11-50 Front turn signal light...11-50 Headlight...11-47 High mount stop light ...11-53 License plate light...11-52 Map light ...11-52 Parking light...11-50 Rear combination light ...11-50 Trunk light...driving...4 Symbol...2 Warnings ...2 Seat Fabric ...10-5 Heater...1-5 Seatbelt...4 Maintenance ...1-19 Pretensioners...1-19 Safety tips ...1-9 Warning light and chime ...1-11, 3-13 Seatbelts ...1-9 Security ID plate...2-3 Selector lever...7-17 Position indicator ...3-24 Shift lock ...


