Owner's Manual
Page 144
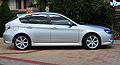
...Once the windshield wiper deicer has been set your windshield wiper deicer for any snow from headlights. The night position reduces glare from the windshield. The windshield wiper deicer will automatically shut...Pull the tab at 9 mph (15 km/h) or lower for the day position. Your SUBARU dealer can set for details. CAUTION To prevent the battery from being discharged, do not operate...the button to turn on again. The indicator light located on the windshield wiper deicer, remove any longer than necessary. & Inside mirror NOTE If your vehicle, you start driving. Before...
...Once the windshield wiper deicer has been set your windshield wiper deicer for any snow from headlights. The night position reduces glare from the windshield. The windshield wiper deicer will automatically shut...Pull the tab at 9 mph (15 km/h) or lower for the day position. Your SUBARU dealer can set for details. CAUTION To prevent the battery from being discharged, do not operate...the button to turn on again. The indicator light located on the windshield wiper deicer, remove any longer than necessary. & Inside mirror NOTE If your vehicle, you start driving. Before...
Owner's Manual
Page 340
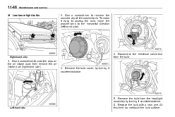
11-48 Maintenance and service ! Use a screwdriver to undo the clips on the air intake duct, then remove the air intake duct (right-hand side). 3. Disconnect the electrical connector from the headlight assembly by turning it counterclockwise. Left-hand side 5. At this time, do not touch the bulb surface. Replace the bulb with...
11-48 Maintenance and service ! Use a screwdriver to undo the clips on the air intake duct, then remove the air intake duct (right-hand side). 3. Disconnect the electrical connector from the headlight assembly by turning it counterclockwise. Left-hand side 5. At this time, do not touch the bulb surface. Replace the bulb with...

Owner's Manual
Page 341
... it by clip (left -hand side). Replace the bulb with clips (right-hand side). 11. Set the washer tank to the headlight assembly, turn it clockwise until it easy to access the bulb, move the washer tank to remove the secured clip of the washer tank. To install the bulb to the... headlight assembly, turn it clockwise until it by clip (left-hand side). ! Install the air intake duct with clips (right-hand side). 9. Use...
... it by clip (left -hand side). Replace the bulb with clips (right-hand side). 11. Set the washer tank to the headlight assembly, turn it clockwise until it easy to access the bulb, move the washer tank to remove the secured clip of the washer tank. To install the bulb to the... headlight assembly, turn it clockwise until it by clip (left-hand side). ! Install the air intake duct with clips (right-hand side). 9. Use...


