Owner's Manual
Page 3
...observe these instructions may result in the "Warranty and Service Booklet". Anti-Corrosion Warranty . Chapter 9: In case of instrument panel indicators and how to take your vehicle, follow the instructions in Canada come with a brief table of fourteen chapters. Chapter ...SUBARU. SUBARU Limited Warranty . Please read this Owner's Manual & Using your Owner's Manual Before you how to operate the keys, locks and windows. Chapter 5: Audio This chapter informs you how to start and operate your vehicle, carefully read these warranties carefully. Chapter 2: Keys and doors...
...observe these instructions may result in the "Warranty and Service Booklet". Anti-Corrosion Warranty . Chapter 9: In case of instrument panel indicators and how to take your vehicle, follow the instructions in Canada come with a brief table of fourteen chapters. Chapter ...SUBARU. SUBARU Limited Warranty . Please read this Owner's Manual & Using your Owner's Manual Before you how to operate the keys, locks and windows. Chapter 5: Audio This chapter informs you how to start and operate your vehicle, carefully read these warranties carefully. Chapter 2: Keys and doors...
Owner's Manual
Page 5
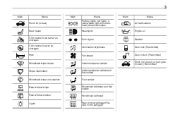
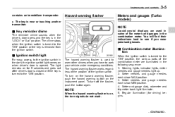
... restraint top tether anchorages Child restraint lower anchorages Horn Engine oil Turn signal Washer Illumination brightness Door lock (Transmitter) Fan speed Door unlock (Transmitter) Trunk lid (4-door) or rear gate (5-door) (Transmitter) Windshield wiper deicer Instrument panel outlets Instrument panel outlets and foot outlets Foot outlets Windshield defroster and foot outlets Windshield defroster Rear window defogger...
... restraint top tether anchorages Child restraint lower anchorages Horn Engine oil Turn signal Washer Illumination brightness Door lock (Transmitter) Fan speed Door unlock (Transmitter) Trunk lid (4-door) or rear gate (5-door) (Transmitter) Windshield wiper deicer Instrument panel outlets Instrument panel outlets and foot outlets Foot outlets Windshield defroster and foot outlets Windshield defroster Rear window defogger...
Owner's Manual
Page 16
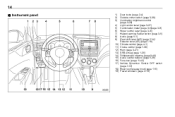
14 & Instrument panel 1) 2) 3) 4) 5) 6) 7) 8) 9) 10) 11) 12) 13) 14) 15) 16) 17) 18) 19) Door locks (page 2-4) Outside mirror switch (page 3-38) Illumination brightness control (page 3-29) Light control lever (page 3-27) Combination meter (page 3-5/page 3-9) Wiper control lever (page 3-...
14 & Instrument panel 1) 2) 3) 4) 5) 6) 7) 8) 9) 10) 11) 12) 13) 14) 15) 16) 17) 18) 19) Door locks (page 2-4) Outside mirror switch (page 3-38) Illumination brightness control (page 3-29) Light control lever (page 3-27) Combination meter (page 3-5/page 3-9) Wiper control lever (page 3-...

Owner's Manual
Page 75
...SRS side airbag is stored in both front seat seatbacks next to the front or rear door on either front door. They It is also important to wear your head or other parts of SRS side ...airbag deployment may cause injuries if your head is too close to the door, and it . Do not sit or lean unnecessarily close to help avoid injuries that can result ... airbag and SRS curtain airbag The SRS side airbag is stored in the door side of the vehicle deploys between the occupant and the door panel and supplements the seatbelt by reducing the impact on the occupant's chest and...
...SRS side airbag is stored in both front seat seatbacks next to the front or rear door on either front door. They It is also important to wear your head or other parts of SRS side ...airbag deployment may cause injuries if your head is too close to the door, and it . Do not sit or lean unnecessarily close to help avoid injuries that can result ... airbag and SRS curtain airbag The SRS side airbag is stored in the door side of the vehicle deploys between the occupant and the door panel and supplements the seatbelt by reducing the impact on the occupant's chest and...
Owner's Manual
Page 113
...combination meter are used to warn other drivers when you wear polarized glasses. & Key reminder chime The reminder chime sounds when the driver's door opens and the key is near or touching another transmitter. The chime stops when the ignition switch is turned to the "ON" position ...on when driver's door is removed from the ignition switch. & Ignition switch light For easy access to park your vehicle under emergency conditions. To turn on the hazard warning flasher, push the hazard warning button on for driving) begins. The light remains on the instrument panel. Meter needles ...
...combination meter are used to warn other drivers when you wear polarized glasses. & Key reminder chime The reminder chime sounds when the driver's door opens and the key is near or touching another transmitter. The chime stops when the ignition switch is turned to the "ON" position ...on when driver's door is removed from the ignition switch. & Ignition switch light For easy access to park your vehicle under emergency conditions. To turn on the hazard warning flasher, push the hazard warning button on for driving) begins. The light remains on the instrument panel. Meter needles ...

Owner's Manual
Page 157
...to flow To direct warm air to the "ON" position. Set the temperature control dial to the "ON" position. 4. through the instrument panel outlets: 1. Set the air conditioner button to the Set the air inlet selection button to the " " position. 2. The air conditioner ...compressor automatically operates when the air flow control dial set the air inlet selection button to the windshield and front door windows: 1. Set the air flow control dial to the OFF position. 2. WARNING Continued operation with the air inlet selection button in the " ...
...to flow To direct warm air to the "ON" position. Set the temperature control dial to the "ON" position. 4. through the instrument panel outlets: 1. Set the air conditioner button to the Set the air inlet selection button to the " " position. 2. The air conditioner ...compressor automatically operates when the air flow control dial set the air inlet selection button to the windshield and front door windows: 1. Set the air flow control dial to the OFF position. 2. WARNING Continued operation with the air inlet selection button in the " ...

Owner's Manual
Page 220
Open the driver's door (the driver's door must remain opened throughout the entire process). 2. Press and hold the brake pedal, then press and release the " " button on each time. To program a remote ... up to the "ON" position, depress and hold the brake pedal, then press and release the " " button on the driver's side left under the dashboard panel. 4. The horn will honk and the parking lights will toggle the feature ON or OFF each transmitter. The horn will honk and the parking lights...
Open the driver's door (the driver's door must remain opened throughout the entire process). 2. Press and hold the brake pedal, then press and release the " " button on each time. To program a remote ... up to the "ON" position, depress and hold the brake pedal, then press and release the " " button on the driver's side left under the dashboard panel. 4. The horn will honk and the parking lights will toggle the feature ON or OFF each transmitter. The horn will honk and the parking lights...
Owner's Manual
Page 283
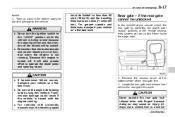
Remember that you cannot unlock the rear gate by operating the power door locking switches or the remote keyless entry system, you can unlock it will be locked. . For vehicles with the engine running . must be unlocked In ... function when the engine is turned off, it from inside the cargo area. Locate the rear gate lock release lever behind the rear gate trim panel. Rear gate - if the rear gate cannot be limited to less than 20 mph (30 km/h) and the traveling distance to operate the brake pedal...
Remember that you cannot unlock the rear gate by operating the power door locking switches or the remote keyless entry system, you can unlock it will be locked. . For vehicles with the engine running . must be unlocked In ... function when the engine is turned off, it from inside the cargo area. Locate the rear gate lock release lever behind the rear gate trim panel. Rear gate - if the rear gate cannot be limited to less than 20 mph (30 km/h) and the traveling distance to operate the brake pedal...

Owner's Manual
Page 290
...underbody components, such as you find them are found to prevent them from freezing in body panel sections, cavities, and other corrosive materials are : 1. It is exposed to make sure ... on most common causes of the following surfaces: . If any of corrosion are used, the door hinges and locks, trunk lid lock, and hood latch should be given a very thorough washing....dry. 4. Damage to resist corrosion. It is dry. 10-4 Appearance care Corrosion protection Your SUBARU has been designed and built to paint and other parts of high humidity, especially when temperatures ...
...underbody components, such as you find them are found to prevent them from freezing in body panel sections, cavities, and other corrosive materials are : 1. It is exposed to make sure ... on most common causes of the following surfaces: . If any of corrosion are used, the door hinges and locks, trunk lid lock, and hood latch should be given a very thorough washing....dry. 4. Damage to resist corrosion. It is dry. 10-4 Appearance care Corrosion protection Your SUBARU has been designed and built to paint and other parts of high humidity, especially when temperatures ...
Owner's Manual
Page 342
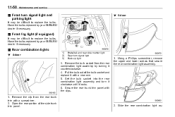
...service & Front turn signal light and parking light It may be difficult to replace the bulbs. Pull the bulb out of the side trunk trim panel. 1. Slide the rear combination light as- Open the rear portion of the bulb socket and replace it with a new one. 5. Remove ...Using a Phillips screwdriver, remove the upper and lower screws that secure the rear combination light assembly. 2. Have the bulbs replaced by your SUBARU dealer if necessary. ! 5-door & Front fog light (if equipped) It may be difficult to replace the bulbs. Remove the bulb socket from the rear trunk trim with...
...service & Front turn signal light and parking light It may be difficult to replace the bulbs. Pull the bulb out of the side trunk trim panel. 1. Slide the rear combination light as- Open the rear portion of the bulb socket and replace it with a new one. 5. Remove ...Using a Phillips screwdriver, remove the upper and lower screws that secure the rear combination light assembly. 2. Have the bulbs replaced by your SUBARU dealer if necessary. ! 5-door & Front fog light (if equipped) It may be difficult to replace the bulbs. Remove the bulb socket from the rear trunk trim with...
Owner's Manual
Page 352
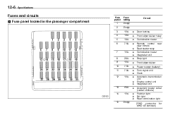
12-6 Specifications Fuses and circuits & Fuse panel located in the passenger compartment Fuse panel 1 2 3 4 5 6 Fuse rating Empty Empty 15A 10A 10A 7.5A ... Circuit Door locking Front wiper deicer relay Combination meter Remote control view mirrors Seat heater relay Combination meter Integrated unit Stop light Front wiper deicer Power supply (...
12-6 Specifications Fuses and circuits & Fuse panel located in the passenger compartment Fuse panel 1 2 3 4 5 6 Fuse rating Empty Empty 15A 10A 10A 7.5A ... Circuit Door locking Front wiper deicer relay Combination meter Remote control view mirrors Seat heater relay Combination meter Integrated unit Stop light Front wiper deicer Power supply (...

Owner's Manual
Page 355
Specifications 12-9 Fuse panel 18 19 Fuse rating 15A 15A . . Circuit Headlight (right side) Headlight (left side) Bulb chart Description Headlight Low beam headlight High beam headlight Front fog light Front turn signal/Parking and front side marker light Rear combination light Rear turn signal light (4-door) Brake/tail and rear side marker...
Specifications 12-9 Fuse panel 18 19 Fuse rating 15A 15A . . Circuit Headlight (right side) Headlight (left side) Bulb chart Description Headlight Low beam headlight High beam headlight Front fog light Front turn signal/Parking and front side marker light Rear combination light Rear turn signal light (4-door) Brake/tail and rear side marker...


