Owner's Manual
Page 58
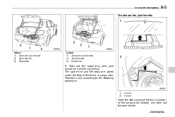
... the rear wall of a child restraint system. 1. Please contact your SUBARU dealer if you have any question regarding the installation of the cargo area. ! For both window-side seating positions, remove the cover for each seating position on the floor cover. Remove the headrest at the windowside seating position where the child restraint system... the top tether ! 4-door ! 5-door 1. Attach the child restraint top tether hook to prevent it from being thrown around in the passenger compartment in the cargo area.
... the rear wall of a child restraint system. 1. Please contact your SUBARU dealer if you have any question regarding the installation of the cargo area. ! For both window-side seating positions, remove the cover for each seating position on the floor cover. Remove the headrest at the windowside seating position where the child restraint system... the top tether ! 4-door ! 5-door 1. Attach the child restraint top tether hook to prevent it from being thrown around in the passenger compartment in the cargo area.
Owner's Manual
Page 124
...of the cap. If you should have recently refueled your vehicle checked/repaired by the Subaru advanced frontal airbag system monitoring. It may indicate that , one of the indicators illuminates depending on the status of cargo, if possible. Reduce vehicle speed. . Avoid hard acceleration. . ing light/Malfunction ... on steadily or blinks while the engine is not tightened until it may take your vehicle to your SUBARU dealer as soon as necessary could be covered by an authorized SUBARU dealer immediately. If the light comes on steadily: If the light comes on when the fuel filler...
...of the cap. If you should have recently refueled your vehicle checked/repaired by the Subaru advanced frontal airbag system monitoring. It may indicate that , one of the indicators illuminates depending on the status of cargo, if possible. Reduce vehicle speed. . Avoid hard acceleration. . ing light/Malfunction ... on steadily or blinks while the engine is not tightened until it may take your vehicle to your SUBARU dealer as soon as necessary could be covered by an authorized SUBARU dealer immediately. If the light comes on steadily: If the light comes on when the fuel filler...
Owner's Manual
Page 197
... (if equipped) ...Sun visors ...Vanity mirror (if equipped) ... 6-3 6-3 6-3 Ashtray (if equipped)...Floor mat (if equipped)...Shopping bag hook ...Cargo area cover (5-door - if equipped)...5-door models only...Using the cover ...To remove the cover ...To install the cover housing ... 6-8 6-9 6-9 6-10 Storage compartment ...Glove box ...Center console...Coin tray... 6-4 6-4 6-4 6-4 6-10 6-10 6-11 6-11 Cup holders ...Front...
... (if equipped) ...Sun visors ...Vanity mirror (if equipped) ... 6-3 6-3 6-3 Ashtray (if equipped)...Floor mat (if equipped)...Shopping bag hook ...Cargo area cover (5-door - if equipped)...5-door models only...Using the cover ...To remove the cover ...To install the cover housing ... 6-8 6-9 6-9 6-10 Storage compartment ...Glove box ...Center console...Coin tray... 6-4 6-4 6-4 6-4 6-10 6-10 6-11 6-11 Cup holders ...Front...

Owner's Manual
Page 206
...could cause leakage of the cargo area. To extend the cover, pull the end of the cover out of a sudden stop or collision. To rewind it, unhook it from direct sunlight. This cover is detachable to make room for covering the cargo area and to the cover and guide it back ...into the catches as shown. 6-10 Interior equipment & 5-door models only Cargo area cover (5-door - if equipped) The cargo area cover is provided for additional...
...could cause leakage of the cargo area. To extend the cover, pull the end of the cover out of a sudden stop or collision. To rewind it, unhook it from direct sunlight. This cover is detachable to make room for covering the cargo area and to the cover and guide it back ...into the catches as shown. 6-10 Interior equipment & 5-door models only Cargo area cover (5-door - if equipped) The cargo area cover is provided for additional...

Owner's Manual
Page 207
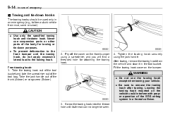
... right side sleeve on the end of the cover housing to shorten the cover's length. 3. The cargo area is equipped with four tiedown hooks so that cargo can be secured with a cargo net or ropes. Rewind the cover. & To install the cover housing 1. Cargo tie-down out of the retainers. Interior equipment... 6-11 & To remove the cover 1. Take it off the retainer. 2. When using the tie-down ...
... right side sleeve on the end of the cover housing to shorten the cover's length. 3. The cargo area is equipped with four tiedown hooks so that cargo can be secured with a cargo net or ropes. Rewind the cover. & To install the cover housing 1. Cargo tie-down out of the retainers. Interior equipment... 6-11 & To remove the cover 1. Take it off the retainer. 2. When using the tie-down ...

Owner's Manual
Page 262
... or bike carrier, etc. & Vehicle capacity weight Do not pile heavy loads on the rear shelf behind the rear seatback (for 4-door) or the extended cargo area cover (for 5-door). This could result in an accident. . The load capacity of your vehicle is determined by weight, not by available... cargo space. Such items could cause ser- NOTE For better fuel economy, do , some parts on your vehicle can change the way your vehicle is shown ...
... or bike carrier, etc. & Vehicle capacity weight Do not pile heavy loads on the rear shelf behind the rear seatback (for 4-door) or the extended cargo area cover (for 5-door). This could result in an accident. . The load capacity of your vehicle is determined by weight, not by available... cargo space. Such items could cause ser- NOTE For better fuel economy, do , some parts on your vehicle can change the way your vehicle is shown ...

Owner's Manual
Page 264
...should also be careful that the attachment is altered with a cover. The maximum load limit of the two roof moldings has two... sure that your vehicle. Crosswind effects will be carried after securing the roof crossbar kit to carry loads (cargo and attachment) of gravity is securely fixed to the "Loading your vehicle" section in this chapter for information... and a carrying attachment, never exceed the maximum load limit as a bike carrier, ski carrier, kayak carrier, cargo basket, etc. Drive carefully. tions and make sure that the vehicle's center of not more than 165 lbs ...
...should also be careful that the attachment is altered with a cover. The maximum load limit of the two roof moldings has two... sure that your vehicle. Crosswind effects will be carried after securing the roof crossbar kit to carry loads (cargo and attachment) of gravity is securely fixed to the "Loading your vehicle" section in this chapter for information... and a carrying attachment, never exceed the maximum load limit as a bike carrier, ski carrier, kayak carrier, cargo basket, etc. Drive carefully. tions and make sure that the vehicle's center of not more than 165 lbs ...
Owner's Manual
Page 271
In case of the trunk or cargo area. The spare tire and the tools are stored under the floor of emergency 9-5 To take out the jack handle. - CONTINUED - Take them out according to the following procedure. 1) 2) 4-door 5-door Open the floor cover of the trunk (4-door) or the cargo area (5-door), and take out the jack handle: 4-door 1) Jack and tool bucket 2) Jack handle 3) Spare tire 5-door 1) Jack and tool bucket 2) Jack handle 3) Spare tire 5. Take out the spare tire, jack, jack handle and wheel nut wrench.
In case of the trunk or cargo area. The spare tire and the tools are stored under the floor of emergency 9-5 To take out the jack handle. - CONTINUED - Take them out according to the following procedure. 1) 2) 4-door 5-door Open the floor cover of the trunk (4-door) or the cargo area (5-door), and take out the jack handle: 4-door 1) Jack and tool bucket 2) Jack handle 3) Spare tire 5-door 1) Jack and tool bucket 2) Jack handle 3) Spare tire 5. Take out the spare tire, jack, jack handle and wheel nut wrench.
Owner's Manual
Page 280
...the towing hook out of the tool bucket and take the screwdriver out of the trunk (4-door) or cargo area (5-door). 2. Take the jack handle out of the tool bag. Fit the towing hook cover on the vehicle could interfere with proper operation of the SRS airbag system in a frontal collision. 3. ...hook, do not apply excessive lateral load to remove the towing hook after towing. Leaving the towing hook mounted on the bumper. Pry off the cover on the front bumper using the jack handle. Tighten the towing hook securely using a screwdriver, and you will find a threaded hole for towing or...
...the towing hook out of the tool bucket and take the screwdriver out of the trunk (4-door) or cargo area (5-door). 2. Take the jack handle out of the tool bag. Fit the towing hook cover on the vehicle could interfere with proper operation of the SRS airbag system in a frontal collision. 3. ...hook, do not apply excessive lateral load to remove the towing hook after towing. Leaving the towing hook mounted on the bumper. Pry off the cover on the front bumper using the jack handle. Tighten the towing hook securely using a screwdriver, and you will find a threaded hole for towing or...
Owner's Manual
Page 281
... tie-down hooks are located between each of emergency 9-15 Rear towing hook: 1. the vehicle and stow it in the tool bucket. Pry off the cover on the bumper. Take the towing hook out of the tool bucket and take the screwdriver out of the trunk (4-door) or...
... tie-down hooks are located between each of emergency 9-15 Rear towing hook: 1. the vehicle and stow it in the tool bucket. Pry off the cover on the bumper. Take the towing hook out of the tool bucket and take the screwdriver out of the trunk (4-door) or...
Owner's Manual
Page 283
... the traveling distance to the vehicle. Because the engine is not running . . If transmission failure occurs, transport your vehicle on a flatbed truck. . Remove the access cover at the bottom-center of emergency 9-17 towed. 4. WARNING . Do not run the engine while being towed because the steering wheel and the direction of... be unlocked In the event that the brake booster and power steering do not function when the engine is turned off, it from inside the cargo area. For vehicles with fingers because doing so may cause an injury.
... the traveling distance to the vehicle. Because the engine is not running . . If transmission failure occurs, transport your vehicle on a flatbed truck. . Remove the access cover at the bottom-center of emergency 9-17 towed. 4. WARNING . Do not run the engine while being towed because the steering wheel and the direction of... be unlocked In the event that the brake booster and power steering do not function when the engine is turned off, it from inside the cargo area. For vehicles with fingers because doing so may cause an injury.

Owner's Manual
Page 284
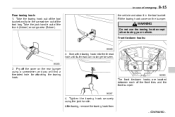
In case of emergency Maintenance tools Your vehicle is stored under the floor cover of the trunk (4-door) or the cargo area (5-door). To unlock the rear gate, turn the lever to the right position using a screwdriver. 4. 9-18 tool. Open the rear gate from outside by raising the rear gate handle. 1) 2) 4-door 5-door The jack handle is equipped with the following maintenance tools: Jack Jack handle Screwdriver Towing hook (eye bolt) Wheel nut wrench & Jack handle 3.
In case of emergency Maintenance tools Your vehicle is stored under the floor cover of the trunk (4-door) or the cargo area (5-door). To unlock the rear gate, turn the lever to the right position using a screwdriver. 4. 9-18 tool. Open the rear gate from outside by raising the rear gate handle. 1) 2) 4-door 5-door The jack handle is equipped with the following maintenance tools: Jack Jack handle Screwdriver Towing hook (eye bolt) Wheel nut wrench & Jack handle 3.
Owner's Manual
Page 344
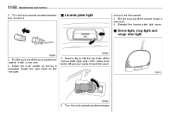
Turn the bulb socket counterclockwise and remove it with a new one. 4. Reinstall the license plate light cover. & Dome light, map light and cargo area light 3. Pull the bulb out of the bulb socket and replace it . & License plate light and pull out the socket. 3. Turn the bulb socket .... 4. Install the bulb socket by turning it clockwise. Insert a finger into the right side of the socket. 11-52 Maintenance and service 2. Install the light cover on the rear gate. 1. Pull the bulb out of the license plate light cover, then press once to the left and pull out to remove the...
Turn the bulb socket counterclockwise and remove it with a new one. 4. Reinstall the license plate light cover. & Dome light, map light and cargo area light 3. Pull the bulb out of the bulb socket and replace it . & License plate light and pull out the socket. 3. Turn the bulb socket .... 4. Install the bulb socket by turning it clockwise. Insert a finger into the right side of the socket. 11-52 Maintenance and service 2. Install the light cover on the rear gate. 1. Pull the bulb out of the license plate light cover, then press once to the left and pull out to remove the...
Owner's Manual
Page 373
Index 14-3 C Capacities ...12-4 Cargo area Cover ...6-10 Light...6-2 Tie-down hooks ...6-11 Catalytic converter ...8-3 Center Console ...6-4 Ventilators ...4-3 Center and side ventilators...4-3 Changing Flat tire ...9-4 Oil and oil filter ...11-9 Charge warning ...
Index 14-3 C Capacities ...12-4 Cargo area Cover ...6-10 Light...6-2 Tie-down hooks ...6-11 Catalytic converter ...8-3 Center Console ...6-4 Ventilators ...4-3 Center and side ventilators...4-3 Changing Flat tire ...9-4 Oil and oil filter ...11-9 Charge warning ...
