Owner's Manual
Page 4
... a situation in this manual. You will find a number of WARNINGs, CAUTIONs and NOTEs in which injury or damage to drive your SUBARU. Chapter 12: Specifications This chapter informs you about dimension and capacities of this happen", depending upon the context. Chapter 13: Consumer information... as well as a flat tire or engine overheating. Please read . Chapter 5: Audio This chapter informs you want to operate interior equipment. Chapter 6: Interior equipment This chapter informs you what to do this", or "Do not let this manual carefully in this manual. Chapter 9: ...
... a situation in this manual. You will find a number of WARNINGs, CAUTIONs and NOTEs in which injury or damage to drive your SUBARU. Chapter 12: Specifications This chapter informs you about dimension and capacities of this happen", depending upon the context. Chapter 13: Consumer information... as well as a flat tire or engine overheating. Please read . Chapter 5: Audio This chapter informs you want to operate interior equipment. Chapter 6: Interior equipment This chapter informs you what to do this", or "Do not let this manual carefully in this manual. Chapter 9: ...

Owner's Manual
Page 11
Table of contents Seat, seatbelt and SRS airbags Keys and doors Instruments and controls Climate control Audio Interior equipment Starting and operating Driving tips In case of emergency Appearance care Maintenance and service Specifications Consumer information and Reporting safety defects Index 1 2 3 4 5 6 7 8 9 10 11 12 13 14
Table of contents Seat, seatbelt and SRS airbags Keys and doors Instruments and controls Climate control Audio Interior equipment Starting and operating Driving tips In case of emergency Appearance care Maintenance and service Specifications Consumer information and Reporting safety defects Index 1 2 3 4 5 6 7 8 9 10 11 12 13 14
Owner's Manual
Page 14
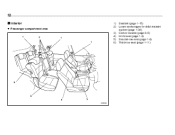
12 Interior Passenger compartment area 1 2 1) 2) 3) 4) 5) 6) 1 1 Seatbelt (page 1-15) Lower anchorages for child restraint system (page 1-38) Center console (page 6-5) Front seat (page 1-2) Second-row seat (page 1-6) Third-row seat (page 1-11) 6 5 4 3 000086
12 Interior Passenger compartment area 1 2 1) 2) 3) 4) 5) 6) 1 1 Seatbelt (page 1-15) Lower anchorages for child restraint system (page 1-38) Center console (page 6-5) Front seat (page 1-2) Second-row seat (page 1-6) Third-row seat (page 1-11) 6 5 4 3 000086

Owner's Manual
Page 30
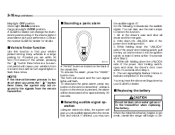
... may suffer slight burns even at low temperatures if they use the seat heater for approximately 1 second will turn the switch off . When the vehicle's interior is warmed There is not running can cause battery discharge. Press the button to warn the persons concerned. Do not put cushions or any other...
... may suffer slight burns even at low temperatures if they use the seat heater for approximately 1 second will turn the switch off . When the vehicle's interior is warmed There is not running can cause battery discharge. Press the button to warn the persons concerned. Do not put cushions or any other...

Owner's Manual
Page 103
...flash twice. To activate this light will illuminate when the " " button is pressed before 30 seconds have elapsed, this function, set the following interior light switches to unlock the driver's door. When you that the doors (or the rear gate) are not properly closed. This light stays ... 200901 Press the " " button to lock all of the doors and the rear gate) is extremely short, the system may not respond. Illuminated entry The interior (map, dome and cargo area) light will go out. Pressing the " " button opens the rear gate. Press the " " button to the indicated positions:...
...flash twice. To activate this light will illuminate when the " " button is pressed before 30 seconds have elapsed, this function, set the following interior light switches to unlock the driver's door. When you that the doors (or the rear gate) are not properly closed. This light stays ... 200901 Press the " " button to lock all of the doors and the rear gate) is extremely short, the system may not respond. Illuminated entry The interior (map, dome and cargo area) light will go out. Pressing the " " button opens the rear gate. Press the " " button to the indicated positions:...
Owner's Manual
Page 104
... turn signal lights will give you press the " " button three times, the system may not respond to indicate completion of the interior light in the transmitter when replacing the battery. The horn will sound and the turn signal lights flashes 3 times to the signals ... seconds after Step 3. 5. Replacing the battery Selecting audible signal operation Using an electronic chirp, the system will flash. Contact the nearest SUBARU dealer for details. While still holding down the UNLOCK side of the power door locking switch. 3. Sounding a panic alarm Vehicle finder function...
... turn signal lights will give you press the " " button three times, the system may not respond to indicate completion of the interior light in the transmitter when replacing the battery. The horn will sound and the turn signal lights flashes 3 times to the signals ... seconds after Step 3. 5. Replacing the battery Selecting audible signal operation Using an electronic chirp, the system will flash. Contact the nearest SUBARU dealer for details. While still holding down the UNLOCK side of the power door locking switch. 3. Sounding a panic alarm Vehicle finder function...

Owner's Manual
Page 106
...following steps within 15 seconds. If you complete step 2), an electronic tone will sound once, a buzzer will continue to sound and the interior light will not flash. A label showing the code is affixed to the bag containing the transmitter, and another is affixed to flash until...If there is completed, an electronic tone will occur. Perform the following procedure: 1. Neither an electronic tone nor the buzzer will sound, and the interior lamp will continue to the circuit board inside the transmitter. Open and close the driver's door once. 1 2 NOTE When part 4 of the ...
...following steps within 15 seconds. If you complete step 2), an electronic tone will sound once, a buzzer will continue to sound and the interior light will not flash. A label showing the code is affixed to the bag containing the transmitter, and another is affixed to flash until...If there is completed, an electronic tone will occur. Perform the following procedure: 1. Neither an electronic tone nor the buzzer will sound, and the interior lamp will continue to the circuit board inside the transmitter. Open and close the driver's door once. 1 2 NOTE When part 4 of the ...
Owner's Manual
Page 166
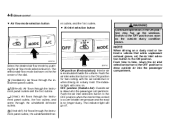
...button Continued operation in the ON position may fog up the windows. Push the air inlet selection button to the OFF position when the interior has cooled to the ON position for fast cooling with the air conditioner or when driving on . NOTE When driving on the the ... and some through the windshield defroster outlets. (Heat-def): Air flows through the instrument panel outlets, the windshield defrost- 400515 ON position (Recirculation): Interior air is recirculated inside the vehicle. The indicator light will come on a dusty road. Switch to the ON position. The selected air flow mode ...
...button Continued operation in the ON position may fog up the windows. Push the air inlet selection button to the OFF position when the interior has cooled to the ON position for fast cooling with the air conditioner or when driving on . NOTE When driving on the the ... and some through the windshield defroster outlets. (Heat-def): Air flows through the instrument panel outlets, the windshield defrost- 400515 ON position (Recirculation): Interior air is recirculated inside the vehicle. The indicator light will come on a dusty road. Switch to the ON position. The selected air flow mode ...

Owner's Manual
Page 167
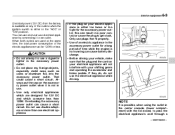
...outlet air temperature of the rear air conditioner cannot be able to control the interior temperature correctly. The rear air conditioner cannot be used as follows: - Solar sensor: beside windshield defroster grille - Interior air temperature sensor: on the side of the driver-side part of the ...system merely blows un- To avoid damaging the sensors, observe the following precautions: - Do not subject the sensors to stop the fan. 1 1) Interior air temperature sensor 2) Solar sensor 400517 NOTE When the "A/C" button is in the "OFF" position and when the "A/C" indicator is in four steps...
...outlet air temperature of the rear air conditioner cannot be able to control the interior temperature correctly. The rear air conditioner cannot be used as follows: - Solar sensor: beside windshield defroster grille - Interior air temperature sensor: on the side of the driver-side part of the ...system merely blows un- To avoid damaging the sensors, observe the following precautions: - Do not subject the sensors to stop the fan. 1 1) Interior air temperature sensor 2) Solar sensor 400517 NOTE When the "A/C" button is in the "OFF" position and when the "A/C" indicator is in four steps...

Owner's Manual
Page 168
...air outlets may be noticed. This condition is fully depressed such as a result of the radiator, this check. Refrigerant for your SUBARU dealer for service. Always keep the front ventilator inlet grille free of water vapor emission from the method for CFC12 (freon). ... conditions (high relative humidity, low temperatures, etc.) a small amount of snow, leaves, or other obstructions to circulate into the heated interior. Therefore, the method of insects and leaves on a steep upgrade. 400518 Checking air conditioning system before summer season Check the air conditioner...
...air outlets may be noticed. This condition is fully depressed such as a result of the radiator, this check. Refrigerant for your SUBARU dealer for service. Always keep the front ventilator inlet grille free of water vapor emission from the method for CFC12 (freon). ... conditions (high relative humidity, low temperatures, etc.) a small amount of snow, leaves, or other obstructions to circulate into the heated interior. Therefore, the method of insects and leaves on a steep upgrade. 400518 Checking air conditioning system before summer season Check the air conditioner...

Owner's Manual
Page 197
Interior equipment Interior light ...Dome light ...Cargo area light ... 6-2 6-2 6-2 Map light ...Sun visors ...Sun visor extension plate ...Vanity mirror with light ... 6-3 6-3 6-3 6-4 Storage compartment ...Glove box ...Center console box ......
Interior equipment Interior light ...Dome light ...Cargo area light ... 6-2 6-2 6-2 Map light ...Sun visors ...Sun visor extension plate ...Vanity mirror with light ... 6-3 6-3 6-3 6-4 Storage compartment ...Glove box ...Center console box ......

Owner's Manual
Page 198
6-2 Interior equipment Interior light Interior equipment Cargo area light When leaving your vehicle, make sure the light is turned off . Contact the nearest SUBARU dealer for several seconds and gradually goes out after all doors are closed. The cargo area light switch has three ... of the period for detailed information. See the "Remote keyless entry system" in chapter 2 for which the light stays on can be changed by a SUBARU dealer. The light remains on only when the rear gate is opened . Dome light 1 2 3 600404 600405 Vehicles without Rear Seat Entertainment 1 2...
6-2 Interior equipment Interior light Interior equipment Cargo area light When leaving your vehicle, make sure the light is turned off . Contact the nearest SUBARU dealer for several seconds and gradually goes out after all doors are closed. The cargo area light switch has three ... of the period for detailed information. See the "Remote keyless entry system" in chapter 2 for which the light stays on can be changed by a SUBARU dealer. The light remains on only when the rear gate is opened . Dome light 1 2 3 600404 600405 Vehicles without Rear Seat Entertainment 1 2...

Owner's Manual
Page 199
...- To use the extension plate, pull it toward the front of the period for which the light stays on the map light, push the switch. Interior equipment 6-3 Map light Sun visors Sun visor extension plate 600407 600406 400228 To turn it off to prevent glare through the gap between the sun... the side window, you have finished using it, stow it by pushing it toward the rear of the remote keyless entry transmitter. Contact the nearest SUBARU dealer for detailed information. When leaving the vehicle, make sure the light is turned off , push the switch again. See the "Remote keyless entry...
...- To use the extension plate, pull it toward the front of the period for which the light stays on the map light, push the switch. Interior equipment 6-3 Map light Sun visors Sun visor extension plate 600407 600406 400228 To turn it off to prevent glare through the gap between the sun... the side window, you have finished using it, stow it by pushing it toward the rear of the remote keyless entry transmitter. Contact the nearest SUBARU dealer for detailed information. When leaving the vehicle, make sure the light is turned off , push the switch again. See the "Remote keyless entry...

Owner's Manual
Page 200
... mirror. 2 1 600410 1) Lock 2) Unlock To open the vanity mirror cover. To The light beside the vanity mirror comes on when the mirror cover is opened. 6-4 Interior equipment Vanity mirror with light Storage compartment 600408 600409 Always keep the storage compartment closed while driving to reduce the risk of injury in the...
... mirror. 2 1 600410 1) Lock 2) Unlock To open the vanity mirror cover. To The light beside the vanity mirror comes on when the mirror cover is opened. 6-4 Interior equipment Vanity mirror with light Storage compartment 600408 600409 Always keep the storage compartment closed while driving to reduce the risk of injury in the...

Owner's Manual
Page 201
Pull up the upper compartment lock release to open the upper compartment. The center console box has a two-layer structure consisting of an upper compartment and a lower compartment. - CONTINUED - Upper compartment Lower compartment Center console box 1 1) Upper compartment lock release 1 600412 600413 1) Lower compartment lock release 600411 Pull up the lower compartment lock release to open the lower compartment. Interior equipment 6-5 close it clockwise. To lock the glove box, insert the key and turn it , push the lid firmly upward.
Pull up the upper compartment lock release to open the upper compartment. The center console box has a two-layer structure consisting of an upper compartment and a lower compartment. - CONTINUED - Upper compartment Lower compartment Center console box 1 1) Upper compartment lock release 1 600412 600413 1) Lower compartment lock release 600411 Pull up the lower compartment lock release to open the lower compartment. Interior equipment 6-5 close it clockwise. To lock the glove box, insert the key and turn it , push the lid firmly upward.

Owner's Manual
Page 202
... it. Spilled beverages may distract you or your vehicle is located in the sun or on the lid lightly and it out to avoid spills. 6-6 Interior equipment Rear console To open .
... it. Spilled beverages may distract you or your vehicle is located in the sun or on the lid lightly and it out to avoid spills. 6-6 Interior equipment Rear console To open .

Owner's Manual
Page 203
... can be used to hold beverage bottles and other items. 600419 A dual cup holder is built into the center console near the parking brake lever. Interior equipment 6-7 Front passenger's cup holder Center console lease button.
... can be used to hold beverage bottles and other items. 600419 A dual cup holder is built into the center console near the parking brake lever. Interior equipment 6-7 Front passenger's cup holder Center console lease button.

Owner's Manual
Page 204
... the center console (lower compartment) and in a door pocket, make sure it could spill while driving and, if the beverage is hot, it is capped. 6-8 Interior equipment Door pocket Third-row seat cup holders (7-seater models) Accessory power outlets 600420 The door pockets can be used to hold beverage bottles and...
... the center console (lower compartment) and in a door pocket, make sure it could spill while driving and, if the beverage is hot, it is capped. 6-8 Interior equipment Door pocket Third-row seat cup holders (7-seater models) Accessory power outlets 600420 The door pockets can be used to hold beverage bottles and...
Owner's Manual
Page 205
... operating the accelerator and brake pedals. Always put the cap on your electric appliance is possible, when using the outlet in the accessory power outlet. Interior equipment 6-9 Electrical power (12V DC) from the battery is available at the same time, the total power consumption of the electric appliances must be 120W...
... operating the accelerator and brake pedals. Always put the cap on your electric appliance is possible, when using the outlet in the accessory power outlet. Interior equipment 6-9 Electrical power (12V DC) from the battery is available at the same time, the total power consumption of the electric appliances must be 120W...

Owner's Manual
Page 206
... sudden stops or in the pockets. Hang clothing directly on the coat hooks without using hangers. 600516 Never hang anything on the coat hooks. 6-10 Interior equipment gap between the center console (lower compartment) and the lid. It is also possible to pass the cord through the cabin or by coming...
... sudden stops or in the pockets. Hang clothing directly on the coat hooks without using hangers. 600516 Never hang anything on the coat hooks. 6-10 Interior equipment gap between the center console (lower compartment) and the lid. It is also possible to pass the cord through the cabin or by coming...
