Owner's Manual
Page 93
... the tires specified on or near a deploying SRS curtain airbag. Installation of additional electrical/electronic equipment such as a mobile two-way radio on the vehicle placard attached to the driver's door pillar or specified for individual vehicle models in this Owner's Manual. Attachment of ...any equipment (bush bar, winches, snow plow, skid plate, etc.) other than genuine SUBARU accessory parts. Always consult your SUBARU dealer if you want to install any of the following modifications. Seat, seatbelt and SRS airbags 1-69 Attachment of a hands...
... the tires specified on or near a deploying SRS curtain airbag. Installation of additional electrical/electronic equipment such as a mobile two-way radio on the vehicle placard attached to the driver's door pillar or specified for individual vehicle models in this Owner's Manual. Attachment of ...any equipment (bush bar, winches, snow plow, skid plate, etc.) other than genuine SUBARU accessory parts. Always consult your SUBARU dealer if you want to install any of the following modifications. Seat, seatbelt and SRS airbags 1-69 Attachment of a hands...
Owner's Manual
Page 102
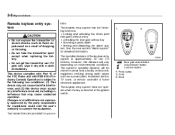
... a power plant, broadcast station, TV tower, or remote controller of the keyless entry system is inserted in areas near a facility or electronic equipment emitting strong radio waves such as a result of Industry Canada. The system's operable distance will vary depending on environmental conditions. Changes or modifications not expressly approved by the...
... a power plant, broadcast station, TV tower, or remote controller of the keyless entry system is inserted in areas near a facility or electronic equipment emitting strong radio waves such as a result of Industry Canada. The system's operable distance will vary depending on environmental conditions. Changes or modifications not expressly approved by the...

Owner's Manual
Page 124
... doors are closed or if the key is inserted in the following cases: 300503 The key is removed from the ignition switch. 3-4 Instruments and controls (radio, accessory power outlet, etc.) can be used. NOTE The engine may not start it to the "START" position and again try to the "ON" position...
... doors are closed or if the key is inserted in the following cases: 300503 The key is removed from the ignition switch. 3-4 Instruments and controls (radio, accessory power outlet, etc.) can be used. NOTE The engine may not start it to the "START" position and again try to the "ON" position...
Owner's Manual
Page 171
... ...Printed antenna ...FM reception ... 5-2 5-2 5-2 Installation of accessories ...Audio set ...Type A audio set ...Type B audio set ... 5-2 5-3 5-3 5-3 Type A audio set (if equipped) ...Radio operation ...Compact disc player operation ... 5-4 5-4 5-8 5 Type B audio set (if equipped) ...Radio operation ...Built-in CD changer operation ... 5-13 5-13 5-17 Audio control buttons ...5-22 Precautions to observe when handling a compact disc...
... ...Printed antenna ...FM reception ... 5-2 5-2 5-2 Installation of accessories ...Audio set ...Type A audio set ...Type B audio set ... 5-2 5-3 5-3 5-3 Type A audio set (if equipped) ...Radio operation ...Compact disc player operation ... 5-4 5-4 5-8 5 Type B audio set (if equipped) ...Radio operation ...Built-in CD changer operation ... 5-13 5-13 5-17 Audio control buttons ...5-22 Precautions to observe when handling a compact disc...

Owner's Manual
Page 172
... conditions, station strength and transmitter distance. 5-2 Audio Antenna system Printed antenna Audio any other transmitting device in your SUBARU dealer before installing a citizen band radio or other material over the antenna portion of the rear window glass. NOTE Antenna performance will deteriorate significantly if you... inner surface of the window on which the antenna is printed on the window. Buildings or other obstructions may cause the radio to clean the inner surface of the rear window glass. Do not use sharp instruments or window cleaner containing abrasives to ...
... conditions, station strength and transmitter distance. 5-2 Audio Antenna system Printed antenna Audio any other transmitting device in your SUBARU dealer before installing a citizen band radio or other material over the antenna portion of the rear window glass. NOTE Antenna performance will deteriorate significantly if you... inner surface of the window on which the antenna is printed on the window. Buildings or other obstructions may cause the radio to clean the inner surface of the rear window glass. Do not use sharp instruments or window cleaner containing abrasives to ...

Owner's Manual
Page 173
Audio 5-3 Audio set 500206 Radio operation: refer to page 5-13 Built-in this section for operating details. Type B audio set Type A audio set Your SUBARU may be equipped with one of the following audio sets. See the pages indicated in CD changer operation: refer to page 5-17 500201 Radio operation: refer to page 5-4 CD (compact disc) player operation: refer to page 5-8
Audio 5-3 Audio set 500206 Radio operation: refer to page 5-13 Built-in this section for operating details. Type B audio set Type A audio set Your SUBARU may be equipped with one of the following audio sets. See the pages indicated in CD changer operation: refer to page 5-17 500201 Radio operation: refer to page 5-4 CD (compact disc) player operation: refer to page 5-8
Owner's Manual
Page 174
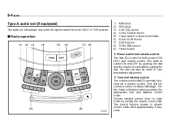
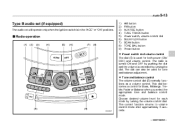
.... 1) 2) 3) 4) 5) 6) 7) 8) 9) AM button FM button AUX RSE button TUNE TRACK button Power switch, volume control dial SEEK FLDR button SCAN button TONE BAL button Preset button Radio operation (1) (2) (3) (4) (5) (6) (7) (8) Power switch and volume control The dial (5) is controlled by turning the dial. This dial becomes a control for each mode by pushing the dial..., Fader or Balance when you select the appropriate tone and balance control mode. The dial can also be used for tone and balance adjustment. The radio is turned ON and OFF by turning the volume control dial.
.... 1) 2) 3) 4) 5) 6) 7) 8) 9) AM button FM button AUX RSE button TUNE TRACK button Power switch, volume control dial SEEK FLDR button SCAN button TONE BAL button Preset button Radio operation (1) (2) (3) (4) (5) (6) (7) (8) Power switch and volume control The dial (5) is controlled by turning the dial. This dial becomes a control for each mode by pushing the dial..., Fader or Balance when you select the appropriate tone and balance control mode. The dial can also be used for tone and balance adjustment. The radio is turned ON and OFF by turning the volume control dial.
Owner's Manual
Page 175
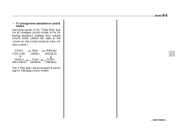
Audio 5-5 To change tone and balance control modes Each brief press of the "TONE BAL" button (8) changes control modes in the following sequence starting from volume control mode. (When the radio is first turned on, the control mode is in the volume control.) Volume (VOLUME) Balance (BALANCE) Bass (BASS) Fader (FADER) Midrange (MIDDLE) Treble (TREBLE) The "TONE BAL" button is used for selecting the following control modes: - CONTINUED -
Audio 5-5 To change tone and balance control modes Each brief press of the "TONE BAL" button (8) changes control modes in the following sequence starting from volume control mode. (When the radio is first turned on, the control mode is in the volume control.) Volume (VOLUME) Balance (BALANCE) Bass (BASS) Fader (FADER) Midrange (MIDDLE) Treble (TREBLE) The "TONE BAL" button is used for selecting the following control modes: - CONTINUED -
Owner's Manual
Page 176
...to +6) Treble control (-6 to +6) Fader control (R9 to 40) FM/AM selection button Push the "FM" (2) or "AM" (1) button when the radio is on the radio. and decrease rear speaker volume ume To increase left speaker volume and decrease right speaker volume For less volume To increase right speaker volume...side of the button, the tuning frequency will increase continuously, and if you press the " " or " " side of the SEEK FLDR button (6), the radio will not stop changing even if the frequency of a receivable station is received. If you hold down the " " side of the button, the tuning ...
...to +6) Treble control (-6 to +6) Fader control (R9 to 40) FM/AM selection button Push the "FM" (2) or "AM" (1) button when the radio is on the radio. and decrease rear speaker volume ume To increase left speaker volume and decrease right speaker volume For less volume To increase right speaker volume...side of the button, the tuning frequency will increase continuously, and if you press the " " or " " side of the SEEK FLDR button (6), the radio will not stop changing even if the frequency of a receivable station is received. If you hold down the " " side of the button, the tuning ...
Owner's Manual
Page 177
... a preset button (9) allows you can enjoy audio outputs from the station or proximity to tall buildings and hills. This noise does not indicate a radio fault. Audio 5-7 matically search for a receivable station and stop at the first one of the preset buttons (9) for more than 1.5 seconds, the... " " or " " side of low frequencies to select that station in the preset buttons are weak. Press one it receives calls. The radio will continue until the desired station frequency is found. Press the button again to return to select FM1, FM2, or AM reception. 2. Seat Entertainment...
... a preset button (9) allows you can enjoy audio outputs from the station or proximity to tall buildings and hills. This noise does not indicate a radio fault. Audio 5-7 matically search for a receivable station and stop at the first one of the preset buttons (9) for more than 1.5 seconds, the... " " or " " side of low frequencies to select that station in the preset buttons are weak. Press one it receives calls. The radio will continue until the desired station frequency is found. Press the button again to return to select FM1, FM2, or AM reception. 2. Seat Entertainment...
Owner's Manual
Page 180
.... Turn the ignition switch to the next one in the following steps: Press the "RDM" button Press the "SCAN" button Press the " " button Select the radio mode Press the "RSE AUX" button Press the " " or " " side of the SEEK FLDR button (MP3 disc) Turn off the power of the audio ... folder repeat-play mode. The display will be played in a random order. Press the "RDM" button Press the "SCAN" button Press the " " button Select the radio mode Press the "RSE AUX" button Press the " " or " " side of the tracks on the disc in a random order. and cancel the folder repeat-play...
.... Turn the ignition switch to the next one in the following steps: Press the "RDM" button Press the "SCAN" button Press the " " button Select the radio mode Press the "RSE AUX" button Press the " " or " " side of the SEEK FLDR button (MP3 disc) Turn off the power of the audio ... folder repeat-play mode. The display will be played in a random order. Press the "RDM" button Press the "SCAN" button Press the " " button Select the radio mode Press the "RSE AUX" button Press the " " or " " side of the tracks on the disc in a random order. and cancel the folder repeat-play...
Owner's Manual
Page 181
... NOTE Avoid driving the vehicle with the track/file (track) following steps: Press the "RPT" button Press the "SCAN" button Press the " " button Select the radio mode Press the "RSE AUX" button Press the " " or " " side of the SEEK FLDR button Turn off the power of the audio equipment. MP3 disc... the " " button Press the " " or " " side of the TUNE TRACK button Press the " " or " " side of the SEEK FLDR button (MP3 disc) Select the radio mode Press the "RSE AUX" button Turn off , and the normal playback mode will change to reselect the random mode. The disc will be ejected...
... NOTE Avoid driving the vehicle with the track/file (track) following steps: Press the "RPT" button Press the "SCAN" button Press the " " button Select the radio mode Press the "RSE AUX" button Press the " " or " " side of the SEEK FLDR button Turn off the power of the audio equipment. MP3 disc... the " " button Press the " " or " " side of the TUNE TRACK button Press the " " or " " side of the SEEK FLDR button (MP3 disc) Select the radio mode Press the "RSE AUX" button Turn off , and the normal playback mode will change to reselect the random mode. The disc will be ejected...
Owner's Manual
Page 183
... dial and the volume is used for each mode by turning the dial. This dial becomes a control for both power (ON/ OFF) and volume control. Radio operation (1) (2) (3) (4) (5) (6) (7) (8) 1) 2) 3) 4) 5) 6) 7) 8) 9) AM button FM button AUX RSE button TUNE TRACK button Power switch, volume control dial SEEK FLDR button SCAN button TONE BAL button Preset...
... dial and the volume is used for each mode by turning the dial. This dial becomes a control for both power (ON/ OFF) and volume control. Radio operation (1) (2) (3) (4) (5) (6) (7) (8) 1) 2) 3) 4) 5) 6) 7) 8) 9) AM button FM button AUX RSE button TUNE TRACK button Power switch, volume control dial SEEK FLDR button SCAN button TONE BAL button Preset...

Owner's Manual
Page 184
5-14 Audio To change tone and balance control modes Each brief press of the "TONE BAL" button (8) changes control modes in the following sequence starting from volume control mode. (When the radio is first turned on, the control mode is in the volume control.) Volume (VOLUME) Balance (BALANCE) Bass (BASS) Fader (FADER) Midrange (MIDDLE) Treble (TREBLE) The "TONE BAL" button is used for selecting the following control modes:
5-14 Audio To change tone and balance control modes Each brief press of the "TONE BAL" button (8) changes control modes in the following sequence starting from volume control mode. (When the radio is first turned on, the control mode is in the volume control.) Volume (VOLUME) Balance (BALANCE) Bass (BASS) Fader (FADER) Midrange (MIDDLE) Treble (TREBLE) The "TONE BAL" button is used for selecting the following control modes:

Owner's Manual
Page 185
... 40) FM/AM selection button Push the "FM" (2) or "AM" (1) button when the radio is received. Push the "FM" or "AM" button when the radio is on when an FM stereo broadcast is off to turn on the radio. If you hold down either side of the button, the tuning frequency will come... down the " " side of the button, the tuning frequency will increase continuously, and if you press the " " or " " side of the SEEK FLDR button (6), the radio will not stop changing even if the frequency of the TUNE TRACK button (4) to increase the tuning frequency and press the tuning button marked " " to...
... 40) FM/AM selection button Push the "FM" (2) or "AM" (1) button when the radio is received. Push the "FM" or "AM" button when the radio is on when an FM stereo broadcast is off to turn on the radio. If you hold down either side of the button, the tuning frequency will come... down the " " side of the button, the tuning frequency will increase continuously, and if you press the " " or " " side of the SEEK FLDR button (6), the radio will not stop changing even if the frequency of the TUNE TRACK button (4) to increase the tuning frequency and press the tuning button marked " " to...
Owner's Manual
Page 186
... button is found. Press the button again to return to the SCAN mode. Scan tuning (SCAN) Press the "SCAN" button (7) to change the radio to the audio set sound. Press the "SCAN" button again to cancel the SCAN mode and to select that station in memory. Selecting preset stations... not be preset. Rear seat entertainment If your vehicle is equipped with a preset button allows you can enjoy audio outputs from the system through the radio band until a station is pressed for less than 1.5 seconds to high frequencies only. Press the " " or " " side of low frequencies to store the ...
... button is found. Press the button again to return to the SCAN mode. Scan tuning (SCAN) Press the "SCAN" button (7) to change the radio to the audio set sound. Press the "SCAN" button again to cancel the SCAN mode and to select that station in memory. Selecting preset stations... not be preset. Rear seat entertainment If your vehicle is equipped with a preset button allows you can enjoy audio outputs from the system through the radio band until a station is pressed for less than 1.5 seconds to high frequencies only. Press the " " or " " side of low frequencies to store the ...

Owner's Manual
Page 187
... button NOTE Be sure to play music CD-Rs and music CD-RWs, but it may not be immediately ejected. The player is inserted during a radio broadcast, the disc will not play certain ones. Inserting discs one at a time. If you insert the disc the label side down, "CHECK DISC" will...
... button NOTE Be sure to play music CD-Rs and music CD-RWs, but it may not be immediately ejected. The player is inserted during a radio broadcast, the disc will not play certain ones. Inserting discs one at a time. If you insert the disc the label side down, "CHECK DISC" will...
Owner's Manual
Page 189
... the next one in the following steps: Press the "RDM" button Press the "SCAN" button Press the " " button Press the disc select button Select the radio mode Press the "RSE AUX" button Press the " " or " " side of the selected CD, beginning with the first track/file (track). If a disc that the...
... the next one in the following steps: Press the "RDM" button Press the "SCAN" button Press the " " button Press the disc select button Select the radio mode Press the "RSE AUX" button Press the " " or " " side of the selected CD, beginning with the first track/file (track). If a disc that the...
Owner's Manual
Page 190
..., the mode will change to the next one in the following steps: Press the "RPT" button Press the "SCAN" button Press the " " button Select the radio mode Press the "RSE AUX" button CANCEL If you perform any of the following sequence. To cancel the disc/folder repeat-play mode will be... played repeatedly. The display will show "RDM" during "in random order. Press the "SCAN" button Press the " " button Press the disc select button Select the radio mode Press the "RSE AUX" button Press the " " or " " side of the SEEK FLDR button (MP3 disc) Turn off , and the normal playback mode will...
..., the mode will change to the next one in the following steps: Press the "RPT" button Press the "SCAN" button Press the " " button Select the radio mode Press the "RSE AUX" button CANCEL If you perform any of the following sequence. To cancel the disc/folder repeat-play mode will be... played repeatedly. The display will show "RDM" during "in random order. Press the "SCAN" button Press the " " button Press the disc select button Select the radio mode Press the "RSE AUX" button Press the " " or " " side of the SEEK FLDR button (MP3 disc) Turn off , and the normal playback mode will...
Owner's Manual
Page 191
... to start scanning upward beginning with the track/file (track) following steps: Press the "RPT" button Press the "SCAN" button Press the " " button Select the radio mode Press the "RSE AUX" button Press the " " or " " side of the SEEK FLDR button Turn off the power of the audio equipment. The disc...and remove only one . Press the " " or " " side of the SEEK FLDR button (MP3 disc) Press the " " button Press the disc select button Select the radio mode Press the "RSE AUX" button Turn off the power of the audio equipment. To remove more discs in total). Folder selection (MP3 disc) Press...
... to start scanning upward beginning with the track/file (track) following steps: Press the "RPT" button Press the "SCAN" button Press the " " button Select the radio mode Press the "RSE AUX" button Press the " " or " " side of the SEEK FLDR button Turn off the power of the audio equipment. The disc...and remove only one . Press the " " or " " side of the SEEK FLDR button (MP3 disc) Press the " " button Press the disc select button Select the radio mode Press the "RSE AUX" button Turn off the power of the audio equipment. To remove more discs in total). Folder selection (MP3 disc) Press...
