
Owner's Manual
Page 84
... pressing the release button. Seat, seatbelt and SRS airbags Anchorage location Three upper anchorages are installed on the rear edge of the roof. Open the cover flaps to prevent it from being thrown around in the passenger compartment in the...
... pressing the release button. Seat, seatbelt and SRS airbags Anchorage location Three upper anchorages are installed on the rear edge of the roof. Open the cover flaps to prevent it from being thrown around in the passenger compartment in the...

Owner's Manual
Page 155
... Reduce the amount of the CHECK ENGINE warning light/malfunction indicator lamp coming on could be covered by your vehicle's warranty. The CHECK ENGINE warning light may take your vehicle to the ...emission control system, you have your vehicle, the cause of cargo, if possible. Tightening the cap will not make the CHECK ENGINE warning light turn off ...in the emission control system. To prevent serious damage to your vehicle checked by an authorized SUBARU dealer immediately. Avoid hard acceleration. Stop towing a trailer as soon as possible. If the...
... Reduce the amount of the CHECK ENGINE warning light/malfunction indicator lamp coming on could be covered by your vehicle's warranty. The CHECK ENGINE warning light may take your vehicle to the ...emission control system, you have your vehicle, the cause of cargo, if possible. Tightening the cap will not make the CHECK ENGINE warning light turn off ...in the emission control system. To prevent serious damage to your vehicle checked by an authorized SUBARU dealer immediately. Avoid hard acceleration. Stop towing a trailer as soon as possible. If the...

Owner's Manual
Page 236
Shopping bag hook ...Cargo tie-down hooks ... Using the cover ...To remove the cover ...To install the cover housing ... 6-18 6-18 6-1 Interior equipment Interior lights ...Dome light ...Cargo area light ...Vanity mirror ...Glove box ...Center console ...Overhead console ...Dashboard storage compartment ...Convenience net ...Coin tray ...Front passenger's cup holder ...Rear passenger's... 6 Cup holders ...Accessory power outlets ...Cigarette lighter socket ... 6-8 6-9 6-11 6-14 6-15 6-16 6-16 6-16 6-17 6-17 6-12 6-13 Ashtray ...Floor mat ...Coat hook ...Cargo area cover (if equipped) ...
Shopping bag hook ...Cargo tie-down hooks ... Using the cover ...To remove the cover ...To install the cover housing ... 6-18 6-18 6-1 Interior equipment Interior lights ...Dome light ...Cargo area light ...Vanity mirror ...Glove box ...Center console ...Overhead console ...Dashboard storage compartment ...Convenience net ...Coin tray ...Front passenger's cup holder ...Rear passenger's... 6 Cup holders ...Accessory power outlets ...Cigarette lighter socket ... 6-8 6-9 6-11 6-14 6-15 6-16 6-16 6-16 6-17 6-17 6-12 6-13 Ashtray ...Floor mat ...Coat hook ...Cargo area cover (if equipped) ...

Owner's Manual
Page 251
... then insert its contents from the catches and it 6-16 This cover is detachable to the rear left passenger's hand grip. Using the cover US6061BA The coat hook is attached to make room for covering the cargo area and to the cover and guide it back into the catches as shown. You should ...hold on to protect its hooks into the cover housing while it will rewind automatically. And ...
... then insert its contents from the catches and it 6-16 This cover is detachable to the rear left passenger's hand grip. Using the cover US6061BA The coat hook is attached to make room for covering the cargo area and to the cover and guide it back into the catches as shown. You should ...hold on to protect its hooks into the cover housing while it will rewind automatically. And ...

Owner's Manual
Page 252
Rewind the cover. - CONTINUED - 6-17 To remove the cover HS6043BA 1. This could tumble forward in the cargo area. Putting excessive weight on the extended cover can break it out. 3. Store the cover housing in the event of the cover housing into the retainers. To install the cover housing To install the cover, insert both ends of a sudden stop or collision. Take it off the retainer, lift it and an object on the extended cover. Interior equipment is rewinding. 2. Do not place anything on the cover could cause serious injury.
Rewind the cover. - CONTINUED - 6-17 To remove the cover HS6043BA 1. This could tumble forward in the cargo area. Putting excessive weight on the extended cover can break it out. 3. Store the cover housing in the event of the cover housing into the retainers. To install the cover housing To install the cover, insert both ends of a sudden stop or collision. Take it off the retainer, lift it and an object on the extended cover. Interior equipment is rewinding. 2. Do not place anything on the cover could cause serious injury.

Owner's Manual
Page 316
... injury. This could tumble forward in the event of a sudden stop . Do not pile heavy loads on the extended cargo area cover. If you can break, or it whenever you do not carry unneeded cargo. - CONTINUED - 8-15 Do not place anything on the roof. These loads raise the vehicle's center of control and...
... injury. This could tumble forward in the event of a sudden stop . Do not pile heavy loads on the extended cargo area cover. If you can break, or it whenever you do not carry unneeded cargo. - CONTINUED - 8-15 Do not place anything on the roof. These loads raise the vehicle's center of control and...

Owner's Manual
Page 354
Locate the rear gate lock release lever behind the rear gate trim panel. 3. Remove the access cover at the bottom-center of emergency Rear gate - if the rear gate cannot be unlocked In the event that you cannot unlock the rear gate by operating the power door locking switches or the remote keyless entry system, you can unlock it from outside by pressing the lever inside the cargo area. 0 HS9026BA 2. Unlock the rear gate by raising the rear gate handle. HS9025BA 1. Open the rear gate from inside the trim upward. 4. In case of the rear gate trim. - CONTINUED - 9-17
Locate the rear gate lock release lever behind the rear gate trim panel. 3. Remove the access cover at the bottom-center of emergency Rear gate - if the rear gate cannot be unlocked In the event that you cannot unlock the rear gate by operating the power door locking switches or the remote keyless entry system, you can unlock it from outside by pressing the lever inside the cargo area. 0 HS9026BA 2. Unlock the rear gate by raising the rear gate handle. HS9025BA 1. Open the rear gate from inside the trim upward. 4. In case of the rear gate trim. - CONTINUED - 9-17
Owner's Manual
Page 437
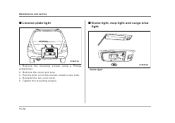
Install a new bulb. 4. Tighten the mounting screws. Pull the bulb out of the socket. Remove the mounting screws using a Phillips screwdriver. 2. Maintenance and service License plate light 0 Dome light, map light and cargo area light HSB087BA 1. HSB088BA Dome light 11-72 Remove the cover and lens. 3. Reinstall the lens and cover. 5.
Install a new bulb. 4. Tighten the mounting screws. Pull the bulb out of the socket. Remove the mounting screws using a Phillips screwdriver. 2. Maintenance and service License plate light 0 Dome light, map light and cargo area light HSB087BA 1. HSB088BA Dome light 11-72 Remove the cover and lens. 3. Reinstall the lens and cover. 5.
Owner's Manual
Page 469
... ...11-39 Braking ...7-22 Braking tips ...7-22 Breaking-in of new brake pads and linings ...11-41 Bulb Chart ...12-9 Replacing ...11-63 C Capacities ...12-4 Cargo area cover (if equipped) ...6-16 Cargo area light ...6-2 Cargo tie-down hooks ...6-18 14-2
... ...11-39 Braking ...7-22 Braking tips ...7-22 Breaking-in of new brake pads and linings ...11-41 Bulb Chart ...12-9 Replacing ...11-63 C Capacities ...12-4 Cargo area cover (if equipped) ...6-16 Cargo area light ...6-2 Cargo tie-down hooks ...6-18 14-2


