
Owner's Manual
Page 1
...you to all models and covers all the information necessary to keep your vehicle and its operation. FUJI HEAVY INDUSTRIES LTD., TOKYO, JAPAN and are those in the vehicle at the time of printing. For information not found in your SUBARU or the nearest SUBARU dealer. Some ...explanations, therefore may understand your SUBARU in excellent condition and to make the same or similar changes on choosing a SUBARU vehicle. Please leave this Owner's Manual, such as details ...
...you to all models and covers all the information necessary to keep your vehicle and its operation. FUJI HEAVY INDUSTRIES LTD., TOKYO, JAPAN and are those in the vehicle at the time of printing. For information not found in your SUBARU or the nearest SUBARU dealer. Some ...explanations, therefore may understand your SUBARU in excellent condition and to make the same or similar changes on choosing a SUBARU vehicle. Please leave this Owner's Manual, such as details ...

Owner's Manual
Page 50
Before closing the door, make sure that the belts are retracted properly to avoid catching the belt webbing in the door. 1) 2) 3) 4) Center seatbelt tongue plate Connector (tongue) Connector (buckle) Center seatbelt buckle - CONTINUED - 1-25 Seat, seatbelt and SRS airbags Unfastening the seatbelt Rear center seatbelt on wagon model 1 2 3 4 HS1053BA US1017BB Push the button on the buckle.
Before closing the door, make sure that the belts are retracted properly to avoid catching the belt webbing in the door. 1) 2) 3) 4) Center seatbelt tongue plate Connector (tongue) Connector (buckle) Center seatbelt buckle - CONTINUED - 1-25 Seat, seatbelt and SRS airbags Unfastening the seatbelt Rear center seatbelt on wagon model 1 2 3 4 HS1053BA US1017BB Push the button on the buckle.

Owner's Manual
Page 58
... extender and the seatbelt are both facing outward as shown in advance. Use the extender only for the front seatbelts and only for the model for a different model. When releasing the seatbelt, press on the buckle-release button on the extender, not on the buckle-release buttons of an extender when it...
... extender and the seatbelt are both facing outward as shown in advance. Use the extender only for the front seatbelts and only for the model for a different model. When releasing the seatbelt, press on the buckle-release button on the extender, not on the buckle-release buttons of an extender when it...

Owner's Manual
Page 191
... 1 2 3 4 5 NOTE The temperature is used in conjunction with the Temperature control dial to maintain a constant, comfortable climate within a range of Fahrenheit for US model and in Centigrade for Canadian model. 11 1) 2) 3) 4) 5) 10 9 8 7 6 UB4031BC AUTO switch OFF switch/BRIGHT Outside air temperature switch Defroster switch Rear window defogger switch (Refer to the "Rear...
... 1 2 3 4 5 NOTE The temperature is used in conjunction with the Temperature control dial to maintain a constant, comfortable climate within a range of Fahrenheit for US model and in Centigrade for Canadian model. 11 1) 2) 3) 4) 5) 10 9 8 7 6 UB4031BC AUTO switch OFF switch/BRIGHT Outside air temperature switch Defroster switch Rear window defogger switch (Refer to the "Rear...

Owner's Manual
Page 196
...the tempera- CONTINUED - 4-17 Climate control this switch is pushed. Temperature control dial ture will be set to 32°C for US models and in the passenger compartment reaches to the specified temperature. 1 1) Temperature control dial UB4033BB NOTE The temperature setting remains even after the ignition... Climate Control system operates at maximum performance until the air in increments of 0.5°C within a range of 65 to 85°F for Canadian models. The indicator light " " on the control panel comes on when this switch is pushed. : Outside air is turned to the "OFF"....
...the tempera- CONTINUED - 4-17 Climate control this switch is pushed. Temperature control dial ture will be set to 32°C for US models and in the passenger compartment reaches to the specified temperature. 1 1) Temperature control dial UB4033BB NOTE The temperature setting remains even after the ignition... Climate Control system operates at maximum performance until the air in increments of 0.5°C within a range of 65 to 85°F for Canadian models. The indicator light " " on the control panel comes on when this switch is pushed. : Outside air is turned to the "OFF"....

Owner's Manual
Page 202
... optional in dash CD changer is connected) ...Radio operation ...Built-in CD changer operation ...OnStar® system operation (models with OnStar® system) ...Radio operation ...Built-in CD changer operation ...OnStar® system operation (models with OnStar® system) ... 5-2 5-3 5-4 5-4 5-4 5-5 5-2 5-3 Installation of accessories ...Audio set (if equipped) ... 5-27 5-28 5-34 5-27 In-dash...
... optional in dash CD changer is connected) ...Radio operation ...Built-in CD changer operation ...OnStar® system operation (models with OnStar® system) ...Radio operation ...Built-in CD changer operation ...OnStar® system operation (models with OnStar® system) ... 5-2 5-3 5-4 5-4 5-4 5-5 5-2 5-3 Installation of accessories ...Audio set (if equipped) ... 5-27 5-28 5-34 5-27 In-dash...

Owner's Manual
Page 228
... call will not be shown on the display, and the speakers will automatically switch over to the incoming voice signal. Audio OnStar® system operation (models with OnStar® system) When the OnStar system operates and a call is initiated, the message "CALL" will be suspended even if the ignition key is...
... call will not be shown on the display, and the speakers will automatically switch over to the incoming voice signal. Audio OnStar® system operation (models with OnStar® system) When the OnStar system operates and a call is initiated, the message "CALL" will be suspended even if the ignition key is...

Owner's Manual
Page 239
If you continue to the 5-38 Remove the disc that has been ejected, the "All disc ejection mode" will be ejected. OnStar® system operation (models with OnStar® system) When the OnStar system operates and a call is turned to the Off position. To remove more discs in succession, repeat Steps 1 ...
If you continue to the 5-38 Remove the disc that has been ejected, the "All disc ejection mode" will be ejected. OnStar® system operation (models with OnStar® system) When the OnStar system operates and a call is turned to the Off position. To remove more discs in succession, repeat Steps 1 ...

Owner's Manual
Page 265
And do not hang items on the coat hook that weigh 2.2 lbs (1 kg) or more . Do not hang items on the coat hook that might obstruct the driver's view or that could cause injury in sudden stops or in a collision. For sedan models UBF014CA HS6040BA The coat hook is attached to each rear passenger's 6-20 A shopping bag hook is attached to each inner side wall of the trunk near the trunk lid opening. Shopping bag hook Never hang anything on the shopping bag hook that weigh 2.2 lbs (1 kg) or more . Interior equipment Convenience hook Coat hook hand grip.
And do not hang items on the coat hook that weigh 2.2 lbs (1 kg) or more . Do not hang items on the coat hook that might obstruct the driver's view or that could cause injury in sudden stops or in a collision. For sedan models UBF014CA HS6040BA The coat hook is attached to each rear passenger's 6-20 A shopping bag hook is attached to each inner side wall of the trunk near the trunk lid opening. Shopping bag hook Never hang anything on the shopping bag hook that weigh 2.2 lbs (1 kg) or more . Interior equipment Convenience hook Coat hook hand grip.

Owner's Manual
Page 266
Interior equipment For station wagon models Floor mat (if equipped) UB7014BA A shopping bag hook is located on the driver's side of the cargo area. HS6038BA A retaining pin is attached to each side of the vehicle next to the fuel filler door release. To use the hook, push the upper portion and the shopping bag hook will appear. The floor mat is secured using the built-in grommet, by placing the grommet over the pin and pushing downward. - CONTINUED - 6-21
Interior equipment For station wagon models Floor mat (if equipped) UB7014BA A shopping bag hook is located on the driver's side of the cargo area. HS6038BA A retaining pin is attached to each side of the vehicle next to the fuel filler door release. To use the hook, push the upper portion and the shopping bag hook will appear. The floor mat is secured using the built-in grommet, by placing the grommet over the pin and pushing downward. - CONTINUED - 6-21

Owner's Manual
Page 275
... damage the emission control system and may cause engine damage. Do not be concerned if your vehicle's catalytic converter Fuel requirements 2.5 Liter models The 2.5 Liter engine is designed to California Emission Standards as the Anti Knock Index (AKI). Regular unleaded gasoline with an octane rating of... 87 AKI or higher. 3.0 Liter models The 3.0 Liter engine is commonly referred to operate using unleaded gasoline with an octane rating of 91 AKI or higher. tane and ...
... damage the emission control system and may cause engine damage. Do not be concerned if your vehicle's catalytic converter Fuel requirements 2.5 Liter models The 2.5 Liter engine is designed to California Emission Standards as the Anti Knock Index (AKI). Regular unleaded gasoline with an octane rating of... 87 AKI or higher. 3.0 Liter models The 3.0 Liter engine is commonly referred to operate using unleaded gasoline with an octane rating of 91 AKI or higher. tane and ...

Owner's Manual
Page 281
.... The U.S. The EPA has issued regulations for a short period of the state emissions inspection. Other states will not damage an AWD SUBARU vehicle. Depending on a dynamometer and permits more accurate measurement of January 1, 2002. States with an electronic scan tool while the engine ...is designed to all 1996 model year and newer passenger cars and light trucks. There are complete. These inspections apply to detect engine and transmission problems that use...
.... The U.S. The EPA has issued regulations for a short period of the state emissions inspection. Other states will not damage an AWD SUBARU vehicle. Depending on a dynamometer and permits more accurate measurement of January 1, 2002. States with an electronic scan tool while the engine ...is designed to all 1996 model year and newer passenger cars and light trucks. There are complete. These inspections apply to detect engine and transmission problems that use...

Owner's Manual
Page 312
... to reactivate the VDC system, the VDC OFF indicator light goes off . If the VDC OFF switch is restarted. Only "VDC" portion will behave like a model not equipped with a snowy, gravel-covered, or otherwise slippery surface extrication of the vehicle when its wheels are stuck in the dark. While the vehicle...
... to reactivate the VDC system, the VDC OFF indicator light goes off . If the VDC OFF switch is restarted. Only "VDC" portion will behave like a model not equipped with a snowy, gravel-covered, or otherwise slippery surface extrication of the vehicle when its wheels are stuck in the dark. While the vehicle...
Owner's Manual
Page 327
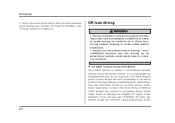
All AWD models except OUTBACK Your AWD vehicle is a passenger car designed primarily for repair under warranty. Always use . Operating it some precautions that you are some limited ... road driving Always maintain a safe driving speed according to on -road use the utmost care in driving - overconfidence because you must observe when towing your SUBARU off -road vehicle nor an all wheel drive vehicle could subject the vehicle to excessive stress which driving surfaces a relatively level, obstructionfree and otherwise similar...
All AWD models except OUTBACK Your AWD vehicle is a passenger car designed primarily for repair under warranty. Always use . Operating it some precautions that you are some limited ... road driving Always maintain a safe driving speed according to on -road use the utmost care in driving - overconfidence because you must observe when towing your SUBARU off -road vehicle nor an all wheel drive vehicle could subject the vehicle to excessive stress which driving surfaces a relatively level, obstructionfree and otherwise similar...

Owner's Manual
Page 333
...tires listed on your vehicle and may affect speedometer/odometer calibration and clearance between the tire and vehicle body. Driving tips Snow tires All models except OUTBACK When replacing original tires with winter (snow) tires, make sure you use only the same size, construction and load range as... recommended. OUTBACK models only When replacing original tires with care at all season tires" which are of radial, belted bias or bias tires since this may be...
...tires listed on your vehicle and may affect speedometer/odometer calibration and clearance between the tire and vehicle body. Driving tips Snow tires All models except OUTBACK When replacing original tires with winter (snow) tires, make sure you use only the same size, construction and load range as... recommended. OUTBACK models only When replacing original tires with care at all season tires" which are of radial, belted bias or bias tires since this may be...

Owner's Manual
Page 334
.... It also may cause rubbing on tires listed below is enough clearance between the tires and vehicle body. P205/55R16 tires for GT models P225/60R16 tires for OUTBACK models P215/60R16 winter (snow) tires for the vehicle and may be possible to enhance performance through use a combination of clearance between the...
.... It also may cause rubbing on tires listed below is enough clearance between the tires and vehicle body. P205/55R16 tires for GT models P225/60R16 tires for OUTBACK models P215/60R16 winter (snow) tires for the vehicle and may be possible to enhance performance through use a combination of clearance between the...

Owner's Manual
Page 335
... the "Automatic transmission" section in 2nd position. Rocking the vehicle If you must rock the vehicle to damage the vehicle body or suspension. Driving tips models Driving on snowy grades or icy roads may require the use the utmost care when driving with tire chains - overconfidence because you are of the...
... the "Automatic transmission" section in 2nd position. Rocking the vehicle If you must rock the vehicle to damage the vehicle body or suspension. Driving tips models Driving on snowy grades or icy roads may require the use the utmost care when driving with tire chains - overconfidence because you are of the...

Owner's Manual
Page 349
... of 104°F (40°C) or above . When towing a trailer on a long uphill grade continuously for over 5 miles (8 km) with brakes. Driving tips OUTBACK Wagon Model Conditions Maximum total trailer weight 1,000 lbs (453 kg) 2,400 lbs (1,087 kg) 1,000 lbs (453 kg) 2,400 lbs (1,087 kg) 1,200 lbs (543 kg...) Others Model Conditions Maximum total trailer weight 1,000 lbs (453 kg) 2,000 lbs (906 kg) 1,000 lbs (453 kg) 2,000 lbs (906 kg) 1,000 lbs (453 kg...
... of 104°F (40°C) or above . When towing a trailer on a long uphill grade continuously for over 5 miles (8 km) with brakes. Driving tips OUTBACK Wagon Model Conditions Maximum total trailer weight 1,000 lbs (453 kg) 2,400 lbs (1,087 kg) 1,000 lbs (453 kg) 2,400 lbs (1,087 kg) 1,200 lbs (543 kg...) Others Model Conditions Maximum total trailer weight 1,000 lbs (453 kg) 2,000 lbs (906 kg) 1,000 lbs (453 kg) 2,000 lbs (906 kg) 1,000 lbs (453 kg...

Owner's Manual
Page 376
In case of emergency _ 4 1 + + 2 3 _ A B UB8007BC 2.5 liter models A) Booster battery B) Engine lifting bracket - CONTINUED - 9-17
In case of emergency _ 4 1 + + 2 3 _ A B UB8007BC 2.5 liter models A) Booster battery B) Engine lifting bracket - CONTINUED - 9-17

Owner's Manual
Page 377
In case of emergency 1) Connect one jumper cable to the positive (+) terminal on the discharged battery. 2) Connect the other end of the jumper cable to the positive (+) terminal of the booster battery. 3) Connect one end of the other cable to the negative (-) terminal of the booster battery. 4) Connect the other metal. Make sure that the cables are not near any moving parts and that the cable clamps are not in contact with any other end of the cable. 2.5 liter models: To the engine lifting bracket. 3.0 liter models: To the strut mounting nut. UB9031BB 3.0 liter models 9-18
In case of emergency 1) Connect one jumper cable to the positive (+) terminal on the discharged battery. 2) Connect the other end of the jumper cable to the positive (+) terminal of the booster battery. 3) Connect one end of the other cable to the negative (-) terminal of the booster battery. 4) Connect the other metal. Make sure that the cables are not near any moving parts and that the cable clamps are not in contact with any other end of the cable. 2.5 liter models: To the engine lifting bracket. 3.0 liter models: To the strut mounting nut. UB9031BB 3.0 liter models 9-18
