
Owner's Manual
Page 15
Illustrated index Exterior 1 2 3 4 5 6 1) 2) 3) 4) 5) 6) 7) 8) 9) 10) 11) 12) 13) Hood lock release (page 11-5) Headlight switch (page 3-19) Bulb replacement (page 11-65) Wiper switch (page 3-26) Moonroof (page 2-32) Roof rail (page 8-20) Door locks (page 2-3) Tire pressure (page 11-44) Flat tires (page 9-5) Tire chains (page 8-15) Fog light switch (page 3-24) Tie-down hooks (page 9-21) Towing hook (page 9-21) 13 12 11 10 9 8 7 UBF003BB 12
Illustrated index Exterior 1 2 3 4 5 6 1) 2) 3) 4) 5) 6) 7) 8) 9) 10) 11) 12) 13) Hood lock release (page 11-5) Headlight switch (page 3-19) Bulb replacement (page 11-65) Wiper switch (page 3-26) Moonroof (page 2-32) Roof rail (page 8-20) Door locks (page 2-3) Tire pressure (page 11-44) Flat tires (page 9-5) Tire chains (page 8-15) Fog light switch (page 3-24) Tie-down hooks (page 9-21) Towing hook (page 9-21) 13 12 11 10 9 8 7 UBF003BB 12

Owner's Manual
Page 16
2 3 1) 2) 3) 4) 5) 6) 1 2 3 7) 8) Rear wiper switch (page 3-27) Rear window defogger switch (page 3-28) Fuel filler lid (page 7-4) Child safety locks (page 2-22) Towing hook (page 9-21) Trunk/Rear gate (page 2-26/231) Tie-down hooks (page 9-21) Bulb replacement (page 11-71) 8 7 6 5 4 4 6 8 7 5 UBF061BB - CONTINUED - 13
2 3 1) 2) 3) 4) 5) 6) 1 2 3 7) 8) Rear wiper switch (page 3-27) Rear window defogger switch (page 3-28) Fuel filler lid (page 7-4) Child safety locks (page 2-22) Towing hook (page 9-21) Trunk/Rear gate (page 2-26/231) Tie-down hooks (page 9-21) Bulb replacement (page 11-71) 8 7 6 5 4 4 6 8 7 5 UBF061BB - CONTINUED - 13

Owner's Manual
Page 153
...switch to fasten the seatbelt. The seatbelt reminder chime will come on while driving or remains illuminated even after six seconds. Contact your authorized SUBARU dealer for about six seconds to remind the driver to the "ON" position. Seatbelt warning light and chime When the ignition switch is... buckled or it indicates a burned-out bulb or a malfunction of the bulbs. This shows the SRS frontal airbag and SRS side airbag (if equipped) and seatbelt pretensioners are in normal operation.
...switch to fasten the seatbelt. The seatbelt reminder chime will come on while driving or remains illuminated even after six seconds. Contact your authorized SUBARU dealer for about six seconds to remind the driver to the "ON" position. Seatbelt warning light and chime When the ignition switch is... buckled or it indicates a burned-out bulb or a malfunction of the bulbs. This shows the SRS frontal airbag and SRS side airbag (if equipped) and seatbelt pretensioners are in normal operation.

Owner's Manual
Page 160
... signal. Turn signal indicator lights These lights show the operation of the selector lever. Refer to the "Replacing bulbs" section in the manual gate, this indicator shows the currently selected gear. Replace the bulb as soon as possible. Instruments and controls Selector lever position indicator (AT vehicles) Gear position indicator (AT vehicle...
... signal. Turn signal indicator lights These lights show the operation of the selector lever. Refer to the "Replacing bulbs" section in the manual gate, this indicator shows the currently selected gear. Replace the bulb as soon as possible. Instruments and controls Selector lever position indicator (AT vehicles) Gear position indicator (AT vehicle...

Owner's Manual
Page 403
... Aluminum wheels (if equipped) ...11-51 Windshield washer fluid ...11-51 Replacement of wiper blades ...11-52 Battery ...Fuses ...Main fuse ...Installation of accessories ...Replacing bulbs ...Replacement wiper blade assembly ...11-53 Replacement wiper blade rubber ...11-53 Headlight ...Front fog light (if equipped) ...Front turn signal light, parking light and...
... Aluminum wheels (if equipped) ...11-51 Windshield washer fluid ...11-51 Replacement of wiper blades ...11-52 Battery ...Fuses ...Main fuse ...Installation of accessories ...Replacing bulbs ...Replacement wiper blade assembly ...11-53 Replacement wiper blade rubber ...11-53 Headlight ...Front fog light (if equipped) ...Front turn signal light, parking light and...

Owner's Manual
Page 464
2Maintenance and service Replacing bulbs 12 14 10 12 1 2 3 4 8 9 10 11 8 13 11 12 7 6 5 13 12 UBB101BB - CONTINUED - 11-63
2Maintenance and service Replacing bulbs 12 14 10 12 1 2 3 4 8 9 10 11 8 13 11 12 7 6 5 13 12 UBB101BB - CONTINUED - 11-63
Owner's Manual
Page 465
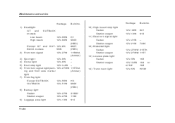
2Maintenance and service Wattage 1) Headlight GT and OUTBACK models Low beam 12V-55W High beam 12V-60W Bulb No. 10) High mount stop light Sedan Station wagon 11) Rear turn signal light Sedan Station wagon 12) Brake/tail light Sedan Station wagon 13) ...License plate light Sedan Station wagon 14) Trunk room light Wattage 12V-16W 12V-13W 12V-21W 12V-21W Bulb No. 921 912 - 7440 2) 3) 4) 5) 6) 7) 8) 9) H1 9005 (HB3) Except GT and OUT- 12V-65/ 9007 BACK models 55W (HB5) Front turn signal 12V-27W 1156NA (Amber...
2Maintenance and service Wattage 1) Headlight GT and OUTBACK models Low beam 12V-55W High beam 12V-60W Bulb No. 10) High mount stop light Sedan Station wagon 11) Rear turn signal light Sedan Station wagon 12) Brake/tail light Sedan Station wagon 13) ...License plate light Sedan Station wagon 14) Trunk room light Wattage 12V-16W 12V-13W 12V-21W 12V-21W Bulb No. 921 912 - 7440 2) 3) 4) 5) 6) 7) 8) 9) H1 9005 (HB3) Except GT and OUT- 12V-65/ 9007 BACK models 55W (HB5) Front turn signal 12V-27W 1156NA (Amber...

Owner's Manual
Page 466
NOTE UBB039BA If headlight aiming is required, consult your SUBARU dealer for proper adjustment of the headlight aim. - CONTINUED - 11-65 2Maintenance and service Headlight For GT and OUTBACK models Halogen headlight bulbs become very hot while in use. If there are finger prints or grease on the bulb surface, wipe them away with a soft cloth moistened with bare hands or greasy gloves, finger prints or grease on the bulb surface will develop into hot spots and cause the bulb to break. If you touch the bulb surface with alcohol.
NOTE UBB039BA If headlight aiming is required, consult your SUBARU dealer for proper adjustment of the headlight aim. - CONTINUED - 11-65 2Maintenance and service Headlight For GT and OUTBACK models Halogen headlight bulbs become very hot while in use. If there are finger prints or grease on the bulb surface, wipe them away with a soft cloth moistened with bare hands or greasy gloves, finger prints or grease on the bulb surface will develop into hot spots and cause the bulb to break. If you touch the bulb surface with alcohol.

Owner's Manual
Page 467
Disconnect the electrical connector for the black cable. 11-66 2Maintenance and service Low beam light bulbs 1 1 0 2 3 UBB040BB UBB041BB 2 1) Low beam light bulb 2) High beam light bulb Remove the headlight bulb cover, by turning it counterclockwise. 1) Electrical connector 2) Red cable 3) Black cable 1.
Disconnect the electrical connector for the black cable. 11-66 2Maintenance and service Low beam light bulbs 1 1 0 2 3 UBB040BB UBB041BB 2 1) Low beam light bulb 2) High beam light bulb Remove the headlight bulb cover, by turning it counterclockwise. 1) Electrical connector 2) Red cable 3) Black cable 1.

Owner's Manual
Page 468
Reconnect the electrical connector for black cable. 5. Remove the retainer spring. 3. Install the headlight bulb cover. 2Maintenance and service High beam light bulbs 0 UBB042BA 2. UBB043BA - CONTINUED - 11-67 Replace the bulb, then set the retainer spring securely. 4.
Reconnect the electrical connector for black cable. 5. Remove the retainer spring. 3. Install the headlight bulb cover. 2Maintenance and service High beam light bulbs 0 UBB042BA 2. UBB043BA - CONTINUED - 11-67 Replace the bulb, then set the retainer spring securely. 4.

Owner's Manual
Page 469
... care not to the headlight assembly, turn it clockwise until it counterclockwise. 3. Install the headlight bulb cover. 1) Electrical connector 2) Push 1. Replace the bulb with new one. 4. Reconnect the electrical connector. To install the bulb to touch the bulb surface. 5. Disconnect the electrical connector while pressing the lock release tab. 11-68 2Maintenance and service...
... care not to the headlight assembly, turn it clockwise until it counterclockwise. 3. Install the headlight bulb cover. 1) Electrical connector 2) Push 1. Replace the bulb with new one. 4. Reconnect the electrical connector. To install the bulb to touch the bulb surface. 5. Disconnect the electrical connector while pressing the lock release tab. 11-68 2Maintenance and service...

Owner's Manual
Page 470
...by turning it locks. 6. Remove the electrical connector. After a bulb has been replaced, it may be replaced. Install the new bulb. 5. Front fog light (if equipped) It may become necessary to replace the bulbs. When the headlight assembly has been removed and then reinstalled, ...light The headlight assembly must be removed before the front turn signal light and parking light bulbs can be difficult to make a headlight aiming adjustment. UBB016BA 1. Remove the bulb from the headlight assembly by turning it clockwise until it counterclockwise. 3. Remove the headlight ...
...by turning it locks. 6. Remove the electrical connector. After a bulb has been replaced, it may be replaced. Install the new bulb. 5. Front fog light (if equipped) It may become necessary to replace the bulbs. When the headlight assembly has been removed and then reinstalled, ...light The headlight assembly must be removed before the front turn signal light and parking light bulbs can be difficult to make a headlight aiming adjustment. UBB016BA 1. Remove the bulb from the headlight assembly by turning it clockwise until it counterclockwise. 3. Remove the headlight ...

Owner's Manual
Page 471
Tighten the mounting screws. 11-70 Set the headlight assembly into the headlight assembly and turn signal light bulb/parking and front side marker light bulb 3. Remove the bulb from the headlight assembly by pushing it locks. 6. Install a new bulb in the socket. 5. Set the bulb socket into the vehicle body. Remove the bulb socket from the socket by turning it counterclockwise. 4. Move the headlight assembly forward. 1 2 UBB039CB UBB020BA 1) Front turn signal light bulb 2) Front turn it clockwise until it and turning counterclockwise. 2Maintenance and service 2.
Tighten the mounting screws. 11-70 Set the headlight assembly into the headlight assembly and turn signal light bulb/parking and front side marker light bulb 3. Remove the bulb from the headlight assembly by pushing it locks. 6. Install a new bulb in the socket. 5. Set the bulb socket into the vehicle body. Remove the bulb socket from the socket by turning it counterclockwise. 4. Move the headlight assembly forward. 1 2 UBB039CB UBB020BA 1) Front turn signal light bulb 2) Front turn it clockwise until it and turning counterclockwise. 2Maintenance and service 2.

Owner's Manual
Page 472
Open the rear combination light cover. Open the trunk lid. 2. 2Maintenance and service Rear combination lights Sedan 1. For covers on the trunk lid: 1 2 UBB034BC 1) Back-up light bulb 2) Brake/tail light bulb UBF014DA Unlatch the cover by pushing the knob and open the cover. - CONTINUED - 11-71
Open the rear combination light cover. Open the trunk lid. 2. 2Maintenance and service Rear combination lights Sedan 1. For covers on the trunk lid: 1 2 UBB034BC 1) Back-up light bulb 2) Brake/tail light bulb UBF014DA Unlatch the cover by pushing the knob and open the cover. - CONTINUED - 11-71

Owner's Manual
Page 473
... and turn it clockwise until it counterclockwise. 4. Remove the bulb socket from the light assembly by your SUBARU dealer. 2 UBB035BB 1) Brake/tail light bulb 2) Rear turn signal light bulbs It may be difficult to replace the bulbs. Install a new bulb in the socket. 6. Others: Pull the bulb out of the cover with a regular screwdriver. 11-72 Close...
... and turn it clockwise until it counterclockwise. 4. Remove the bulb socket from the light assembly by your SUBARU dealer. 2 UBB035BB 1) Brake/tail light bulb 2) Rear turn signal light bulbs It may be difficult to replace the bulbs. Install a new bulb in the socket. 6. Others: Pull the bulb out of the cover with a regular screwdriver. 11-72 Close...

Owner's Manual
Page 474
Then, slide the rear combination lamp assembly to the rear and remove it counterclockwise. - CONTINUED - 11-73 Remove the bulb socket from the rear combination light assembly by turning it from the vehicle. 3. Remove the upper and lower nuts. Using a Phillips screwdriver, remove the upper and lower screws that secure the side cover of the rear combination light assembly. 1) Rear turn signal light bulb 2) Brake/tail light bulb 4. 2Maintenance and service 1 1 2 UBB022BB UBB070BB 1) Nuts 2.
Then, slide the rear combination lamp assembly to the rear and remove it counterclockwise. - CONTINUED - 11-73 Remove the bulb socket from the rear combination light assembly by turning it from the vehicle. 3. Remove the upper and lower nuts. Using a Phillips screwdriver, remove the upper and lower screws that secure the side cover of the rear combination light assembly. 1) Rear turn signal light bulb 2) Brake/tail light bulb 4. 2Maintenance and service 1 1 2 UBB022BB UBB070BB 1) Nuts 2.

Owner's Manual
Page 475
...assembly. 9. Brake/tail light: Remove the bulb from the interior of the socket. Install a new bulb in the socket. 7. Fit the rear combination light assembly into the rear combination light assembly and turn it clockwise until it counterclockwise. 6. Set the bulb holder into the vehicle body and tighten ...the nuts from the socket by pushing it and turning it locks. 8. Remove the bulb from the socket. Turn signal light: Pull the bulb out of the vehicle. 11-74 2Maintenance and ...
...assembly. 9. Brake/tail light: Remove the bulb from the interior of the socket. Install a new bulb in the socket. 7. Fit the rear combination light assembly into the rear combination light assembly and turn it clockwise until it counterclockwise. 6. Set the bulb holder into the vehicle body and tighten ...the nuts from the socket by pushing it and turning it locks. 8. Remove the bulb from the socket. Turn signal light: Pull the bulb out of the vehicle. 11-74 2Maintenance and ...

Owner's Manual
Page 476
...into the rear finisher light assembly and turn it clockwise until it and turning counterclockwise. Open the cover up light bulb 2) Brake/tail light bulb 3. Remove the bulb from the rear finisher light assembly by turning it counterclockwise. - CONTINUED - 11-75 Unlatch the rear finisher light ...cover by pushing it locks. 5. 2Maintenance and service 10.Reinstall the light bulb replacement service hole covers. Install a new bulb in the socket. 4. Remove the bulb socket from the socket by moving the knob upward. Close the cover and latch the lock. ...
...into the rear finisher light assembly and turn it clockwise until it and turning counterclockwise. Open the cover up light bulb 2) Brake/tail light bulb 3. Remove the bulb from the rear finisher light assembly by turning it counterclockwise. - CONTINUED - 11-75 Unlatch the rear finisher light ...cover by pushing it locks. 5. 2Maintenance and service 10.Reinstall the light bulb replacement service hole covers. Install a new bulb in the socket. 4. Remove the bulb socket from the socket by moving the knob upward. Close the cover and latch the lock. ...

Owner's Manual
Page 477
2Maintenance and service License plate light 0 1. Install a new bulb. 4. Tighten the mounting screws. Reinstall the lens and cover. 5. Map light, dome light, luggage compartment light and door step light UBF013EA UBB029BA Map light (without moonroof model) UBB027BA 11-76 Remove the cover and lens. 3. Remove the mounting screws using a phillips screwdriver. 2. Pull the bulb out of the socket.
2Maintenance and service License plate light 0 1. Install a new bulb. 4. Tighten the mounting screws. Reinstall the lens and cover. 5. Map light, dome light, luggage compartment light and door step light UBF013EA UBB029BA Map light (without moonroof model) UBB027BA 11-76 Remove the cover and lens. 3. Remove the mounting screws using a phillips screwdriver. 2. Pull the bulb out of the socket.

Owner's Manual
Page 479
Pull the bulb out of the lens with a regular screwdriver. 2. Reinstall the lens. 11-78 Remove the lens by prying the edge of the socket. 2Maintenance and service 1 Luggage compartment light 1) Bulb UBB067BB UBS037AA Door step light 1. Install a new bulb. 3.
Pull the bulb out of the lens with a regular screwdriver. 2. Reinstall the lens. 11-78 Remove the lens by prying the edge of the socket. 2Maintenance and service 1 Luggage compartment light 1) Bulb UBB067BB UBS037AA Door step light 1. Install a new bulb. 3.


