
Owner's Manual
Page 202
... lighter ...Using as an accessory power outlet ...Coat hook ...Cargo net hooks ...Cargo tie-down hooks ...Operation ...Bed extender removal ...Securing the cover ... 6-2 6-3 6-3 6-4 6-4 6-5 6-5 6-6 6-6 6-2 Roof rail and crossbar ... Cargo lamp ...Bed cover (if equipped) ... 6-19 6-20 6-20 6-1 Cover removal ...Cover reinstallation ...Installing carrying attachments on the crossbars ...Removal and installation of the crossbars ... 6-23 6-24 6-24 6-21...
... lighter ...Using as an accessory power outlet ...Coat hook ...Cargo net hooks ...Cargo tie-down hooks ...Operation ...Bed extender removal ...Securing the cover ... 6-2 6-3 6-3 6-4 6-4 6-5 6-5 6-6 6-6 6-2 Roof rail and crossbar ... Cargo lamp ...Bed cover (if equipped) ... 6-19 6-20 6-20 6-1 Cover removal ...Cover reinstallation ...Installing carrying attachments on the crossbars ...Removal and installation of the crossbars ... 6-23 6-24 6-24 6-21...

Owner's Manual
Page 221
" Do not use the hard bed cover section as a step. " To avoid damage, clean the bed cover with only soap, water and a soft brush. " Remove the soft portion of the bed. " Do not use the bed cover to cover the cargo area of the bed cover before taking the vehicle through a car wash. UB6033AA UB6034BA 6-20 Interior and exterior equipments Bed cover (if equipped) The bed cover is water resistant, but not waterproof. ! The bed cover is designed to secure cargo. Securing the cover " Do not place cargo on top of the bed cover.
" Do not use the hard bed cover section as a step. " To avoid damage, clean the bed cover with only soap, water and a soft brush. " Remove the soft portion of the bed. " Do not use the bed cover to cover the cargo area of the bed cover before taking the vehicle through a car wash. UB6033AA UB6034BA 6-20 Interior and exterior equipments Bed cover (if equipped) The bed cover is water resistant, but not waterproof. ! The bed cover is designed to secure cargo. Securing the cover " Do not place cargo on top of the bed cover.

Owner's Manual
Page 222
...closeout wraps and firmly pull the cover out to one side. Fasten both closeout wraps with Velcro around the entire length of the bed. Interior and exterior equipments To secure the soft portion of the bed cover to the bed, simply start from the bed cover's hard section for cleaning or ...storage. UB6035BA - CONTINUED - 6-21 Your cover should be removed from either side of the...
...closeout wraps and firmly pull the cover out to one side. Fasten both closeout wraps with Velcro around the entire length of the bed. Interior and exterior equipments To secure the soft portion of the bed cover to the bed, simply start from the bed cover's hard section for cleaning or ...storage. UB6035BA - CONTINUED - 6-21 Your cover should be removed from either side of the...

Owner's Manual
Page 223
...portion are straight and ready to enter the flared out portion of the soft portion into the bed cover's hard section, make sure the soft portion is flared out to "Securing the cover". 6-22 Start by inserting the left front edge of the hard section. To complete the ...installation, refer to ease installation. Once you insert (and pull) the soft portion of the bed cover into the right side of the bed cover can be reinstalled onto the bed cover's hard section. This area is equally centered on both sides. Cover reinstallation UB6038BA UB6037BA The soft portion of the hard...
...portion are straight and ready to enter the flared out portion of the soft portion into the bed cover's hard section, make sure the soft portion is flared out to "Securing the cover". 6-22 Start by inserting the left front edge of the hard section. To complete the ...installation, refer to ease installation. Once you insert (and pull) the soft portion of the bed cover into the right side of the bed cover can be reinstalled onto the bed cover's hard section. This area is equally centered on both sides. Cover reinstallation UB6038BA UB6037BA The soft portion of the hard...
Owner's Manual
Page 235
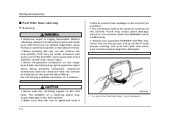
...the cap, do not remove the cap quickly. Approved containers must be under the SUBARU Limited Warranty. Do not fill any cleaning agents to the fuel tank. Starting and ...that there are no lighted cigarettes, open the fuel filler door, pull it outward. If you use a genuine SUBARU fuel filler cap. Refueling " Gasoline vapor is tightened until it may ignite gasoline vapor when filling portable containers. ... be damaged. 0 " Never add any portable container on the cargo bed. Fuels may cause paint damage, which may cause damage to prevent fuel spillage in hot weather, which is...
...the cap, do not remove the cap quickly. Approved containers must be under the SUBARU Limited Warranty. Do not fill any cleaning agents to the fuel tank. Starting and ...that there are no lighted cigarettes, open the fuel filler door, pull it outward. If you use a genuine SUBARU fuel filler cap. Refueling " Gasoline vapor is tightened until it may ignite gasoline vapor when filling portable containers. ... be damaged. 0 " Never add any portable container on the cargo bed. Fuels may cause paint damage, which may cause damage to prevent fuel spillage in hot weather, which is...
Owner's Manual
Page 295
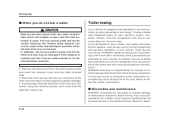
... equipment, or from the hitch receiver tube and insert the receiver cover onto the hitch receiver tube. " Occasionally lubricate terminals of the hitch wire harness to protect against possible damage. Warranties and maintenance SUBARU warranties do decide to follow the proper instructions. Seek the advice ... and the license plate bracket is at the lowered/open position when the ball mount is used at the lowered/open and the bed extender is connected. " Remove the ball mount from any errors or omissions in purchasing a hitch and other towing equipment manufacturers. ...
... equipment, or from the hitch receiver tube and insert the receiver cover onto the hitch receiver tube. " Occasionally lubricate terminals of the hitch wire harness to protect against possible damage. Warranties and maintenance SUBARU warranties do decide to follow the proper instructions. Seek the advice ... and the license plate bracket is at the lowered/open position when the ball mount is used at the lowered/open and the bed extender is connected. " Remove the ball mount from any errors or omissions in purchasing a hitch and other towing equipment manufacturers. ...

Owner's Manual
Page 451
... Capacities ...12-3 Fluid ...11-28 Selector lever ...7-15, 7-21 Shift lock release ...7-19, 7-28 SPORTSHIFT mode - BAJA-Turbo ...7-20 Temperature warning light ...3-12 B Battery ...11-55 Jump starting ...9-18 14-2 Replacement (Remote keyless entry system) ...Bed cover ...Bed extender ...Brake Booster ...Fluid ...Pad and lining ...Pedal ...Brake system ...Warning light ...Braking ...Breaking-in of...
... Capacities ...12-3 Fluid ...11-28 Selector lever ...7-15, 7-21 Shift lock release ...7-19, 7-28 SPORTSHIFT mode - BAJA-Turbo ...7-20 Temperature warning light ...3-12 B Battery ...11-55 Jump starting ...9-18 14-2 Replacement (Remote keyless entry system) ...Bed cover ...Bed extender ...Brake Booster ...Fluid ...Pad and lining ...Pedal ...Brake system ...Warning light ...Braking ...Breaking-in of...

