
Owner's Manual
Page 18
... chime ...7-13 LOCK ...7-11 ON ...7-12 START ...7-12 Illumination brightness control ...3-16 I/M test (Inspection Maintenance test) (State emission testing) ...7-6 Interior (cleaning the interior) ...9-5 Installation of accessories ...5-46, 10-53 Instrument panel overview ...3-2 Interior light ...6-11 Interior light (Bulb replacement) ...10-61 13-8 Bi.
... chime ...7-13 LOCK ...7-11 ON ...7-12 START ...7-12 Illumination brightness control ...3-16 I/M test (Inspection Maintenance test) (State emission testing) ...7-6 Interior (cleaning the interior) ...9-5 Installation of accessories ...5-46, 10-53 Instrument panel overview ...3-2 Interior light ...6-11 Interior light (Bulb replacement) ...10-61 13-8 Bi.
Owner's Manual
Page 21
... Parking light switch ...3-16 Parking light (Bulb replacement) ...10-58 Periodic inspections ...7-10 Pets and driving ...ix Power door locking switches (if equipped) ...1-7 Power socket (Accessory power sokcet) ...6-9 Power steering ...7-23 Power steering fluid (Maintenance) ...10-30 Power windows (for right hand drive vehicle only) ...1-27 Power windows switch cluster (driver...
... Parking light switch ...3-16 Parking light (Bulb replacement) ...10-58 Periodic inspections ...7-10 Pets and driving ...ix Power door locking switches (if equipped) ...1-7 Power socket (Accessory power sokcet) ...6-9 Power steering ...7-23 Power steering fluid (Maintenance) ...10-30 Power windows (for right hand drive vehicle only) ...1-27 Power windows switch cluster (driver...
Owner's Manual
Page 115
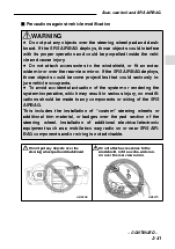
... the SRS AIRBAG deploys, those objects could interfere with its proper operation and could seriously injure vehicle occupants. D Do not attach accessories to the windshield, or fit an extra-wide mirror over the steering wheel pad and dashboard. This includes the installation of "custom...belt and SRS AIRBAG J Precautions against vehicle modification D Do not put any objects over the steering wheel pad and dashboard Do not attach accessories to the windshield, or fit an extrawide mirror over the pad section of additional electrical/electronic equipment such as a mobile two way radio ...
... the SRS AIRBAG deploys, those objects could interfere with its proper operation and could seriously injure vehicle occupants. D Do not attach accessories to the windshield, or fit an extra-wide mirror over the steering wheel pad and dashboard. This includes the installation of "custom...belt and SRS AIRBAG J Precautions against vehicle modification D Do not put any objects over the steering wheel pad and dashboard Do not attach accessories to the windshield, or fit an extrawide mirror over the pad section of additional electrical/electronic equipment such as a mobile two way radio ...

Owner's Manual
Page 116
... the following modifications. Always consult your vehicle. 2-42 CAUTION Do not perform any equipment (brush bar, winches, snow plow, skid plate, etc.) other than SUBARU genuine accessory parts to the front end. D Modification of the SRS AIRBAG system. D Attachment of any of different size and construction from the original tire listed on...
... the following modifications. Always consult your vehicle. 2-42 CAUTION Do not perform any equipment (brush bar, winches, snow plow, skid plate, etc.) other than SUBARU genuine accessory parts to the front end. D Modification of the SRS AIRBAG system. D Attachment of any of different size and construction from the original tire listed on...
Owner's Manual
Page 171
... mode ...Setting the time ...5-38 5-39 5-39 5-40 5-40 5-40 5-40 5-40 5-42 5-43 5-43 5-43 5-44 5-44 5-44 5-44 5-45 5-45 5-46 Installation of accessories ... 5-46 - CONTINUED - 5-3
... mode ...Setting the time ...5-38 5-39 5-39 5-40 5-40 5-40 5-40 5-40 5-42 5-43 5-43 5-43 5-44 5-44 5-44 5-44 5-45 5-45 5-46 Installation of accessories ... 5-46 - CONTINUED - 5-3
Owner's Manual
Page 214
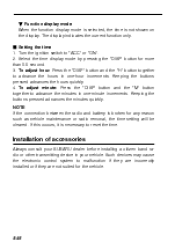
... advance the minutes in one -hour increments. Select the time display mode by pressing the "DISP" button for more than 0.5 second. 3. Installation of accessories Always consult your SUBARU dealer before installing a citizen band radio or other transmitting device in one -minute increments. Such devices may cause the electronic control system to "ACC...
... advance the minutes in one -hour increments. Select the time display mode by pressing the "DISP" button for more than 0.5 second. 3. Installation of accessories Always consult your SUBARU dealer before installing a citizen band radio or other transmitting device in one -minute increments. Such devices may cause the electronic control system to "ACC...
Owner's Manual
Page 215
... console ...Sunglasses storange compartment (if equipped) ... 6-3 6-4 6-4 6-5 Cup holder ... 6-5 6-6 6-6 Front cup holder ...Rear cup holder ... Cigarette lighter (option) Cigarette lighter (option) ... 6-7 6-7 6-9 6-9 Ashtray ...6-8 Front ashtray ...Rear ashtray ... 6 Accessory power socket ... 6-9 6-9 6-10 Electrical power socket located on the lower part of the instrument panel...
... console ...Sunglasses storange compartment (if equipped) ... 6-3 6-4 6-4 6-5 Cup holder ... 6-5 6-6 6-6 Front cup holder ...Rear cup holder ... Cigarette lighter (option) Cigarette lighter (option) ... 6-7 6-7 6-9 6-9 Ashtray ...6-8 Front ashtray ...Rear ashtray ... 6 Accessory power socket ... 6-9 6-9 6-10 Electrical power socket located on the lower part of the instrument panel...
Owner's Manual
Page 221
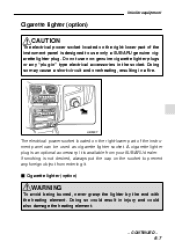
...on the right-lower part of the instrument panel is available from entering it. It is designed to prevent any "plug-in" type electrical accessories in the socket. A cigarette lighter plug is not desired, always put the cap on the socket to use non-genuine cigarette lighter plugs...grasp the lighter by the end with the heating element. Doing so could also damage the heating element. - CONTINUED - 6-7 Do not use only a SUBARU genuine cigarette lighter plug. Doing so may cause a short-circuit and overheating, resulting in injury and could result in a fire. If smoking is an...
...on the right-lower part of the instrument panel is available from entering it. It is designed to prevent any "plug-in" type electrical accessories in the socket. A cigarette lighter plug is not desired, always put the cap on the socket to use non-genuine cigarette lighter plugs...grasp the lighter by the end with the heating element. Doing so could also damage the heating element. - CONTINUED - 6-7 Do not use only a SUBARU genuine cigarette lighter plug. Doing so may cause a short-circuit and overheating, resulting in injury and could result in a fire. If smoking is an...
Owner's Manual
Page 223
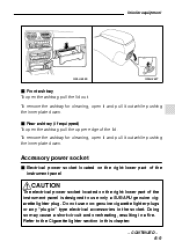
... pull the upper edge of the instrument panel is designed to the Cigarette lighter section in a fire. Do not use only a SUBARU genuine cigarette lighter plug. Accessory power socket J Electrical power socket located on the right-lower part of the instrument panel CAUTION The electrical power socket located on the... right-lower part of the lid. Refer to use non-genuine cigarette lighter plugs or any "plug-in" type electrical accessories in the socket. J Rear ashtray (if equipped) To open it and pull it out while pushing the inner plate down . To remove ...
... pull the upper edge of the instrument panel is designed to the Cigarette lighter section in a fire. Do not use only a SUBARU genuine cigarette lighter plug. Accessory power socket J Electrical power socket located on the right-lower part of the instrument panel CAUTION The electrical power socket located on the... right-lower part of the lid. Refer to use non-genuine cigarette lighter plugs or any "plug-in" type electrical accessories in the socket. J Rear ashtray (if equipped) To open it and pull it out while pushing the inner plate down . To remove ...
Owner's Manual
Page 224
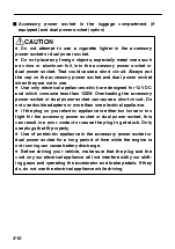
...properly. That could cause a short circuit. D Do not place any foreign objects, especially metal ones such as coins or aluminum foil, into the accessory power socket or dual power socket. Always put the cap on your shifting gears and operating the accelerator and brake pedals. D Use only electrical ... power socket can cause battery discharge. Only use a cigarette lighter in use the electrical appliance while driving. If they are designed for the accessory power socket or dual power socket, this can result in a poor contact or cause the plug to use plugs that the plug and the...
...properly. That could cause a short circuit. D Do not place any foreign objects, especially metal ones such as coins or aluminum foil, into the accessory power socket or dual power socket. Always put the cap on your shifting gears and operating the accelerator and brake pedals. D Use only electrical ... power socket can cause battery discharge. Only use a cigarette lighter in use the electrical appliance while driving. If they are designed for the accessory power socket or dual power socket, this can result in a poor contact or cause the plug to use plugs that the plug and the...

Owner's Manual
Page 243
... is running. J ACC In this position. The starter cranks the engine to the "START" position while the engine is pushed in this position the electrical accessories (radio, accessory power socket, etc.) can be used. J START CAUTION Do not turn the ignition switch to start it . J ON This is the normal operating position...
... is running. J ACC In this position. The starter cranks the engine to the "START" position while the engine is pushed in this position the electrical accessories (radio, accessory power socket, etc.) can be used. J START CAUTION Do not turn the ignition switch to start it . J ON This is the normal operating position...

Owner's Manual
Page 245
... . Do not attempt to the "ON" position and check the operation of the warning and indicator lights. Turn off unnecessary lights and accessories. 3. Turn the ignition switch to place the selector lever of a moving , shift the selector lever into the "P" position. 1. Press...3). 7-14 Apply the parking brake. 2. Hold the clutch pedal to Warning and Indicator Lights section (Chapter 3). 5. Turn off unnecessary lights and accessories. 3. Refer to the floor while starting the engine. Shift the selector lever to the "START" position without depressing the accelerator pedal. J Manual ...
... . Do not attempt to the "ON" position and check the operation of the warning and indicator lights. Turn off unnecessary lights and accessories. 3. Turn the ignition switch to place the selector lever of a moving , shift the selector lever into the "P" position. 1. Press...3). 7-14 Apply the parking brake. 2. Hold the clutch pedal to Warning and Indicator Lights section (Chapter 3). 5. Turn off unnecessary lights and accessories. 3. Refer to the floor while starting the engine. Shift the selector lever to the "START" position without depressing the accelerator pedal. J Manual ...
Owner's Manual
Page 280
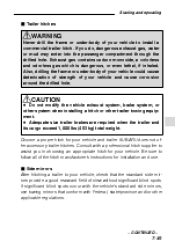
... 1,000 lbs (453 kg) total weight. Exhaust gas contains carbon monoxide, a colorless and odorless gas which is dangerous, or even lethal, if inhaled. SUBARU does not offer accessory trailer hitches. If you in choosing an appropriate hitch for installation and use towing mirrors that the standard side mirrors provide a good rearward field...
... 1,000 lbs (453 kg) total weight. Exhaust gas contains carbon monoxide, a colorless and odorless gas which is dangerous, or even lethal, if inhaled. SUBARU does not offer accessory trailer hitches. If you in choosing an appropriate hitch for installation and use towing mirrors that the standard side mirrors provide a good rearward field...
Owner's Manual
Page 298
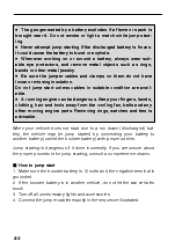
... the two vehicles touch. 3. Removing rings, watches and ties is brought near it done incorrectly. If you are available. Turn off all unnecessary lights and accessories. 4. Connect the jumper cables exactly in suitable condition are unsure about the proper procedure for jump starting is grounded. 2. D The gas generated by connecting your...
... the two vehicles touch. 3. Removing rings, watches and ties is brought near it done incorrectly. If you are available. Turn off all unnecessary lights and accessories. 4. Connect the jumper cables exactly in suitable condition are unsure about the proper procedure for jump starting is grounded. 2. D The gas generated by connecting your...
Owner's Manual
Page 322
... covers ...10-47 Aluminum wheels (If equipped) ...10-48 Fuses ...10-49 Replacing a fuse ... 10-50 Main fuse and fusible link ...10-52 Installation of accessories ...10-53 Replacing bulbs ...10-54 Headlight ...Fog light (OUTBACK and SUS) ...Fog light (GT models) ...Front turn signal, parking light and front side marker...
... covers ...10-47 Aluminum wheels (If equipped) ...10-48 Fuses ...10-49 Replacing a fuse ... 10-50 Main fuse and fusible link ...10-52 Installation of accessories ...10-53 Replacing bulbs ...10-54 Headlight ...Fog light (OUTBACK and SUS) ...Fog light (GT models) ...Front turn signal, parking light and front side marker...
Owner's Manual
Page 369
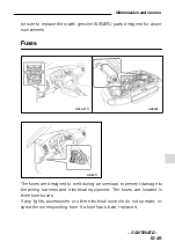
The fuses are designed to melt during an overload to prevent damage to replace them with genuine SUBARU parts designed for aluminum wheels. Fuses OM-H2711 HB0285 HB0211 The fuses are located in three fuse boxes. If any lights, accessories or other electrical controls do not operate, inspect the corresponding fuse. If a fuse has blown, replace it. - CONTINUED - 10-49 Maintenance and service be sure to the wiring harness and electrical equipment.
The fuses are designed to melt during an overload to prevent damage to replace them with genuine SUBARU parts designed for aluminum wheels. Fuses OM-H2711 HB0285 HB0211 The fuses are located in three fuse boxes. If any lights, accessories or other electrical controls do not operate, inspect the corresponding fuse. If a fuse has blown, replace it. - CONTINUED - 10-49 Maintenance and service be sure to the wiring harness and electrical equipment.
Owner's Manual
Page 370
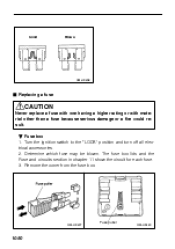
The fuse box lids and the Fuse and circuits section in chapter 11 show the circuit for each fuse. 3. OM-H0237 Fuse puller OM-H0423 10-50 Good Blown OM-H0236 J Replacing a fuse CAUTION Never replace a fuse with one having a higher rating or with material other than a fuse because serious damage or a fire could result. Turn the ignition switch to the "LOCK" position and turn off all electrical accessories. 2. Determine which fuse may be blown. Remove the cover from the fuse box. B Fuse box 1.
The fuse box lids and the Fuse and circuits section in chapter 11 show the circuit for each fuse. 3. OM-H0237 Fuse puller OM-H0423 10-50 Good Blown OM-H0236 J Replacing a fuse CAUTION Never replace a fuse with one having a higher rating or with material other than a fuse because serious damage or a fire could result. Turn the ignition switch to the "LOCK" position and turn off all electrical accessories. 2. Determine which fuse may be blown. Remove the cover from the fuse box. B Fuse box 1.

Owner's Manual
Page 371
... ignition switch to the "LOCK" position and turn off all electrical accessories. 2. HB0212 HB0216 3. Fuse and Circuits section in chapter 11 show the circuit for repairs. If the same fuse blows again, this indicates that its system has a problem. Contact your SUBARU dealer for each fuse. Pull out the fuse with a spare...
... ignition switch to the "LOCK" position and turn off all electrical accessories. 2. HB0212 HB0216 3. Fuse and Circuits section in chapter 11 show the circuit for repairs. If the same fuse blows again, this indicates that its system has a problem. Contact your SUBARU dealer for each fuse. Pull out the fuse with a spare...
Owner's Manual
Page 373
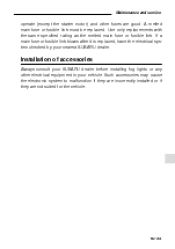
... cause the electronic system to malfunction if they are incorrectly installed or if they are good. Installation of accessories Always consult your SUBARU dealer before installing fog lights or any other fuses are not suited for the vehicle. - CONTINUED - 10-53 Use only replacements with the same specified ...
... cause the electronic system to malfunction if they are incorrectly installed or if they are good. Installation of accessories Always consult your SUBARU dealer before installing fog lights or any other fuses are not suited for the vehicle. - CONTINUED - 10-53 Use only replacements with the same specified ...
Owner's Manual
Page 392
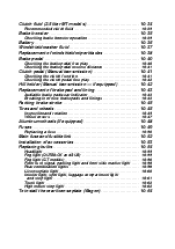
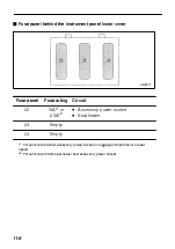
J Fuse panel behind the instrument panel lower cover HB0217 Fuse panel 22 Fuse rating 15A*1 or 20A*2 Empty Empty Circuit D Accessory power socket D Seat heater 23 24 *1: For vehicle with either accessory power socket (in luggage compartment) or seat heater *2: For vehicle with both seat heater and accessory power socket. 11-8
J Fuse panel behind the instrument panel lower cover HB0217 Fuse panel 22 Fuse rating 15A*1 or 20A*2 Empty Empty Circuit D Accessory power socket D Seat heater 23 24 *1: For vehicle with either accessory power socket (in luggage compartment) or seat heater *2: For vehicle with both seat heater and accessory power socket. 11-8