Owner's Manual
Page 48
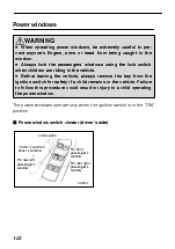
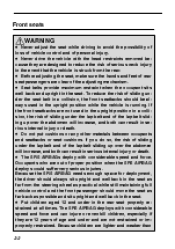
...' windows using the lock switch when children are riding in the "ON" position. D Before leaving the vehicle, always remove the key from being caught in injury to prevent anyone's fingers, arms or head from the ignition switch for driver's window For rear left passenger's window WARNING For front passenger's window For rear...
...' windows using the lock switch when children are riding in the "ON" position. D Before leaving the vehicle, always remove the key from being caught in injury to prevent anyone's fingers, arms or head from the ignition switch for driver's window For rear left passenger's window WARNING For front passenger's window For rear...
Owner's Manual
Page 57
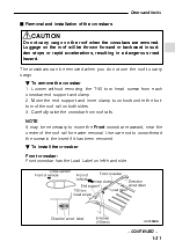
...has the Load Label on both sides. 3. B To remove the crossbar 1. Loosen without removing the T-30 torx head screw from roof rails. Use care not to move the Front crossbar rearward, near the center of the roof rail for easier removal. The crossbars can be necessary to cross-thread the screw ...end support and inner clamp to carry cargo. Carefully raise the crossbar from each crossbar end support and clamp. 2. Doors and locks J Removal and installation of the crossbars CAUTION Do not carry cargo on the roof will be thrown forward or backward in sudden stops or rapid accelerations...
...has the Load Label on both sides. 3. B To remove the crossbar 1. Loosen without removing the T-30 torx head screw from roof rails. Use care not to move the Front crossbar rearward, near the center of the roof rail for easier removal. The crossbars can be necessary to cross-thread the screw ...end support and inner clamp to carry cargo. Carefully raise the crossbar from each crossbar end support and clamp. 2. Doors and locks J Removal and installation of the crossbars CAUTION Do not carry cargo on the roof will be thrown forward or backward in sudden stops or rapid accelerations...
Owner's Manual
Page 58
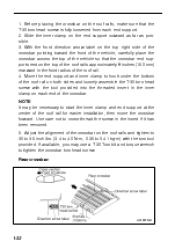
... possible. 3. Use care not to hook under the bottom of the roof rails approximately 6 inches (150 mm) rearward in the insert if it has been removed. 5. Move the end support and inner clamp to cross-thread the screw in the front radius of the roof rail. 4. Rear crossbar: HS1007BB 1-32 Adjust... of the crossbar pointing toward the front of the vehicle, carefully place the crossbar across the top of the vehicle so that the T-30 torx head screw is fully loosened from each end of the roof rail for easier installation, then move the crossbar forward. 1. If available, you may be ...
... possible. 3. Use care not to hook under the bottom of the roof rails approximately 6 inches (150 mm) rearward in the insert if it has been removed. 5. Move the end support and inner clamp to cross-thread the screw in the front radius of the roof rail. 4. Rear crossbar: HS1007BB 1-32 Adjust... of the crossbar pointing toward the front of the vehicle, carefully place the crossbar across the top of the vehicle so that the T-30 torx head screw is fully loosened from each end of the roof rail for easier installation, then move the crossbar forward. 1. If available, you may be ...
Owner's Manual
Page 61
... adjusting mechanism. If you do so, the risk of sliding under the lap belt and of personal injury. D Never drive the vehicle with the head restraints removed because they are designed to avoid the possibility of loss of vehicle control and of the lap belt sliding up over the abdomen will increase...
... adjusting mechanism. If you do so, the risk of sliding under the lap belt and of personal injury. D Never drive the vehicle with the head restraints removed because they are designed to avoid the possibility of loss of vehicle control and of the lap belt sliding up over the abdomen will increase...
Owner's Manual
Page 67
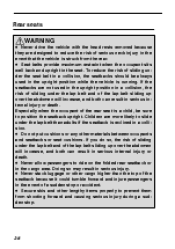
... up over the abdomen will increase, and both can result in serious internal injury or death. Rear seats D Never drive the vehicle with the head rests removed because they are designed to reduce the risk of sliding under the seat belt in a collision, the seatbacks should be sure to position the seatback...
... up over the abdomen will increase, and both can result in serious internal injury or death. Rear seats D Never drive the vehicle with the head rests removed because they are designed to reduce the risk of sliding under the seat belt in a collision, the seatbacks should be sure to position the seatback...
Owner's Manual
Page 86
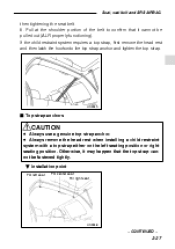
D Always remove the head rest when installing a child restraint system with a top strap either on the left seat For center seat For right seat CAUTION HS0046 - CONTINUED - 2-27 Pull ..., it cannot be fastened tightly. Seat, seat belt and SRS AIRBAG then tightening the seat belt. 8. If the child restraint system requires a top strap, first remove the head rest and then latch the hook onto the top strap anchor and tighten the top strap.
D Always remove the head rest when installing a child restraint system with a top strap either on the left seat For center seat For right seat CAUTION HS0046 - CONTINUED - 2-27 Pull ..., it cannot be fastened tightly. Seat, seat belt and SRS AIRBAG then tightening the seat belt. 8. If the child restraint system requires a top strap, first remove the head rest and then latch the hook onto the top strap anchor and tighten the top strap.
Owner's Manual
Page 180
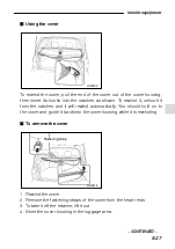
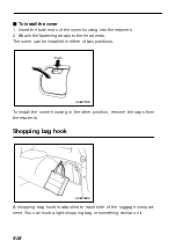
... into the catches as shown. To take it off the retainer, lift it is rewinding. Store the cover housing in the luggage area. - CONTINUED - 6-27 Remove the fastening straps of the cover housing, then insert its hooks into the cover housing while it out. Interior equipment J Using the cover HS0133 To... of the cover out of the cover from the catches and it will rewind automatically. Rewind the cover. To rewind it, unhook it from the head rests.
... into the catches as shown. To take it off the retainer, lift it is rewinding. Store the cover housing in the luggage area. - CONTINUED - 6-27 Remove the fastening straps of the cover housing, then insert its hooks into the cover housing while it out. Interior equipment J Using the cover HS0133 To... of the cover out of the cover from the catches and it will rewind automatically. Rewind the cover. To rewind it, unhook it from the head rests.
Owner's Manual
Page 181
Attach the fastening straps to each side of the luggage compartment. HS6017BB To install the cover housing in either of the cover housing into the retainers. 2. You can be installed in the other position, remove the caps from the retainers. J To install the cover 1. The cover can hook a light shopping bag or something similar on it. 6-28 Insert the both ends of two positions. Shopping bag hook HS6016BA A shopping bag hook is attached to the head rests.
Attach the fastening straps to each side of the luggage compartment. HS6017BB To install the cover housing in either of the cover housing into the retainers. 2. You can be installed in the other position, remove the caps from the retainers. J To install the cover 1. The cover can hook a light shopping bag or something similar on it. 6-28 Insert the both ends of two positions. Shopping bag hook HS6016BA A shopping bag hook is attached to the head rests.
Owner's Manual
Page 248
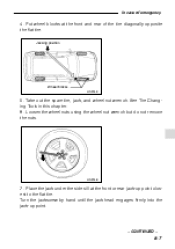
Place the jack under the side sill at the front and rear of emergency 4. Take out the spare tire, jack, and wheel nut wrench. Put wheel blocks at the front or rear jack-up point. - CONTINUED - 8-7 Turn the jackscrew by hand until the jack head engages firmly into the jack-up point closest to the flat tire. HS0149 7. Jacking position Wheel blocks HS0148 5. See Tire Changing Tools in this chapter. 6. Loosen the wheel nuts using the wheel nut wrench but do not remove the nuts. In case of the tire diagonally opposite the flat tire.
Place the jack under the side sill at the front and rear of emergency 4. Take out the spare tire, jack, and wheel nut wrench. Put wheel blocks at the front or rear jack-up point. - CONTINUED - 8-7 Turn the jackscrew by hand until the jack head engages firmly into the jack-up point closest to the flat tire. HS0149 7. Jacking position Wheel blocks HS0148 5. See Tire Changing Tools in this chapter. 6. Loosen the wheel nuts using the wheel nut wrench but do not remove the nuts. In case of the tire diagonally opposite the flat tire.

