
Owner's Manual
Page 12
... ABS warning light ...3-11 ACC (Ignition switch) ...7-12 Accessories installing ...5-12/10-53 Accessory power socket In the instrument panel ...6-7 In the luggage compartment ...6-7 Aiming (Headlights) ...10-53 Air cleaner element ...10-20 Location ...10-5/10-6 Replacing ...10-21 Air conditioner operation ...4-8 Air conditioner and heater operation (see "Climate control") Air...
... ABS warning light ...3-11 ACC (Ignition switch) ...7-12 Accessories installing ...5-12/10-53 Accessory power socket In the instrument panel ...6-7 In the luggage compartment ...6-7 Aiming (Headlights) ...10-53 Air cleaner element ...10-20 Location ...10-5/10-6 Replacing ...10-21 Air conditioner operation ...4-8 Air conditioner and heater operation (see "Climate control") Air...
Owner's Manual
Page 13
... tips ...7-27 Break-in (New vehicle) ...7-3 Brightness control (Illumination) ...3-18 Bulb replacement Bulb chart ...11-8 Fog lights ...10-56 Front turn signal lights ...10-58 Headlights ...10-55 Interior(Doom) light, spot lights ...10-61 License plate light ...10-61 Parking lights ...10-57 Rear combination lights ...10-59 Side turn...
... tips ...7-27 Break-in (New vehicle) ...7-3 Brightness control (Illumination) ...3-18 Bulb replacement Bulb chart ...11-8 Fog lights ...10-56 Front turn signal lights ...10-58 Headlights ...10-55 Interior(Doom) light, spot lights ...10-61 License plate light ...10-61 Parking lights ...10-57 Rear combination lights ...10-59 Side turn...
Owner's Manual
Page 14
... fluid ...10-33 Clutch pedal ...10-41 Engine coolant level ...10-14 Engine oil level ...10-8 Front differential gear oil level (AT vehicles) ...10-27 Headlight aim ...10-53 13-4
... fluid ...10-33 Clutch pedal ...10-41 Engine coolant level ...10-14 Engine oil level ...10-8 Front differential gear oil level (AT vehicles) ...10-27 Headlight aim ...10-53 13-4

Owner's Manual
Page 20
... ...10-53 Bulb replacement ...10-55 Daytime running light ...3-16 Headlight flasher ...3-16 Headlight switch ...3-15 High beam indicator ...3-13 High/low beam change ...3-16 Head restraint adjustment (See "Seats") Heater operation ...4-4 Heating and air conditioning (see "Climate control") ...
... ...10-53 Bulb replacement ...10-55 Daytime running light ...3-16 Headlight flasher ...3-16 Headlight switch ...3-15 High beam indicator ...3-13 High/low beam change ...3-16 Head restraint adjustment (See "Seats") Heater operation ...4-4 Heating and air conditioning (see "Climate control") ...
Owner's Manual
Page 95
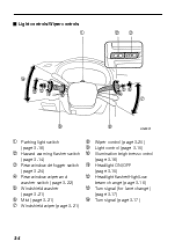
J Light controls/Wiper controls 1 2 3 T R E W Q 56 4 7 9 1 Parking light switch 2 3 4 5 6 7 (page 3-18) Hazard warning flasher switch (page 3-14) Rear window defogger switch (page 3-24) Rear window wiper and washer switch (page 3-22) Windshield washer (page 3-21) Mist (page 3-21) Windshield wiper (page 3-21) 8 HG0331 8 Wiper control (page 3-20) 9 Light control (page 3-15) Q Illumination brightness control W Headlight ON/OFF E Headlight flasher/High/Low R Turn signal (for lane change) T Turn signal (page 3-17) (page 3-17) beam change (page 3-16) (page 3-15) (page 3-18) 3-4
J Light controls/Wiper controls 1 2 3 T R E W Q 56 4 7 9 1 Parking light switch 2 3 4 5 6 7 (page 3-18) Hazard warning flasher switch (page 3-14) Rear window defogger switch (page 3-24) Rear window wiper and washer switch (page 3-22) Windshield washer (page 3-21) Mist (page 3-21) Windshield wiper (page 3-21) 8 HG0331 8 Wiper control (page 3-20) 9 Light control (page 3-15) Q Illumination brightness control W Headlight ON/OFF E Headlight flasher/High/Low R Turn signal (for lane change) T Turn signal (page 3-17) (page 3-17) beam change (page 3-16) (page 3-15) (page 3-18) 3-4
Owner's Manual
Page 104
... Wheel Drive is disengaged and the drive mechanism is switched to Front Wheel Drive for AWD AT vehicles) This light comes on when operating headlight flasher. Instruments and controls matic transmission control system is out before you start to Replacing Bulbs section in chapter 10. If the indicator lights... light comes on when the tank is in the high beam mode. NOTE If the fuel tank is not fully closed. Contact your nearest SUBARU dealer for wagon) is completely empty, the CHECK ENGINE warning light may be burned out. Refer to the "CHECK ENGINE Warning Light/Malfunction ...
... Wheel Drive is disengaged and the drive mechanism is switched to Front Wheel Drive for AWD AT vehicles) This light comes on when operating headlight flasher. Instruments and controls matic transmission control system is out before you start to Replacing Bulbs section in chapter 10. If the indicator lights... light comes on when the tank is in the high beam mode. NOTE If the fuel tank is not fully closed. Contact your nearest SUBARU dealer for wagon) is completely empty, the CHECK ENGINE warning light may be burned out. Refer to the "CHECK ENGINE Warning Light/Malfunction ...
Owner's Manual
Page 106
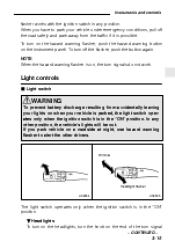
... warning flasher to park your vehicle is parked, the light switch operates only when the ignition switch is in the "ON" position. Dimmer Headlight flasher HS0054 HS0055 The light switch operates only when the ignition switch is in the "ON" position. To turn signals do not work. ...hazard warning flasher is possible. Instruments and controls flasher works with the ignition switch in any other drivers. In any position. B Headlights To turn on the headlights, turn the knob on , the turn off the road safely and park away from accidentally leaving your lights on when your ...
... warning flasher to park your vehicle is parked, the light switch operates only when the ignition switch is in the "ON" position. Dimmer Headlight flasher HS0054 HS0055 The light switch operates only when the ignition switch is in the "ON" position. To turn signals do not work. ...hazard warning flasher is possible. Instruments and controls flasher works with the ignition switch in any other drivers. In any position. B Headlights To turn on the headlights, turn the knob on , the turn off the road safely and park away from accidentally leaving your lights on when your ...
Owner's Manual
Page 107
... comes on by the daytime running light system. B High/low beam change (dimmer) To change from low beam to the detent position. When the headlights are not turned on . B Daytime running light system (for more than just a few seconds. To switch back to low beam, pull the lever...to high beam, push the turn signal lever forward. The light switch must always be turned to the "a" position when it . To flash the headlights, pull the lever toward you hold the lever in the "OFF" position. first position Parking lights, instrument panel illumination, tail lights, side marker ...
... comes on by the daytime running light system. B High/low beam change (dimmer) To change from low beam to the detent position. When the headlights are not turned on . B Daytime running light system (for more than just a few seconds. To switch back to low beam, pull the lever...to high beam, push the turn signal lever forward. The light switch must always be turned to the "a" position when it . To flash the headlights, pull the lever toward you hold the lever in the "OFF" position. first position Parking lights, instrument panel illumination, tail lights, side marker ...
Owner's Manual
Page 108
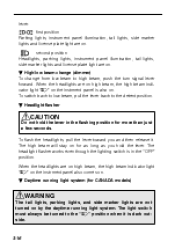
... switch is in the direction of the turn signal lever up . When the turn signal lever up or down . Instruments and controls The low beam headlights will automatically come on at other than the "P" position. B Turn signals Right turn Left turn HS0056 To activate the right turn signal, push the turn...
... switch is in the direction of the turn signal lever up . When the turn signal lever up or down . Instruments and controls The low beam headlights will automatically come on at other than the "P" position. B Turn signals Right turn Left turn HS0056 To activate the right turn signal, push the turn...
Owner's Manual
Page 110
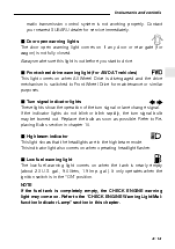
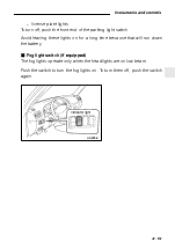
Push the switch to turn them off , push the front end of the parking light switch. Avoid leaving these lights on low beam. J Fog light switch (if equipped) The fog lights operate only when the headlights are on for a long time because that will run down the battery. To turn the fog lights on. Indicator light HS0059 - CONTINUED - 3-19 Instruments and controls - license plate lights To turn off , push the switch again.
Push the switch to turn them off , push the front end of the parking light switch. Avoid leaving these lights on low beam. J Fog light switch (if equipped) The fog lights operate only when the headlights are on for a long time because that will run down the battery. To turn the fog lights on. Indicator light HS0059 - CONTINUED - 3-19 Instruments and controls - license plate lights To turn off , push the switch again.
Owner's Manual
Page 116
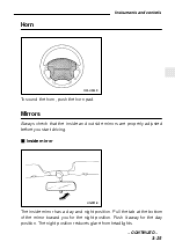
Instruments and controls Horn OM-H0440 To sound the horn, push the horn pad. Push it away for the night position. Mirrors Always check that the inside mirror has a day and night position. Pull the tab at the bottom of the mirror toward you start driving. The night position reduces glare from headlights. - CONTINUED - 3-25 J Inside mirror HG0019 The inside and outside mirrors are properly adjusted before you for the day position.
Instruments and controls Horn OM-H0440 To sound the horn, push the horn pad. Push it away for the night position. Mirrors Always check that the inside mirror has a day and night position. Pull the tab at the bottom of the mirror toward you start driving. The night position reduces glare from headlights. - CONTINUED - 3-25 J Inside mirror HG0019 The inside and outside mirrors are properly adjusted before you for the day position.
Owner's Manual
Page 235
...-42 Checking the clutch function ...10-41 Checking the clutch pedal free play ...10-41 Replacement of accessories ...10-53 Checking the headlight aim ...10-53 To check the headlight aim ... 10-53 Replacing bulbs ... 10-55 10-55 10-56 10-57 10-58 10-58 10-59 10-60 10...-60 Headlight ...Fog light (if equipped) ...Parking light ...Front turn signal light ...Side turn signal light ...Rear combination lights ...License plate light ...Interior light, spot light ... 10-2 ...
...-42 Checking the clutch function ...10-41 Checking the clutch pedal free play ...10-41 Replacement of accessories ...10-53 Checking the headlight aim ...10-53 To check the headlight aim ... 10-53 Replacing bulbs ... 10-55 10-55 10-56 10-57 10-58 10-58 10-59 10-60 10...-60 Headlight ...Fog light (if equipped) ...Parking light ...Front turn signal light ...Side turn signal light ...Rear combination lights ...License plate light ...Interior light, spot light ... 10-2 ...
Owner's Manual
Page 286
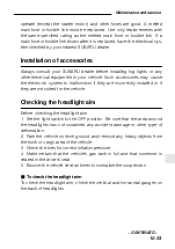
...vehicle. Make certain that the vehicle's gas tank is full and that the area around the headlights has not sustained any accident damage or other type of accessories Always consult your SUBARU dealer before installing fog lights or any heavy objects from the trunk or cargo area of...fuse or fusible link blows after it is seated in your nearest SUBARU dealer. Park the vehicle on the back of the vehicle. 3. Checking the headlight aim Before checking the headlight aim: 1. J To check the headlight aim To check the headlight aim, check the vertical and horizontal gauges on level ground and...
...vehicle. Make certain that the vehicle's gas tank is full and that the area around the headlights has not sustained any accident damage or other type of accessories Always consult your SUBARU dealer before installing fog lights or any heavy objects from the trunk or cargo area of...fuse or fusible link blows after it is seated in your nearest SUBARU dealer. Park the vehicle on the back of the vehicle. 3. Checking the headlight aim Before checking the headlight aim: 1. J To check the headlight aim To check the headlight aim, check the vertical and horizontal gauges on level ground and...
Owner's Manual
Page 288
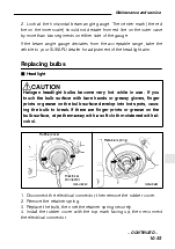
... cover. 2. Maintenance and service 2. If you touch the bulb surface with bare hands or greasy gloves, finger prints or grease on either side of the headlight aim. Replace the bulb, then set the retainer spring securely. 4. Look at the horizontal beam angle gauge. The center mark (the red line on the... from red line on the outer case by more than two segments on the bulb surface develop into hot spots, causing the bulb to your SUBARU dealer for adjustment of the gauge. Remove the retainer spring. 3.
... cover. 2. Maintenance and service 2. If you touch the bulb surface with bare hands or greasy gloves, finger prints or grease on either side of the headlight aim. Replace the bulb, then set the retainer spring securely. 4. Look at the horizontal beam angle gauge. The center mark (the red line on the... from red line on the outer case by more than two segments on the bulb surface develop into hot spots, causing the bulb to your SUBARU dealer for adjustment of the gauge. Remove the retainer spring. 3.
Owner's Manual
Page 290
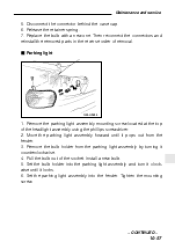
Then reconnect the connectors and reinstall the removed parts in the reverse order of the headlight assembly using the phillips screwdriver. 2. Move the parking light assembly forward until it counterclockwise. 4. Remove the bulb holder from the fender. 3. Set the parking light ...
Then reconnect the connectors and reinstall the removed parts in the reverse order of the headlight assembly using the phillips screwdriver. 2. Move the parking light assembly forward until it counterclockwise. 4. Remove the bulb holder from the fender. 3. Set the parking light ...
Owner's Manual
Page 302
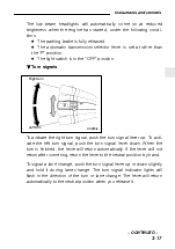
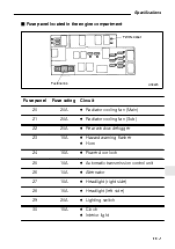
Specifications J Fuse panel located in the engine compartment A S G H J FWD socket K L Z X D F Fusible link HS0225 Fuse panel 20 21 22 23 Fuse rating 20A 20A 20A 15A Circuit D Radiator cooling fan (Main) D Radiator cooling fan (Sub) D Rear window defogger D Hazard warning flasher D Horn D Power door lock D Automatic transmission control unit D Alternator D Headlight (right side) D Headlight (left side) D Lighting switch D Clock D Interior light 24 25 26 27 28 29 30 15A 10A 10A 15A 15A 20A 15A - CONTINUED - 11-7
Specifications J Fuse panel located in the engine compartment A S G H J FWD socket K L Z X D F Fusible link HS0225 Fuse panel 20 21 22 23 Fuse rating 20A 20A 20A 15A Circuit D Radiator cooling fan (Main) D Radiator cooling fan (Sub) D Rear window defogger D Hazard warning flasher D Horn D Power door lock D Automatic transmission control unit D Alternator D Headlight (right side) D Headlight (left side) D Lighting switch D Clock D Interior light 24 25 26 27 28 29 30 15A 10A 10A 15A 15A 20A 15A - CONTINUED - 11-7
Owner's Manual
Page 303
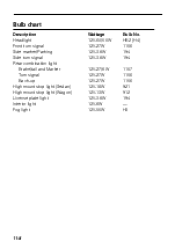
HB2 (H4) 1156 194 194 1157 1156 1156 921 912 194 - H3 11-8 Bulb chart Description Headlight Front turn signal Side marker/Parking Side turn signal Rear combination light Brake/tail and Marker Turn signal Back-up High mount stop light (Sedan) High mount stop light (Wagon) License plate light Interior light Fog light Wattage 12V-60/55W 12V-27W 12V-3.8W 12V-3.8W 12V-27/8W 12V-27W 12V-27W 12V-18W 12V-13W 12V-3.8W 12V-8W 12V-55W Bulb No.
HB2 (H4) 1156 194 194 1157 1156 1156 921 912 194 - H3 11-8 Bulb chart Description Headlight Front turn signal Side marker/Parking Side turn signal Rear combination light Brake/tail and Marker Turn signal Back-up High mount stop light (Sedan) High mount stop light (Wagon) License plate light Interior light Fog light Wattage 12V-60/55W 12V-27W 12V-3.8W 12V-3.8W 12V-27/8W 12V-27W 12V-27W 12V-18W 12V-13W 12V-3.8W 12V-8W 12V-55W Bulb No.
