

Owner's Manual
Page 25
... down without squeezing the release buttons to the desired position. They can help tighten the safety belts during the early stages of the safety belt assembly. Pretensioners work only once. Rear Safety Belt Comfort Guides Rear shoulder belt comfort guides may provide added safety belt comfort for older children who have...
... down without squeezing the release buttons to the desired position. They can help tighten the safety belts during the early stages of the safety belt assembly. Pretensioners work only once. Rear Safety Belt Comfort Guides Rear shoulder belt comfort guides may provide added safety belt comfort for older children who have...
Owner's Manual
Page 63
... LATCH system (if equipped) parts? If an airbag in this section. After a very minor crash, nothing may have the safety belt assemblies inspected or replaced. But the safety belt assemblies that were used during a crash, you are working properly after the vehicle is started, or while you may not properly protect the...
... LATCH system (if equipped) parts? If an airbag in this section. After a very minor crash, nothing may have the safety belt assemblies inspected or replaced. But the safety belt assemblies that were used during a crash, you are working properly after the vehicle is started, or while you may not properly protect the...
Owner's Manual
Page 240
... loads, generating extra heat. This helps the engine and other parts could be driving. Load-pulling components such as the engine, transmission, rear axle, wheel assemblies and tires are forced to work harder against the drag of your passengers. The vehicle has Trailer Sway Control (TSC). The engine is driven. The...
... loads, generating extra heat. This helps the engine and other parts could be driving. Load-pulling components such as the engine, transmission, rear axle, wheel assemblies and tires are forced to work harder against the drag of your passengers. The vehicle has Trailer Sway Control (TSC). The engine is driven. The...
Owner's Manual
Page 265
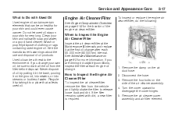
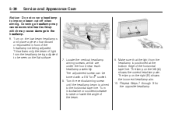
... into sewers, or into streams or bodies of oil products. Turn the cover upward to the environment. Wash or properly dispose of the air cleaner assembly. 4. If the filter remains caked with soap and water, or a good hand cleaner. Never dispose of oil by taking it on the... skin and nails with dirt, a new filter is required. See Scheduled Maintenance on the air duct hose. 2. Remove the air cleaner cover assembly and air filter element. Remove the clamp on page 6-3 for very long. Used oil can be sure to release loose dust and dirt. ...
... into sewers, or into streams or bodies of oil products. Turn the cover upward to the environment. Wash or properly dispose of the air cleaner assembly. 4. If the filter remains caked with soap and water, or a good hand cleaner. Never dispose of oil by taking it on the... skin and nails with dirt, a new filter is required. See Scheduled Maintenance on the air duct hose. 2. Remove the air cleaner cover assembly and air filter element. Remove the clamp on page 6-3 for very long. Used oil can be sure to release loose dust and dirt. ...
Owner's Manual
Page 283
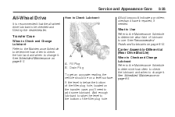
... the dealer/retailer. See Recommended Fluids and Lubricants on page 6-3. Add enough lubricant to raise the level to the bottom of lubricant to use. Carrier Assembly-Differential (Rear Drive Module) A. Fill Plug B. See Scheduled Maintenance on page 6-3. Service and Appearance Care 5-35 All-Wheel Drive It is below the bottom of...
... the dealer/retailer. See Recommended Fluids and Lubricants on page 6-3. Add enough lubricant to raise the level to the bottom of lubricant to use. Carrier Assembly-Differential (Rear Drive Module) A. Fill Plug B. See Scheduled Maintenance on page 6-3. Service and Appearance Care 5-35 All-Wheel Drive It is below the bottom of...

Owner's Manual
Page 285
.... At the wall measure from Step 3 and mark it . See Hood Release on page 5-11 for more information. 5-37 • The vehicle should be fully assembled and all other work stopped while headlamp aiming is done with a full tank of fuel and one person or 160 lbs (75 kg) sitting on...
.... At the wall measure from Step 3 and mark it . See Hood Release on page 5-11 for more information. 5-37 • The vehicle should be fully assembled and all other work stopped while headlamp aiming is done with a full tank of fuel and one person or 160 lbs (75 kg) sitting on...
Owner's Manual
Page 286
Covering a headlamp may cause excessive heat build-up which are under the hood near each headlamp assembly. Turn it clockwise or counterclockwise to raise or lower the angle of the headlamp not being adjusted to the horizontal tape line. The lamp on ...
Covering a headlamp may cause excessive heat build-up which are under the hood near each headlamp assembly. Turn it clockwise or counterclockwise to raise or lower the angle of the headlamp not being adjusted to the horizontal tape line. The lamp on ...
Owner's Manual
Page 287
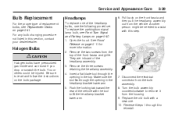
... bulbs have pressurized gas inside and can burst if you drop or scratch the bulb. Remove the two screws from the top of the headlamp assembly. 3. Service and Appearance Care 5-39 Bulb Replacement For the proper type of replacement bulbs, see Front Turn Signal and Parking Lamps on the front ...fascia and then pull the headlamp assembly out from the vehicle. For any bulb changing procedure not listed in the top. Open the hood. Make sure the tool fits through 8 ...
... bulbs have pressurized gas inside and can burst if you drop or scratch the bulb. Remove the two screws from the top of the headlamp assembly. 3. Service and Appearance Care 5-39 Bulb Replacement For the proper type of replacement bulbs, see Front Turn Signal and Parking Lamps on the front ...fascia and then pull the headlamp assembly out from the vehicle. For any bulb changing procedure not listed in the top. Open the hood. Make sure the tool fits through 8 ...
Owner's Manual
Page 288
... the bulb to be replaced counterclockwise to reinstall the headlamp assembly. Push the new bulb into the headlamp assembly. 6. Back-up Lamps To replace one of the bulb socket assembly. 4. Insert the bulb assembly into the bulb socket assembly. 5. 5-40 Service and Appearance Care 3. Reverse the ...steps to remove it from the headlamp assembly. Follow Steps 1 through 6 under Headlamps on page 5-39 to access the ...
... the bulb to be replaced counterclockwise to reinstall the headlamp assembly. Push the new bulb into the headlamp assembly. 6. Back-up Lamps To replace one of the bulb socket assembly. 4. Insert the bulb assembly into the bulb socket assembly. 5. 5-40 Service and Appearance Care 3. Reverse the ...steps to remove it from the headlamp assembly. Follow Steps 1 through 6 under Headlamps on page 5-39 to access the ...
Owner's Manual
Page 289
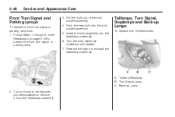
... HB4 3057 For replacement bulbs not listed here, contact your dealer/retailer. Push and turn it clockwise to lock it . 5. Slide the taillamp assembly rearward and away from the vehicle. 4. Open the liftgate. 5-41 License Plate Lamp To replace one of the bulb socket. 6. Turn the... straight out of the license plate lamps to disconnect it into place. 5. Remove the two screws holding the license plate lamps to reinstall the taillamp assembly. 2. Reverse Steps 2 through the fascia opening . 3. Remove the two screws holding each of the socket. Push the new bulb into the bulb...
... HB4 3057 For replacement bulbs not listed here, contact your dealer/retailer. Push and turn it clockwise to lock it . 5. Slide the taillamp assembly rearward and away from the vehicle. 4. Open the liftgate. 5-41 License Plate Lamp To replace one of the bulb socket. 6. Turn the... straight out of the license plate lamps to disconnect it into place. 5. Remove the two screws holding the license plate lamps to reinstall the taillamp assembly. 2. Reverse Steps 2 through the fascia opening . 3. Remove the two screws holding each of the socket. Push the new bulb into the bulb...
Owner's Manual
Page 290
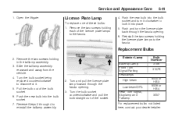
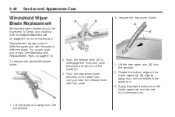
...the hook and push the wiper arm (A) out of the blade (C). 3. Lift the wiper arm away from the underside of the blade assembly (B) slightly away from the windshield. 5-42 Service and Appearance Care To replace the rear wiper blade: Windshield Wiper Blade Replacement Windshield wiper blades...be inspected for more information. Replacement blades come in different types and are removed in different ways. Push the release lever (B) to the blade assembly and remove from the window. 2. Rotate the bottom edge of the wiper arm. 3. To replace the windshield wiper blade: 2. Lift the rear...
...the hook and push the wiper arm (A) out of the blade (C). 3. Lift the wiper arm away from the underside of the blade assembly (B) slightly away from the windshield. 5-42 Service and Appearance Care To replace the rear wiper blade: Windshield Wiper Blade Replacement Windshield wiper blades...be inspected for more information. Replacement blades come in different types and are removed in different ways. Push the release lever (B) to the blade assembly and remove from the window. 2. Rotate the bottom edge of the wiper arm. 3. To replace the windshield wiper blade: 2. Lift the rear...
Owner's Manual
Page 301
The low tire pressure warning light comes on at each tire and wheel assembly, excluding the spare tire and wheel assembly. This may be an early indicator that the air pressure in the tire(s) are missing or inoperable. A Tire and Loading Information label, attached to your ...
The low tire pressure warning light comes on at each tire and wheel assembly, excluding the spare tire and wheel assembly. This may be an early indicator that the air pressure in the tire(s) are missing or inoperable. A Tire and Loading Information label, attached to your ...

Owner's Manual
Page 344
... the emission warranty or limit recall liability prior to a corrosive environment. Look for more information. (e) Make sure the safety belt reminder light and safety belt assemblies are cracked, swollen, or deteriorated. Applying silicone grease on page 1-58. (f) Lubricate all pipes, fittings, and clamps; Inspect disc brake pads for wear and...
... the emission warranty or limit recall liability prior to a corrosive environment. Look for more information. (e) Make sure the safety belt reminder light and safety belt assemblies are cracked, swollen, or deteriorated. Applying silicone grease on page 1-58. (f) Lubricate all pipes, fittings, and clamps; Inspect disc brake pads for wear and...

Owner's Manual
Page 350
... Part No. U.S. 12345579, in Canada 10953474). Lubriplate Lubricant Aerosol (Saturn Part No. 21038869 or GM Part No. U.S. 12346241, in Canada 10953518) or Dielectric Silicone Grease (GM Part No. Multi-Purpose Lubricant, Superlube (GM Part No. 6-14 Maintenance Schedule Usage Transfer Case and Carrier Assembly - U.S. 12346293, in Canada 89021678) meeting requirements of NLGI...
... Part No. U.S. 12345579, in Canada 10953474). Lubriplate Lubricant Aerosol (Saturn Part No. 21038869 or GM Part No. U.S. 12346241, in Canada 10953518) or Dielectric Silicone Grease (GM Part No. Multi-Purpose Lubricant, Superlube (GM Part No. 6-14 Maintenance Schedule Usage Transfer Case and Carrier Assembly - U.S. 12346293, in Canada 89021678) meeting requirements of NLGI...
