
Owner's Manual
Page 1
2005 Saturn RELAY Owner Manual Seats and Restraint Systems ...1-1 Front Seats ...1-2 Rear Seats ...1-6 Safety Belts ...1-22 Child Restraints ...1-43 Airbag System ...1-64 Restraint System Check ...1-79 Features and Controls ...2-1 Keys ...2-3 Doors and Locks ...2-10 Windows ...2-23 Theft-Deterrent ...
2005 Saturn RELAY Owner Manual Seats and Restraint Systems ...1-1 Front Seats ...1-2 Rear Seats ...1-6 Safety Belts ...1-22 Child Restraints ...1-43 Airbag System ...1-64 Restraint System Check ...1-79 Features and Controls ...2-1 Keys ...2-3 Doors and Locks ...2-10 Windows ...2-23 Theft-Deterrent ...

Owner's Manual
Page 4
...;c name of text. A notice tells about something that can damage the vehicle. They use symbols instead of a component, gage, or indicator, reference the following topics: Seats and Restraint Systems in Section 1 Features and Controls in Section 2 Instrument Panel Overview in Section 3 Climate Controls in Section 3 Warning Lights, Gages, and Indicators in...
...;c name of text. A notice tells about something that can damage the vehicle. They use symbols instead of a component, gage, or indicator, reference the following topics: Seats and Restraint Systems in Section 1 Features and Controls in Section 2 Instrument Panel Overview in Section 3 Climate Controls in Section 3 Warning Lights, Gages, and Indicators in...
Owner's Manual
Page 7
...After a Crash ...1-80 1-1 Front Seats ...1-2 Manual Seats ...1-2 Six-Way Power Seats ...1-3 Heated Seats ...1-3 Reclining Seatbacks ...1-4 Head Restraints ...1-6 Rear Seats ...1-6 Rear Seat Operation ...1-6 Flip and Fold Feature (Bucket Seats) ...1-7 Bucket Seats ...1-8 Captain Chairs ...1-14 Third Row Seat ...1-18 Safety Belts ...1-22 Safety Belts... Belt Height Adjustment ...1-35 Safety Belt Use During Pregnancy ...1-36 Right Front Passenger Position ...1-36 Rear Seat Passengers ...1-36 Rear Safety Belt Comfort Guides for Children and Small Adults ...1-39 Safety Belt Pretensioners ...1-...
...After a Crash ...1-80 1-1 Front Seats ...1-2 Manual Seats ...1-2 Six-Way Power Seats ...1-3 Heated Seats ...1-3 Reclining Seatbacks ...1-4 Head Restraints ...1-6 Rear Seats ...1-6 Rear Seat Operation ...1-6 Flip and Fold Feature (Bucket Seats) ...1-7 Bucket Seats ...1-8 Captain Chairs ...1-14 Third Row Seat ...1-18 Safety Belts ...1-22 Safety Belts... Belt Height Adjustment ...1-35 Safety Belt Use During Pregnancy ...1-36 Right Front Passenger Position ...1-36 Rear Seat Passengers ...1-36 Rear Safety Belt Comfort Guides for Children and Small Adults ...1-39 Safety Belt Pretensioners ...1-...
Owner's Manual
Page 8
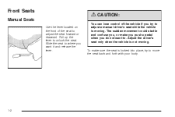
...lever located on the front of the vehicle if you try to move the seat back and forth with your body. 1-2 To make you push a pedal when you want to unlock the seat. Slide the seat to adjust a manual driver's seat while the vehicle is not moving . The sudden movement could startle and ...confuse you, or make sure the seat is locked into place, try to where you do not want it and...
...lever located on the front of the vehicle if you try to move the seat back and forth with your body. 1-2 To make you push a pedal when you want to unlock the seat. Slide the seat to adjust a manual driver's seat while the vehicle is not moving . The sudden movement could startle and ...confuse you, or make sure the seat is locked into place, try to where you do not want it and...

Owner's Manual
Page 9
... are located on the high setting. Press this feature. Press the button a third time to turn on the driver's side heated seat to the high setting. • Move the front of the control up or down to adjust the front portion of the cushion up or down. &#... have this feature. Both indicator lights to the right of the driver's and front passenger's seats. If it is located on the whole control to move the entire seat up or down. • To move the whole seat forward or rearward, slide the control forward or rearward. One indicator will heat the lower...
... are located on the high setting. Press this feature. Press the button a third time to turn on the driver's side heated seat to the high setting. • Move the front of the control up or down to adjust the front portion of the cushion up or down. &#... have this feature. Both indicator lights to the right of the driver's and front passenger's seats. If it is located on the whole control to move the entire seat up or down. • To move the whole seat forward or rearward, slide the control forward or rearward. One indicator will heat the lower...
Owner's Manual
Page 10
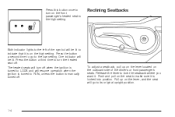
Reclining Seatbacks Both indicator lights to make sure it is on the high setting. The heated seats will turn the heated seat off. Push and pull on the seat to the left of the driver's or front passenger's seats. Release the lever to the low setting. Press the button a third time to turn off ... symbol will resume operation when the ignition is turned to its original upright position. 1-4 To adjust a seatback, pull up on the lever, and the seat will be lit to the high setting. Press the button a second time to go to RUN, unless the button is manually turned off when the...
Reclining Seatbacks Both indicator lights to make sure it is on the high setting. The heated seats will turn the heated seat off. Push and pull on the seat to the left of the driver's or front passenger's seats. Release the lever to the low setting. Press the button a third time to turn off ... symbol will resume operation when the ignition is turned to its original upright position. 1-4 To adjust a seatback, pull up on the lever, and the seat will be lit to the high setting. Press the button a second time to go to RUN, unless the button is manually turned off when the...

Owner's Manual
Page 11
{CAUTION: Sitting in a reclined position when your vehicle is in front of you. Even if you buckle up over your vehicle is in the seat and wear your body. The shoulder belt cannot do its job either. Instead, it will be in motion can be dangerous. The belt forces would ...
{CAUTION: Sitting in a reclined position when your vehicle is in front of you. Even if you buckle up over your vehicle is in the seat and wear your body. The shoulder belt cannot do its job either. Instead, it will be in motion can be dangerous. The belt forces would ...
Owner's Manual
Page 12
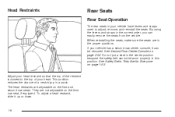
... the chance of a neck injury in this position. If your vehicle has a second row center console, it up or down. 1-6 Do not put a seat in the center position because the safety belt cannot be removed. They are adjustable on page 1-22. See Second Row Center Console on the third.... Adjust your head restraint so that the top of the restraint is closest to adjust, remove, and reinstall the seats. To adjust a head restraint, slide it can easily remove the seats from the vehicle. The head restraints are not adjustable on page 2-52. See Safety Belts: They Are for Everyone...
... the chance of a neck injury in this position. If your vehicle has a second row center console, it up or down. 1-6 Do not put a seat in the center position because the safety belt cannot be removed. They are adjustable on page 1-22. See Second Row Center Console on the third.... Adjust your head restraint so that the top of the restraint is closest to adjust, remove, and reinstall the seats. To adjust a head restraint, slide it can easily remove the seats from the vehicle. The head restraints are not adjustable on page 2-52. See Safety Belts: They Are for Everyone...
Owner's Manual
Page 13
... firmly push the rear hooks onto the rear floor pins by pushing down on the front of the seat and raise the seatback until it all the way back. 3. If the seat adjusts, slide it locks upright. 4. Hang on the seatback to check that it is locked. 1-7 To return the... seat(s) to guide the seat forward. Use this feature for exiting and entering third row seats. 1. Release the rear set of hooks from the floor pins by either pulling on the nylon strap on the...
... firmly push the rear hooks onto the rear floor pins by pushing down on the front of the seat and raise the seatback until it all the way back. 3. If the seat adjusts, slide it locks upright. 4. Hang on the seatback to check that it is locked. 1-7 To return the... seat(s) to guide the seat forward. Use this feature for exiting and entering third row seats. 1. Release the rear set of hooks from the floor pins by either pulling on the nylon strap on the...
Owner's Manual
Page 14
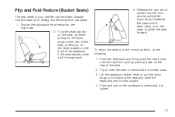
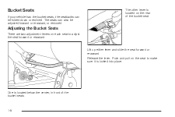
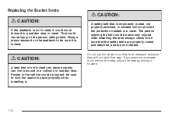
One is locked into place. The seats can be adjusted forward or rearward, or removed. Lift up either lever and slide the seat forward or rearward. Release the lever. Push and pull on the seat to adjust the seat forward or rearward. The other lever is located on each seat to make sure it is located below the center, in front of the bucket seat. Adjusting the Bucket Seats There are two adjustment levers on the rear of the bucket seats. 1-8 Bucket Seats If your vehicle has the bucket seats, the seatbacks can also be folded down or reclined.
One is locked into place. The seats can be adjusted forward or rearward, or removed. Lift up either lever and slide the seat forward or rearward. Release the lever. Push and pull on the seat to adjust the seat forward or rearward. The other lever is located on each seat to make sure it is located below the center, in front of the bucket seat. Adjusting the Bucket Seats There are two adjustment levers on the rear of the bucket seats. 1-8 Bucket Seats If your vehicle has the bucket seats, the seatbacks can also be folded down or reclined.

Owner's Manual
Page 15
The following explains how to use either folded forward or reclined. That could move forward in a sudden stop or crash. The seatback on a bucket seat can be sure it could cause injury to fold or recline the seatback. Nylon Strap Recliner Lever To fold the seatback forward, pull the nylon ...strap located on the rear of the seat or lift up on the recliner lever located on the seatback to be either the nylon strap or the lever to the person sitting there...
The following explains how to use either folded forward or reclined. That could move forward in a sudden stop or crash. The seatback on a bucket seat can be sure it could cause injury to fold or recline the seatback. Nylon Strap Recliner Lever To fold the seatback forward, pull the nylon ...strap located on the rear of the seat or lift up on the recliner lever located on the seatback to be either the nylon strap or the lever to the person sitting there...
Owner's Manual
Page 16
... raising the seatback until you reach the desired position, then let go of the seat to fold the seatback forward. 2. Push and pull on the seatback. Slide the seat all the way back by lifting either one of the seat, to release the rear latches from the floor pins. 1-10 From behind... position, pull on the nylon strap or lift the recliner lever without putting any pressure on the seatback to be fully down. 1. Removing the Bucket Seats Make sure the seatback is locked into place. Push and pull on the back of the strap or lever. To recline the seatback, pull the...
... raising the seatback until you reach the desired position, then let go of the seat to fold the seatback forward. 2. Push and pull on the seatback. Slide the seat all the way back by lifting either one of the seat, to release the rear latches from the floor pins. 1-10 From behind... position, pull on the nylon strap or lift the recliner lever without putting any pressure on the seatback to be fully down. 1. Removing the Bucket Seats Make sure the seatback is locked into place. Push and pull on the back of the strap or lever. To recline the seatback, pull the...

Owner's Manual
Page 17
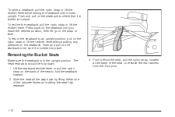
Remove the seat by rocking it slightly forward, then toward the straight crossbar. 5. This should be done in one motion. 1-11 To unlatch the front latches, with the seat folded forward, squeeze the angled bar toward the rear of the vehicle and then pulling it out. You can also lift the lever on the side of the strap or lever until the seat is folded all the way forward. 4. Do not let go of the seat to release the rear latches from the floor pins.
Remove the seat by rocking it slightly forward, then toward the straight crossbar. 5. This should be done in one motion. 1-11 To unlatch the front latches, with the seat folded forward, squeeze the angled bar toward the rear of the vehicle and then pulling it out. You can also lift the lever on the side of the strap or lever until the seat is folded all the way forward. 4. Do not let go of the seat to release the rear latches from the floor pins.
Owner's Manual
Page 18
...not provide the protection needed in a sudden stop . A safety belt that is not locked into place properly when installing it forward. {CAUTION: A seat that is improperly routed, not properly attached, or twisted will not latch that the safety belts are properly routed and attached, and are not twisted.... If you want more storage room behind the seat, adjust the seat by sliding it . 1-12 Always press rearward on the seatback to the person sitting there. That could be injured. People in a ...
...not provide the protection needed in a sudden stop . A safety belt that is not locked into place properly when installing it forward. {CAUTION: A seat that is improperly routed, not properly attached, or twisted will not latch that the safety belts are properly routed and attached, and are not twisted.... If you want more storage room behind the seat, adjust the seat by sliding it . 1-12 Always press rearward on the seatback to the person sitting there. That could be injured. People in a ...

Owner's Manual
Page 19
..., check that it is in place. 1-13 Push and pull on the back of floor pins. Make sure the bucket seat is locked down the rear of the bucket seat onto the front two floor pins. 2. Lift the seatback recliner lever or pull the nylon strap on the seatback to... make sure that the seat is locked in the full rear position. 4. Firmly push the rear hooks onto the rear floor pins by pushing down . 5. If the front hooks ...
..., check that it is in place. 1-13 Push and pull on the back of floor pins. Make sure the bucket seat is locked down the rear of the bucket seat onto the front two floor pins. 2. Lift the seatback recliner lever or pull the nylon strap on the seatback to... make sure that the seat is locked in the full rear position. 4. Firmly push the rear hooks onto the rear floor pins by pushing down . 5. If the front hooks ...
Owner's Manual
Page 20
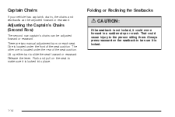
... the Seatbacks {CAUTION: If the seatback is not locked, it could cause injury to make sure it is located under the front of the seat cushion. Adjusting the Captain's Chairs (Second Row) The second row captain's chairs can be adjusted forward or rearward. There are two manual adjustment... bars on the seatback to slide the seat forward or rearward. Captain Chairs If your vehicle has captain's chairs, the chairs and seatbacks can be adjusted forward or rearward. The other one...
... the Seatbacks {CAUTION: If the seatback is not locked, it could cause injury to make sure it is located under the front of the seat cushion. Adjusting the Captain's Chairs (Second Row) The second row captain's chairs can be adjusted forward or rearward. There are two manual adjustment... bars on the seatback to slide the seat forward or rearward. Captain Chairs If your vehicle has captain's chairs, the chairs and seatbacks can be adjusted forward or rearward. The other one...

Owner's Manual
Page 21
The armrests can be lowered or raised for entering or exiting the vehicle. 1. Pull the nylon strap behind the seat to the desired position. Use the recliner lever to move the seatback to release the rear hooks from the floor pins. 1-15 Removing the ...Captain's Chairs To recline the seatback, lift up on the outboard side of the seat. It is easier to the upright position. The seatback will lock into place when you push it back to raise or lower the seatback if...
The armrests can be lowered or raised for entering or exiting the vehicle. 1. Pull the nylon strap behind the seat to the desired position. Use the recliner lever to move the seatback to release the rear hooks from the floor pins. 1-15 Removing the ...Captain's Chairs To recline the seatback, lift up on the outboard side of the seat. It is easier to the upright position. The seatback will lock into place when you push it back to raise or lower the seatback if...

Owner's Manual
Page 22
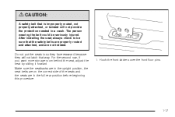
The seat can then be lifted off the front floor pins and removed from the vehicle. {CAUTION: A seat that is not locked into place properly when installing it is not locked, it could move around in the vehicle could cause injury to be sure it . 1-16 Be sure to lock the seat into place properly can move forward in a sudden stop . People in a collision or sudden stop or crash. Always press rearward on the seatback to the person sitting there. That could be injured. Replacing the Captain's Chairs {CAUTION: If the seatback is locked. 2.
The seat can then be lifted off the front floor pins and removed from the vehicle. {CAUTION: A seat that is not locked into place properly when installing it is not locked, it could move around in the vehicle could cause injury to be sure it . 1-16 Be sure to lock the seat into place properly can move forward in a sudden stop . People in a collision or sudden stop or crash. Always press rearward on the seatback to the person sitting there. That could be injured. Replacing the Captain's Chairs {CAUTION: If the seatback is locked. 2.
Owner's Manual
Page 23
For the second row, if you want more storage room behind the seat, adjust the seat by sliding it forward. {CAUTION: A safety belt that is improperly routed, not properly attached, or twisted will not latch that the safety belts are properly ... are in a crash. The person wearing the belt could be sure that way. Make sure the seatbacks are in the upright position, the seat belts are on the correct side of the seats and the seats are not twisted. Hook the front latches over the front floor pins. 1-17 After installing the...
For the second row, if you want more storage room behind the seat, adjust the seat by sliding it forward. {CAUTION: A safety belt that is improperly routed, not properly attached, or twisted will not latch that the safety belts are properly ... are in a crash. The person wearing the belt could be sure that way. Make sure the seatbacks are in the upright position, the seat belts are on the correct side of the seats and the seats are not twisted. Hook the front latches over the front floor pins. 1-17 After installing the...

Owner's Manual
Page 24
... and replaced, or with the seatback folded, it is locked into place. 1-18 See Hideaway Rear Storage Bins on the seat to make sure that it is properly attached. Third Row Seat Your vehicle may come with hideaway rear storage bins. Push and pull on the back of floor pins. 3. Folding... the Seatback(s) To fold down until it is a full bench seat and may have a third row seat. It is locked into place. 2. The third row seat can be sure it will lie flat with the hideaway rear storage bins. Push and pull on page...
... and replaced, or with the seatback folded, it is locked into place. 1-18 See Hideaway Rear Storage Bins on the seat to make sure that it is properly attached. Third Row Seat Your vehicle may come with hideaway rear storage bins. Push and pull on the back of floor pins. 3. Folding... the Seatback(s) To fold down until it is a full bench seat and may have a third row seat. It is locked into place. 2. The third row seat can be sure it will lie flat with the hideaway rear storage bins. Push and pull on page...


