
Owner's Manual
Page 18
... adjustable front seats 3 See page 20. Repeated lifting of the lever will increase the height in steps. Repeated downward presses of the lever will lower the seat in steps. Electric heating, front seats 3 See pages 114. Manually adjusted front seats 3 The following order: Seats WARNING Never adjust ...the driver's seat except when the car is spring-loaded to return to its neutral position. 93_US_MY09.book Page 18 Tuesday, April 15, 2008 10:30 AM 18 Safety We recommend that adjustments...
... adjustable front seats 3 See page 20. Repeated lifting of the lever will increase the height in steps. Repeated downward presses of the lever will lower the seat in steps. Electric heating, front seats 3 See pages 114. Manually adjusted front seats 3 The following order: Seats WARNING Never adjust ...the driver's seat except when the car is spring-loaded to return to its neutral position. 93_US_MY09.book Page 18 Tuesday, April 15, 2008 10:30 AM 18 Safety We recommend that adjustments...
Owner's Manual
Page 224
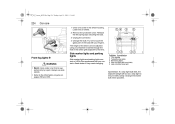
... act as a stop light to the information on jacks on pages 258 and 259. Lower the air shield. 2 Remove the protective cover. Front fog lights 3 WARNING • Never crawl under a car that you contact a Saab dealer if they need changing. Side marker lights and parking lights Side marker lights and ... not to touch the glass part of LEDs.We recommend that is supported only by a jack. Change the broken bulb when possible. Release the two spring clips securing the bulb. 3 Unplug the connector. 4 Change the bulb. 93_US_7carcare_MY09.fm Page 224 Tuesday, April 15, 2008 11:26 AM 224 Car care...
... act as a stop light to the information on jacks on pages 258 and 259. Lower the air shield. 2 Remove the protective cover. Front fog lights 3 WARNING • Never crawl under a car that you contact a Saab dealer if they need changing. Side marker lights and parking lights Side marker lights and ... not to touch the glass part of LEDs.We recommend that is supported only by a jack. Change the broken bulb when possible. Release the two spring clips securing the bulb. 3 Unplug the connector. 4 Change the bulb. 93_US_7carcare_MY09.fm Page 224 Tuesday, April 15, 2008 11:26 AM 224 Car care...


