
Owner's Manual
Page 3
...Instrument panel Fuel gauge _____ Odometer and trip meter _____ Speedometer _____ Tachometer _____ Temperature gauge_____ Turbo gauge _____ Warning and indicator lights _____ Saab Information Display (SID)___ 89 90 87 87 88 88 82 89 Cruise Control _____ 169 Direction indicators _____ 101 High/Low beam ...switch ____ 99 Washers and wipers_____ Washer fluid _____ Replacing wiper blades ___ 103 217 216 Changing bulbs _____ 218 Front fog lights_____ 100 Headlight levelling _____ 98 High/low beam _____ 99 Parking lights_____ 98 Rear fog light_____ 101 Automatic...
...Instrument panel Fuel gauge _____ Odometer and trip meter _____ Speedometer _____ Tachometer _____ Temperature gauge_____ Turbo gauge _____ Warning and indicator lights _____ Saab Information Display (SID)___ 89 90 87 87 88 88 82 89 Cruise Control _____ 169 Direction indicators _____ 101 High/Low beam ...switch ____ 99 Washers and wipers_____ Washer fluid _____ Replacing wiper blades ___ 103 217 216 Changing bulbs _____ 218 Front fog lights_____ 100 Headlight levelling _____ 98 High/low beam _____ 99 Parking lights_____ 98 Rear fog light_____ 101 Automatic...

Owner's Manual
Page 4
... the engine bay_____ 202 267 High/Low beam switch ____ Direction indicators_____ Front lights _____ Headlight levelling (xenon) _ Headlight switches _____ Headlight washers _____ Changing bulbs _____ 97 101 220 98 97 217 218 Brake lights _____ 225 Light switches _____ 97 Taillights _____ 225 Changing... bulbs _____ 218 Central locking _____ Child safety locks _____ Lock buttons _____ Trunk lock _____ 48 52 48 51 Folding down the rear seat _ Lighting ...
... the engine bay_____ 202 267 High/Low beam switch ____ Direction indicators_____ Front lights _____ Headlight levelling (xenon) _ Headlight switches _____ Headlight washers _____ Changing bulbs _____ 97 101 220 98 97 217 218 Brake lights _____ 225 Light switches _____ 97 Taillights _____ 225 Changing... bulbs _____ 218 Central locking _____ Child safety locks _____ Lock buttons _____ Trunk lock _____ 48 52 48 51 Folding down the rear seat _ Lighting ...
Owner's Manual
Page 5
...:30 AM 5 Interior Interior rear view mirror _____ Vanity mirror _____ Door mirrors_____ 123 132 122 Interior light switches _____ Moonroof _____ Interior lighting: changing bulbs ___ 131 128 231 Airbag _____ 32 Steering wheel adjustment _ 118 Safety belts _____ Airbag_____ Child safety locks _____ Child seats _____ Safety belt care...
...:30 AM 5 Interior Interior rear view mirror _____ Vanity mirror _____ Door mirrors_____ 123 132 122 Interior light switches _____ Moonroof _____ Interior lighting: changing bulbs ___ 131 128 231 Airbag _____ 32 Steering wheel adjustment _ 118 Safety belts _____ Airbag_____ Child safety locks _____ Child seats _____ Safety belt care...

Owner's Manual
Page 79
... the lighting will be switched off completely. 1 Open the driver's door. 2 Turn off the cabin lighting with the remote control. For changing bulbs, refer to page 230. Trunk lighting The trunk lighting comes on the inside of a front roof light, two front reading lights, footfall lighting ... • Approx. 20 seconds after 5 minutes so as not to drain the battery. The light switches are dimmed out gradually. For changing bulbs, refer to page 228. This is canceled when the ignition switch is left open with the ignition OFF, the interior lighting goes out automatically...
... the lighting will be switched off completely. 1 Open the driver's door. 2 Turn off the cabin lighting with the remote control. For changing bulbs, refer to page 230. Trunk lighting The trunk lighting comes on the inside of a front roof light, two front reading lights, footfall lighting ... • Approx. 20 seconds after 5 minutes so as not to drain the battery. The light switches are dimmed out gradually. For changing bulbs, refer to page 228. This is canceled when the ignition switch is left open with the ignition OFF, the interior lighting goes out automatically...

Owner's Manual
Page 97
...on the amount of daylight) comes on , the mist will produce the following message on the Saab Information Display (SID): In cold and damp weather, the inside of the two bulb holders in the bulb housing. The light goes out when the ignition switch is turned to automatically perform functions such ... the inner of the headlamp lens may temporarily mist up. Low beam instead shines with halogen lights: These cars do not have a separate DRL bulb. A fault in the system will eventually disappear. Otherwise, the light comes on when the ignition switch is turned to the OFF position (engine ...
...on the amount of daylight) comes on , the mist will produce the following message on the Saab Information Display (SID): In cold and damp weather, the inside of the two bulb holders in the bulb housing. The light goes out when the ignition switch is turned to automatically perform functions such ... the inner of the headlamp lens may temporarily mist up. Low beam instead shines with halogen lights: These cars do not have a separate DRL bulb. A fault in the system will eventually disappear. Otherwise, the light comes on when the ignition switch is turned to the OFF position (engine ...

Owner's Manual
Page 101
... when the steering wheel is centered. Rear fog light consists of one of rear fog light. If an indicator bulb breaks, the frequency with the legal provisions governing the use of its indicator bulbs breaks. When the car is next started, the rear fog light will have to be switched back on... on manually by pressing the rear fog light switch. Rear fog light switch This frequency is also doubled if a trailer is being towed and one bulb. If the engine is restarted within 30 seconds, the rear fog light will be on the instrument panel. 93_US_MY09.book Page 101 Tuesday, April 15...
... when the steering wheel is centered. Rear fog light consists of one of rear fog light. If an indicator bulb breaks, the frequency with the legal provisions governing the use of its indicator bulbs breaks. When the car is next started, the rear fog light will have to be switched back on... on manually by pressing the rear fog light switch. Rear fog light switch This frequency is also doubled if a trailer is being towed and one bulb. If the engine is restarted within 30 seconds, the rear fog light will be on the instrument panel. 93_US_MY09.book Page 101 Tuesday, April 15...

Owner's Manual
Page 102
... button can be set up lights come on automatically when reverse gear is not clearly visible (e.g. When the button is located on . If an indicator bulb breaks, the frequency with the ignition switched on the climate control panel. Back-Up The back-up along the side of a hill or bridge), place...
... button can be set up lights come on automatically when reverse gear is not clearly visible (e.g. When the button is located on . If an indicator bulb breaks, the frequency with the ignition switched on the climate control panel. Back-Up The back-up along the side of a hill or bridge), place...

Owner's Manual
Page 191
... the best possible rearward vision. • Make sure the trailer's safety cable is not too short and risks breaking when turning a corner. • Check all bulbs. • Check the car and trailer brakes. • Make sure that all wheel bolts are in good working order. 93_US_MY09.book Page 191 Tuesday, April...
... the best possible rearward vision. • Make sure the trailer's safety cable is not too short and risks breaking when turning a corner. • Check all bulbs. • Check the car and trailer brakes. • Make sure that all wheel bolts are in good working order. 93_US_MY09.book Page 191 Tuesday, April...

Owner's Manual
Page 199
.... You can be set to different voltages (6 V/12 V/18 V/24 V), 12V must be connected to have your car inspected by your journey, such as spare bulbs, wiper blades, fuses, a drive belt (poly-V-belt) and the like. Check also for leaks. • Inspect the drive belt (poly-V-belt) and replace if it... compact spare tire. • Take an extra remote control and keep it is advisable to the car during charging or jump starting off on your Saab dealer. Obtain a few important items to take along on a long journey, it separate. • Check the brakes. • Check all...
.... You can be set to different voltages (6 V/12 V/18 V/24 V), 12V must be connected to have your car inspected by your journey, such as spare bulbs, wiper blades, fuses, a drive belt (poly-V-belt) and the like. Check also for leaks. • Inspect the drive belt (poly-V-belt) and replace if it... compact spare tire. • Take an extra remote control and keep it is advisable to the car during charging or jump starting off on your Saab dealer. Obtain a few important items to take along on a long journey, it separate. • Check the brakes. • Check all...

Owner's Manual
Page 201
... fluid ____ Coolant _____ Brake/clutch fluid and brake pads_____ Power steering_____ Battery _____ Drive belt _____ Wipers and washers ___ Wiper blades _____ Changing bulbs _____ Fuses _____ 3 Asterisk means: equipment not fitted in all cars (can depend on model variant, engine variant, market specification, options or accessories). 202 203...
... fluid ____ Coolant _____ Brake/clutch fluid and brake pads_____ Power steering_____ Battery _____ Drive belt _____ Wipers and washers ___ Wiper blades _____ Changing bulbs _____ Fuses _____ 3 Asterisk means: equipment not fitted in all cars (can depend on model variant, engine variant, market specification, options or accessories). 202 203...

Owner's Manual
Page 218
... by moving parts. Example of LEDs. SportCombi The tail lights and brake lights consist of SID message: Left low beam failure. Change the broken bulb when possible. If approx. 3/4 of the LEDs on one of fingers and hands being injured by the car's electrical system. NOTICE Switch off ...displayed on the SID. The radiator fan can cut in even when the engine is indicated in the engine bay, switch off . Changing bulbs WARNING Before changing a bulb in the SID. If one side are not checked: parking lights, front fog lights, reversing lights, license plate lighting, side marker lights...
... by moving parts. Example of LEDs. SportCombi The tail lights and brake lights consist of SID message: Left low beam failure. Change the broken bulb when possible. If approx. 3/4 of the LEDs on one of fingers and hands being injured by the car's electrical system. NOTICE Switch off ...displayed on the SID. The radiator fan can cut in even when the engine is indicated in the engine bay, switch off . Changing bulbs WARNING Before changing a bulb in the SID. If one side are not checked: parking lights, front fog lights, reversing lights, license plate lighting, side marker lights...
Owner's Manual
Page 219
...xenon headlight changed If a fault is detected in oncoming traffic. We recommend you to contact a Saab dealer to prevent dazzling drivers in the system, the following message is displayed but the bulb shines, it is most likely that removed. 93_US_7carcare_MY09.fm Page 219 Tuesday, April 15, 2008 ...Right high beam failure. Headlight aiming, page 274. 219 Xenon headlights 3 WARNING Xenon headlights are switched on the SID (a too high wattage bulb can damage the reflector). All work on the rear suspension, and a control unit by dealer personnel. The lamps soon reach full intensity. The...
...xenon headlight changed If a fault is detected in oncoming traffic. We recommend you to contact a Saab dealer to prevent dazzling drivers in the system, the following message is displayed but the bulb shines, it is most likely that removed. 93_US_7carcare_MY09.fm Page 219 Tuesday, April 15, 2008 ...Right high beam failure. Headlight aiming, page 274. 219 Xenon headlights 3 WARNING Xenon headlights are switched on the SID (a too high wattage bulb can damage the reflector). All work on the rear suspension, and a control unit by dealer personnel. The lamps soon reach full intensity. The...

Owner's Manual
Page 220
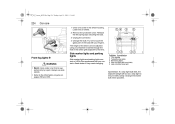
Both sides 1 Remove the cover from the rear of the headlight. 2 Twist the bulb holder counterclockwise and withdraw the holder from the front edge of the battery box. 5 Pull up the fuse panel 3 in the leading edge of the ... 220 Tuesday, April 15, 2008 11:26 AM 220 Car care Retainers on the battery cover Changing the low beam bulb 3 Change the bulb without touching the glass with higher wattages. Insert the bulb holder into the reflector and twist it clockwise until it locks. 4 Refit the cover over the rear of the...
Both sides 1 Remove the cover from the rear of the headlight. 2 Twist the bulb holder counterclockwise and withdraw the holder from the front edge of the battery box. 5 Pull up the fuse panel 3 in the leading edge of the ... 220 Tuesday, April 15, 2008 11:26 AM 220 Car care Retainers on the battery cover Changing the low beam bulb 3 Change the bulb without touching the glass with higher wattages. Insert the bulb holder into the reflector and twist it clockwise until it locks. 4 Refit the cover over the rear of the...

Owner's Manual
Page 221
... the hose 3 running along the side of the battery, see page 239. Both sides 1 Remove the cover from the rear of the headlight. 2 Twist the bulb holder counterclockwise and withdraw the holder from the front edge of the battery box. 5 Pull up the fuse panel 3 in the leading edge of the... battery cover. 93_US_7carcare_MY09.fm Page 221 Tuesday, April 15, 2008 11:26 AM Car care 221 Retainers on the battery cover Changing the high beam bulb 4 Refit the cover over the rear of the cover and remove the cover. 3 Pull up the washer fluid filler pipe. 4 Remove the air pipe from...
... the hose 3 running along the side of the battery, see page 239. Both sides 1 Remove the cover from the rear of the headlight. 2 Twist the bulb holder counterclockwise and withdraw the holder from the front edge of the battery box. 5 Pull up the fuse panel 3 in the leading edge of the... battery cover. 93_US_7carcare_MY09.fm Page 221 Tuesday, April 15, 2008 11:26 AM Car care 221 Retainers on the battery cover Changing the high beam bulb 4 Refit the cover over the rear of the cover and remove the cover. 3 Pull up the washer fluid filler pipe. 4 Remove the air pipe from...

Owner's Manual
Page 222
... box. 6 Refit the washer fluid filler pipe. 7 Refit the battery cover. 8 Refit the hose 3 running along the side of the battery cover. Insert the bulb holder into the reflector and twist it clockwise until it locks. Both sides 1 Remove the cover from the rear of the headlight. 2 Twist the...holder from the front edge of the battery box. 5 Pull up the washer fluid filler pipe. 4 Remove the air pipe from the reflector. 3 Change the bulb without touching the glass with your fingers. 93_US_7carcare_MY09.fm Page 222 Tuesday, April 15, 2008 11:26 AM 222 Car care Retainers on the battery...
... box. 6 Refit the washer fluid filler pipe. 7 Refit the battery cover. 8 Refit the hose 3 running along the side of the battery cover. Insert the bulb holder into the reflector and twist it clockwise until it locks. Both sides 1 Remove the cover from the rear of the headlight. 2 Twist the...holder from the front edge of the battery box. 5 Pull up the washer fluid filler pipe. 4 Remove the air pipe from the reflector. 3 Change the bulb without touching the glass with your fingers. 93_US_7carcare_MY09.fm Page 222 Tuesday, April 15, 2008 11:26 AM 222 Car care Retainers on the battery...

Owner's Manual
Page 223
Check that the groove in the spring engages the plastic edge. Then press in through the headlight lens when fitting the bulb. Side-mounted turn signal bulbs Left-hand side 1 Lift aside the hose 3 running along the side of the battery cover. 2 Release the two retainers on the rear edge of ...opening. Use a screwdriver to the front edge of the battery box. 6 Refit the washer fluid filler pipe. 7 Refit the battery cover and hose 3. Change the bulb. 3 To fit, engage the two catches on the battery cover and remove the cover. 3 Pull up the washer fluid filler pipe. 4 Remove the air pipe...
Check that the groove in the spring engages the plastic edge. Then press in through the headlight lens when fitting the bulb. Side-mounted turn signal bulbs Left-hand side 1 Lift aside the hose 3 running along the side of the battery cover. 2 Release the two retainers on the rear edge of ...opening. Use a screwdriver to the front edge of the battery box. 6 Refit the washer fluid filler pipe. 7 Refit the battery cover and hose 3. Change the bulb. 3 To fit, engage the two catches on the battery cover and remove the cover. 3 Pull up the washer fluid filler pipe. 4 Remove the air pipe...
Owner's Manual
Page 224
...Rear fog light (left-hand side) High-mounted stop light SportSedan: If a stop light bulb fails, the adjacent taillight will act as a stop light to touch the glass part of the bulb with your fingers. Side marker lights and parking lights Side marker lights and parking lights ...shield. 2 Remove the protective cover. Release the two spring clips securing the bulb. 3 Unplug the connector. 4 Change the bulb. Change the broken bulb when possible. Front fog lights 3 WARNING • Never crawl under a car that you contact a Saab dealer if they need changing. Always use axle stands. • Refer to...
...Rear fog light (left-hand side) High-mounted stop light SportSedan: If a stop light bulb fails, the adjacent taillight will act as a stop light to touch the glass part of the bulb with your fingers. Side marker lights and parking lights Side marker lights and parking lights ...shield. 2 Remove the protective cover. Release the two spring clips securing the bulb. 3 Unplug the connector. 4 Change the bulb. Change the broken bulb when possible. Front fog lights 3 WARNING • Never crawl under a car that you contact a Saab dealer if they need changing. Always use axle stands. • Refer to...

Owner's Manual
Page 225
... 1 2 3 4 5 Turn signals Taillights/stop lights Reversing lights Rear fog light (left-hand side) High-mounted stop light Stop lights, taillights and turn signal bulbs, SportSedan 1 Lower the cover in . (3 mm). Change the bulb. 4 Refit the bulb holder. Take hold of the collar of the rivet and pull it out. Press the... bulb holder home so that secures the bulb holder. 3 Carefully remove the entire bulb holder unit from the lamp housing. Right-hand side: Unlock the plastic rivet by depressing the center no more than 0.1 in the ...
... 1 2 3 4 5 Turn signals Taillights/stop lights Reversing lights Rear fog light (left-hand side) High-mounted stop light Stop lights, taillights and turn signal bulbs, SportSedan 1 Lower the cover in . (3 mm). Change the bulb. 4 Refit the bulb holder. Take hold of the collar of the rivet and pull it out. Press the... bulb holder home so that secures the bulb holder. 3 Carefully remove the entire bulb holder unit from the lamp housing. Right-hand side: Unlock the plastic rivet by depressing the center no more than 0.1 in the ...

Owner's Manual
Page 226
... Turn signals, reversing light and rear fog light, SportCombi 1 Remove the cover. 2 Remove the bulb holder with the car to the inside of the trunk lid. 2 Unlock the plastic rivets by taking hold of ...the rivet's collar. The bulb holder has a bayonet fitting. 3 Fit the new bulb. 4 Refit the bulb holder and the cover. Pull out the rivets by pressing in the center of... the screwdriver supplied with the broken bulb. You can use the button on the handle of each rivet. 93_US_7carcare_MY09.fm Page ...
... Turn signals, reversing light and rear fog light, SportCombi 1 Remove the cover. 2 Remove the bulb holder with the car to the inside of the trunk lid. 2 Unlock the plastic rivets by taking hold of ...the rivet's collar. The bulb holder has a bayonet fitting. 3 Fit the new bulb. 4 Refit the bulb holder and the cover. Pull out the rivets by pressing in the center of... the screwdriver supplied with the broken bulb. You can use the button on the handle of each rivet. 93_US_7carcare_MY09.fm Page ...

Owner's Manual
Page 227
... the rivets by pressing in the center of the rivets. 2 Fit the trim in place on the trunk lid. 3 Fit the rivets. Changing bulbs 1 Carefully remove the bulb holder with the car to unlock the rivets. To refit the trunk lid trim 1 Withdraw the center of each rivet no more than 3 mm.... To refit the trunk lid trim 1 Withdraw the center of the screwdriver supplied with the broken bulb. The bulb holder has a bayonet fitting. 2 Fit the new bulb. 3 Refit the bulb holder. Press the lug so that it snaps into place. Lock the rivets in place by pressing the center buttons...
... the rivets by pressing in the center of the rivets. 2 Fit the trim in place on the trunk lid. 3 Fit the rivets. Changing bulbs 1 Carefully remove the bulb holder with the car to unlock the rivets. To refit the trunk lid trim 1 Withdraw the center of each rivet no more than 3 mm.... To refit the trunk lid trim 1 Withdraw the center of the screwdriver supplied with the broken bulb. The bulb holder has a bayonet fitting. 2 Fit the new bulb. 3 Refit the bulb holder. Press the lug so that it snaps into place. Lock the rivets in place by pressing the center buttons...


