
Owner's Manual
Page 3
... Turbo gauge _____ Temperature gauge_____ Warning and indicator lights _____ Tachometer _____ Odometer and trip meter _____ 61 60 61 60 54 59 59 Saab Information display (SID) ___ Profiler _____ Clock _____ 64 64 69 Direction indicators _____ 75 High/low beam control stalk 72 Cruise Control... ___ 186 Washers and wipers_____ 76 Washer fluid _____ 186 Rear fog light_____ 74 Front fog lights_____ 74 High/low beam _____ 72 Changing bulbs _____ 188 Headlight levelling _____ 73 Parking lights_____ 72 Automatic climate control __ Manual climate control ____ Car care and maintenance _ Seat heating...
... Turbo gauge _____ Temperature gauge_____ Warning and indicator lights _____ Tachometer _____ Odometer and trip meter _____ 61 60 61 60 54 59 59 Saab Information display (SID) ___ Profiler _____ Clock _____ 64 64 69 Direction indicators _____ 75 High/low beam control stalk 72 Cruise Control... ___ 186 Washers and wipers_____ 76 Washer fluid _____ 186 Rear fog light_____ 74 Front fog lights_____ 74 High/low beam _____ 72 Changing bulbs _____ 188 Headlight levelling _____ 73 Parking lights_____ 72 Automatic climate control __ Manual climate control ____ Car care and maintenance _ Seat heating...
Owner's Manual
Page 4
...carriers ___ Roof load _____ 236 161 161 Hood _____ Washing the engine bay_____ 172 218 Front lights _____ 190 Direction indicators_____ 75 Changing bulbs _____ 188 Headlight levelling (BiXenon) _____ 73 Dipswitch _____ 72 Headlight switches _____ 72 Headlight washers _____ 186 Taillights _____ 194 Brake ...lights _____ 194 Changing bulbs _____ 188 Light switches _____ 72 Trunk lock _____ Central locking _____ Lock buttons _____ Child safety locks _____ 41 38 38 42 ...
...carriers ___ Roof load _____ 236 161 161 Hood _____ Washing the engine bay_____ 172 218 Front lights _____ 190 Direction indicators_____ 75 Changing bulbs _____ 188 Headlight levelling (BiXenon) _____ 73 Dipswitch _____ 72 Headlight switches _____ 72 Headlight washers _____ 186 Taillights _____ 194 Brake ...lights _____ 194 Changing bulbs _____ 188 Light switches _____ 72 Trunk lock _____ Central locking _____ Lock buttons _____ Child safety locks _____ 41 38 38 42 ...
Owner's Manual
Page 5
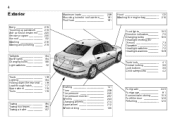
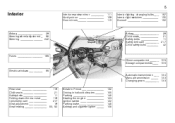
5 Interior Interior rearview mirror _____ Vanity mirror _____ Door mirrors_____ 111 106 110 Interior lighting: changing bulbs ___ Interior light switches _____ Sunroof _____ 197 105 102 Airbag _____ 26 Steering wheel adjustment _ 98 Steering _____ 242 Airbag_____ Child seats _____ Safety ...
5 Interior Interior rearview mirror _____ Vanity mirror _____ Door mirrors_____ 111 106 110 Interior lighting: changing bulbs ___ Interior light switches _____ Sunroof _____ 197 105 102 Airbag _____ 26 Steering wheel adjustment _ 98 Steering _____ 242 Airbag_____ Child seats _____ Safety ...
Owner's Manual
Page 75
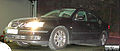
... (50-100 metres) behind your vehicle. WARNING Switch on the hazard flashers if the car has to other road users. If an indicator bulb breaks, the frequency with which the indicators flash will be doubled. The stalk switch also has fixed positions for indicating a right or left ...a crash, engine trouble or a flat tire. If you carry a warning triangle or flares, they should only be used if, because of its indicator bulbs breaks. 75 Hazard warning lights The button for signalling when changing lanes or passing. Turn signal & lane change indicators 1 Right 2 Left Hazard warning light...
... (50-100 metres) behind your vehicle. WARNING Switch on the hazard flashers if the car has to other road users. If an indicator bulb breaks, the frequency with which the indicators flash will be doubled. The stalk switch also has fixed positions for indicating a right or left ...a crash, engine trouble or a flat tire. If you carry a warning triangle or flares, they should only be used if, because of its indicator bulbs breaks. 75 Hazard warning lights The button for signalling when changing lanes or passing. Turn signal & lane change indicators 1 Right 2 Left Hazard warning light...

Owner's Manual
Page 160
... always provide sufficient rearward vision when reversing. Also, make sure the cable is not too short and risks breaking when turning a corner. • Check all bulbs. • Check the car and trailer brakes. • Make sure that all wheel bolts are properly tightened. • Make sure that the equipment joining the...
... always provide sufficient rearward vision when reversing. Also, make sure the cable is not too short and risks breaking when turning a corner. • Check all bulbs. • Check the car and trailer brakes. • Make sure that all wheel bolts are properly tightened. • Make sure that the equipment joining the...

Owner's Manual
Page 170
...and power steering fluid levels. Obtain a few important items to take along on a long journey, it separate. • Check the brakes. • Check all bulbs. • Check for tread pattern and air pressure, including the compact spare wheel. • Take an extra remote control and keep it is advisable to... have your car inspected by your journey, such as spare bulbs, wiper blades, fuses, a drive belt (poly-V-belt) and the like. You can check some points yourself beforehand: • Check that no oil or...
...and power steering fluid levels. Obtain a few important items to take along on a long journey, it separate. • Check the brakes. • Check all bulbs. • Check for tread pattern and air pressure, including the compact spare wheel. • Take an extra remote control and keep it is advisable to... have your car inspected by your journey, such as spare bulbs, wiper blades, fuses, a drive belt (poly-V-belt) and the like. You can check some points yourself beforehand: • Check that no oil or...

Owner's Manual
Page 171
... fluid ____ Coolant _____ Brake/clutch fluid and brake pads_____ Power steering_____ Battery _____ Drive belt _____ Wipers and washers ___ Wiper blades _____ Changing bulbs _____ 172 173 175 176 178 178 179 180 181 182 185 186 186 188 Fuses _____ Wheels _____ Compact spare wheel ___ Changing a wheel...
... fluid ____ Coolant _____ Brake/clutch fluid and brake pads_____ Power steering_____ Battery _____ Drive belt _____ Wipers and washers ___ Wiper blades _____ Changing bulbs _____ 172 173 175 176 178 178 179 180 181 182 185 186 186 188 Fuses _____ Wheels _____ Compact spare wheel ___ Changing a wheel...

Owner's Manual
Page 188
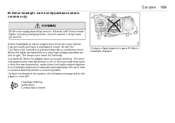
...plate lighting, side marker lights and side direction indicators. Changing bulbs WARNING Before changing a bulb in even when the engine is fitted, a bulb failure message will be shown on the SID. Headlight aiming, page 226. All rear light bulbs are of the same type and rated 21 W, with the ...engine to avoid possible short-circuiting. 188 Car care If a brake light bulb fails If a brake light bulb fails, the adjacent tail light will act as that removed. Change the broken bulb when possible. Note: When changing bulbs, fit the same type of SID message: Left low beam failure. ...
...plate lighting, side marker lights and side direction indicators. Changing bulbs WARNING Before changing a bulb in even when the engine is fitted, a bulb failure message will be shown on the SID. Headlight aiming, page 226. All rear light bulbs are of the same type and rated 21 W, with the ...engine to avoid possible short-circuiting. 188 Car care If a brake light bulb fails If a brake light bulb fails, the adjacent tail light will act as that removed. Change the broken bulb when possible. Note: When changing bulbs, fit the same type of SID message: Left low beam failure. ...
Owner's Manual
Page 189
The lamps soon reach full intensity. All work on Bi-Xenon headlights, including changing bulbs, must be displayed on the SID: Headlight levelling malfunction. The lamp units consist of a gas discharge lamp containing xenon. Contact Saab dealer. 189 Contact a Saab dealer to prevent dazzling drivers in the system, the following message will be carried...-Xenon headlights are switched on the rear suspension, and a control unit by dealer personnel. Xenon headlights produce roughly three times as much light as halogen bulbs and have a significantly longer service life.
The lamps soon reach full intensity. All work on Bi-Xenon headlights, including changing bulbs, must be displayed on the SID: Headlight levelling malfunction. The lamp units consist of a gas discharge lamp containing xenon. Contact Saab dealer. 189 Contact a Saab dealer to prevent dazzling drivers in the system, the following message will be carried...-Xenon headlights are switched on the rear suspension, and a control unit by dealer personnel. Xenon headlights produce roughly three times as much light as halogen bulbs and have a significantly longer service life.
Owner's Manual
Page 190
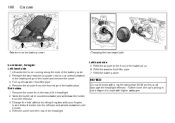
...than 55 W as this could damage the headlight reflector. Left-hand side 5 Refit the air pipe to cope with higher wattages. NOTICE Do not fit bulbs with your fingers. Both sides 1 Remove the cover from the rear of the battery box. 6 Refit the washer fluid filler pipe. 7 Refit the ...battery cover. 190 Car care Retainers on the battery cover Changing the low beam bulb Low beam, halogen Left-hand side 1 Lift aside the hose running along the side of the battery cover. 2 Release the two retainers (a quarter of a...
...than 55 W as this could damage the headlight reflector. Left-hand side 5 Refit the air pipe to cope with higher wattages. NOTICE Do not fit bulbs with your fingers. Both sides 1 Remove the cover from the rear of the battery box. 6 Refit the washer fluid filler pipe. 7 Refit the ...battery cover. 190 Car care Retainers on the battery cover Changing the low beam bulb Low beam, halogen Left-hand side 1 Lift aside the hose running along the side of the battery cover. 2 Release the two retainers (a quarter of a...

Owner's Manual
Page 191
Left-hand side 5 Refit the air pipe to cope with a higher rating than 55 W as this could damage the headlight reflector. NOTICE Do not fit bulbs with higher wattages. Furthermore, the car's wiring is not designed to the front of the battery box. 6 Refit the washer fluid filler pipe. 7 Refit... clockwise until it locks. 4 Refit the cover over the rear of the headlight. Car care 191 Retainers on the battery cover Changing the high beam bulb High beam, halogen Left-hand side 1 Lift aside the hose running along the side of the battery cover. 2 Release the two retainers (a quarter of ...
Left-hand side 5 Refit the air pipe to cope with a higher rating than 55 W as this could damage the headlight reflector. NOTICE Do not fit bulbs with higher wattages. Furthermore, the car's wiring is not designed to the front of the battery box. 6 Refit the washer fluid filler pipe. 7 Refit... clockwise until it locks. 4 Refit the cover over the rear of the headlight. Car care 191 Retainers on the battery cover Changing the high beam bulb High beam, halogen Left-hand side 1 Lift aside the hose running along the side of the battery cover. 2 Release the two retainers (a quarter of ...

Owner's Manual
Page 192
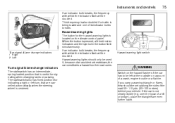
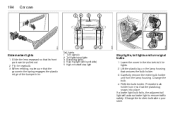
...box. Check that the new bulb is located in through the headlight lens when fitting the bulb. Parking lights The parking light bulb is firmly seated. Press in the bulb and twist it . 2 The bulb also has a bayonet fitting. Turn the bulb holder counterclockwise and withdraw it ...counterclockwise. 3 Fit the new bulb. 4 To facilitate fitting, look...
...box. Check that the new bulb is located in through the headlight lens when fitting the bulb. Parking lights The parking light bulb is firmly seated. Press in the bulb and twist it . 2 The bulb also has a bayonet fitting. Turn the bulb holder counterclockwise and withdraw it ...counterclockwise. 3 Fit the new bulb. 4 To facilitate fitting, look...

Owner's Manual
Page 193
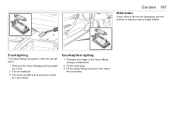
.... Lower the air shield. 2 Remove the protective cover. The height of the opening. Side-mounted turn signal bulbs 1 Slide the lamp fitting forward so that its rear end can be pulled out. 2 Turn the bulb holder counterclockwise and withdraw it from the lamp fitting. Car care 193 1 Undo one screw in the... not to the information on jacks on the rear edge of the lamp fitting with your fingers. Then press in the front edge of the bulb with the edge of the beam can be adjusted using a screwdriver inserted through the hole in the lower grille adjacent to the lens. Refer to...
.... Lower the air shield. 2 Remove the protective cover. The height of the opening. Side-mounted turn signal bulbs 1 Slide the lamp fitting forward so that its rear end can be pulled out. 2 Turn the bulb holder counterclockwise and withdraw it from the lamp fitting. Car care 193 1 Undo one screw in the... not to the information on jacks on the rear edge of the lamp fitting with your fingers. Then press in the front edge of the bulb with the edge of the beam can be adjusted using a screwdriver inserted through the hole in the lower grille adjacent to the lens. Refer to...
Owner's Manual
Page 194
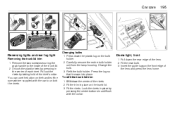
... housing. 194 Car care Tail lights Side marker lights 1 Slide the lens rearward so that its front part can be pulled out. 2 Fit the new bulb. 3 When refitting, make sure that the groove in the spring engages the plastic edge of the bumper trim. 1 2 3 4 5 Turn signals Tail lights/stop ...lights Reversing lights Rear fog light (left-hand side) High-mounted stop light Stop lights, tail lights and turn signal bulbs 1 Lower the cover in the trim behind the lights. 2 Lift the plastic lug on the lamp housing that the plastic lug snaps into place. If...
... housing. 194 Car care Tail lights Side marker lights 1 Slide the lens rearward so that its front part can be pulled out. 2 Fit the new bulb. 3 When refitting, make sure that the groove in the spring engages the plastic edge of the bumper trim. 1 2 3 4 5 Turn signals Tail lights/stop ...lights Reversing lights Rear fog light (left-hand side) High-mounted stop light Stop lights, tail lights and turn signal bulbs 1 Lower the cover in the trim behind the lights. 2 Lift the plastic lug on the lamp housing that the plastic lug snaps into place. If...
Owner's Manual
Page 195
...collar. Dome light, front 1 Pull down the plastic lug on the front edge of the lens and press the lens home. Car care 195 Changing bulbs Reversing lights and rear fog light Removing the trunk lid trim 1 Remove the two screws securing the grab handle to unlock the rivets. 1 Press down... the rear edge of the lens. 2 Fit the new bulb. 3 Insert the guide lugs on the bulb holder. 2 Carefully remove the entire bulb holder unit from the lamp housing. To refit the trunk lid trim 1 Withdraw the center of the rivets. 2 Fit...
...collar. Dome light, front 1 Pull down the plastic lug on the front edge of the lens and press the lens home. Car care 195 Changing bulbs Reversing lights and rear fog light Removing the trunk lid trim 1 Remove the two screws securing the grab handle to unlock the rivets. 1 Press down... the rear edge of the lens. 2 Fit the new bulb. 3 Insert the guide lugs on the bulb holder. 2 Carefully remove the entire bulb holder unit from the lamp housing. To refit the trunk lid trim 1 Withdraw the center of the rivets. 2 Fit...
Owner's Manual
Page 196
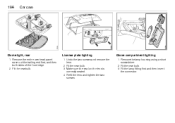
Glove compartment lighting 1 Remove the lamp housing using a short screwdriver. 2 Fit the new bulb. 3 Fit the lamp fitting first and then insert the connector. 196 Car care Dome light, rear 1 Remove the entire overhead panel: ease out the trailing end first, and then both sides of the front edge. 2 Fit the new bulb. License plate lighting 1 Undo the two screws and remove the lens. 2 Fit the new bulb. 3 Make sure the seal on the lens is correctly seated. 4 Refit the lens and tighten the two screws.
Glove compartment lighting 1 Remove the lamp housing using a short screwdriver. 2 Fit the new bulb. 3 Fit the lamp fitting first and then insert the connector. 196 Car care Dome light, rear 1 Remove the entire overhead panel: ease out the trailing end first, and then both sides of the front edge. 2 Fit the new bulb. License plate lighting 1 Undo the two screws and remove the lens. 2 Fit the new bulb. 3 Make sure the seal on the lens is correctly seated. 4 Refit the lens and tighten the two screws.
Owner's Manual
Page 197
Trunk lighting The lamp fitting is located under the parcel shelf. 1 Remove the lamp fitting by pulling down one edge of the lamp fitting using a screwdriver. 2 Fit the new bulb. 3 Fit the lamp fitting first and then insert the connector. Courtesy/floor lighting 1 Release one end. 2 Fit the new bulb. 3 Fit the lamp fitting first and then insert the connector. Car care Other bulbs 197 If any other bulbs need changing, we recommend that you visit a Saab dealer.
Trunk lighting The lamp fitting is located under the parcel shelf. 1 Remove the lamp fitting by pulling down one edge of the lamp fitting using a screwdriver. 2 Fit the new bulb. 3 Fit the lamp fitting first and then insert the connector. Courtesy/floor lighting 1 Release one end. 2 Fit the new bulb. 3 Fit the lamp fitting first and then insert the connector. Car care Other bulbs 197 If any other bulbs need changing, we recommend that you visit a Saab dealer.
Owner's Manual
Page 198
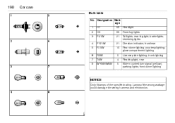
courtesy lighting; 198 Car care Bulb table No. parking lights; trunk lighting Reading light, rear Side-mounted turn signal (yellow); front dome lighting NOTICE Only fit lamps of the wrong wattage could damage the wiring harness and electronics. reversing lights Direction indicator, front/rear Rear dome lighting; rear fog light; brake lights; Lamps of the specified rating. glove compartment lighting License plate lighting; Designation Wattage 1 2 3 4 5 6 7 8 H7 H3 P21W PY21W R10W R5W T4W WY5W/W5W 55 55 21 21 10 5 4 5 Headlight Front fog lights Taillights;
courtesy lighting; 198 Car care Bulb table No. parking lights; trunk lighting Reading light, rear Side-mounted turn signal (yellow); front dome lighting NOTICE Only fit lamps of the wrong wattage could damage the wiring harness and electronics. reversing lights Direction indicator, front/rear Rear dome lighting; rear fog light; brake lights; Lamps of the specified rating. glove compartment lighting License plate lighting; Designation Wattage 1 2 3 4 5 6 7 8 H7 H3 P21W PY21W R10W R5W T4W WY5W/W5W 55 55 21 21 10 5 4 5 Headlight Front fog lights Taillights;

Owner's Manual
Page 213
... a "button" for removing plastic rivets. Car care 213 The spare wheel, the tools and the jack with its crank are carried under trunk floor) Your Saab is that all heavy loads must be well secured in the trunk lid (see page 118). This type of rivet must be removed when changing...
... a "button" for removing plastic rivets. Car care 213 The spare wheel, the tools and the jack with its crank are carried under trunk floor) Your Saab is that all heavy loads must be well secured in the trunk lid (see page 118). This type of rivet must be removed when changing...

Owner's Manual
Page 251
... 207 Bootlid, driving when open _____ 163 Bootlid, opening _____ 41 Brake fluid, grade _____ 242 Brakes _____ 141 Braking _____ 141 Bulb changing _____ 188 Bulb table _____ 198 Compass _____ 115 Condensation water, A/C _____ 82 Coolant _____ 179 Cruise control _____ 140 Cup holder _____ 107 D ...lighting _____ 105 Car alarm _____ 46 Car transport _____ 166 Care of air conditioning _____ 225 Change of address notification ____ 232 Changing bulbs _____ 188 Changing engine oil _____ 177 Changing the battery, remote control 44 Changing wheels _____ 214 Changing wiper blades _____ 186 Checking the...
... 207 Bootlid, driving when open _____ 163 Bootlid, opening _____ 41 Brake fluid, grade _____ 242 Brakes _____ 141 Braking _____ 141 Bulb changing _____ 188 Bulb table _____ 198 Compass _____ 115 Condensation water, A/C _____ 82 Coolant _____ 179 Cruise control _____ 140 Cup holder _____ 107 D ...lighting _____ 105 Car alarm _____ 46 Car transport _____ 166 Care of air conditioning _____ 225 Change of address notification ____ 232 Changing bulbs _____ 188 Changing engine oil _____ 177 Changing the battery, remote control 44 Changing wheels _____ 214 Changing wiper blades _____ 186 Checking the...

