Owner's Manual
Page 1
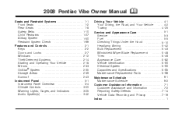
2008 Pontiac Vibe Owner Manual Seats and Restraint Systems ...1-1 Front Seats ...1-2 Rear Seats ...1-8 Safety Belts ...1-10 Child Restraints ...1-27 Airbag System ...1-50 Restraint System Check ...1-66 ... ...3-42 M Driving Your Vehicle ...4-1 Your Driving, the Road, and Your Vehicle ...4-2 Towing ...4-25 Service and Appearance Care ...5-1 Service ...5-3 Fuel ...5-5 Checking Things Under the Hood ...5-10 Headlamp Aiming ...5-42 Bulb Replacement ...5-43 Windshield Wiper Blade Replacement ...5-48 Tires ...5-49 Appearance Care ...5-82 Vehicle Identification ...5-90 Electrical System ...5-90...
2008 Pontiac Vibe Owner Manual Seats and Restraint Systems ...1-1 Front Seats ...1-2 Rear Seats ...1-8 Safety Belts ...1-10 Child Restraints ...1-27 Airbag System ...1-50 Restraint System Check ...1-66 ... ...3-42 M Driving Your Vehicle ...4-1 Your Driving, the Road, and Your Vehicle ...4-2 Towing ...4-25 Service and Appearance Care ...5-1 Service ...5-3 Fuel ...5-5 Checking Things Under the Hood ...5-10 Headlamp Aiming ...5-42 Bulb Replacement ...5-43 Windshield Wiper Blade Replacement ...5-48 Tires ...5-49 Appearance Care ...5-82 Vehicle Identification ...5-90 Electrical System ...5-90...

Owner's Manual
Page 94
... cause a fire. The electrical cord is located on the outside temperature, the kind of trying to keep the coolant heater plugged in? Open the hood and unwrap the electrical cord. Plug the cord into a properly grounded three-prong 110-volt AC outlet. The answer depends on the driver's side of...
... cause a fire. The electrical cord is located on the outside temperature, the kind of trying to keep the coolant heater plugged in? Open the hood and unwrap the electrical cord. Plug the cord into a properly grounded three-prong 110-volt AC outlet. The answer depends on the driver's side of...
Owner's Manual
Page 121
...Ashtray(s) and Cigarette Lighter on page 3-19 or Accessory Power Outlet(s) on page 2-39. See Safety Belt Reminders on page 2-39. H. N. Hood Release. Ignition Switch. See Coinholder(s) on page 3-28. Windshield Wiper Lever. E. See Instrument Panel Brightness on page 2-26. 3-5 L. P. Horn... page 3-16. D. Passenger Airbag Status Indicator. Rear Liftglass Release Button. See Tire Pressure Monitor System on page 5-10. See Hood Release on page 5-57. Shift Lever. I. The main components of your instrument panel are the following: A. Hazard Warning Flasher ...
...Ashtray(s) and Cigarette Lighter on page 3-19 or Accessory Power Outlet(s) on page 2-39. See Safety Belt Reminders on page 2-39. H. N. Hood Release. Ignition Switch. See Coinholder(s) on page 3-28. Windshield Wiper Lever. E. See Instrument Panel Brightness on page 2-26. 3-5 L. P. Horn... page 3-16. D. Passenger Airbag Status Indicator. Rear Liftglass Release Button. See Tire Pressure Monitor System on page 5-10. See Hood Release on page 5-57. Shift Lever. I. The main components of your instrument panel are the following: A. Hazard Warning Flasher ...
Owner's Manual
Page 138
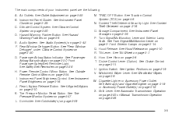
... the rear liftglass opened. The rear window defogger will only work when the ignition is in the ON position. • Use of non-GM approved hood deflectors may need to help circulate the air inside rear window. Repairs would not be covered by turning off automatically approximately 15 minutes...
... the rear liftglass opened. The rear window defogger will only work when the ignition is in the ON position. • Use of non-GM approved hood deflectors may need to help circulate the air inside rear window. Repairs would not be covered by turning off automatically approximately 15 minutes...

Owner's Manual
Page 215
... ...5-5 Gasoline Octane ...5-5 Gasoline Specifications ...5-5 California Fuel ...5-5 Additives ...5-6 Fuels in Foreign Countries ...5-6 Filling the Tank ...5-7 Filling a Portable Fuel Container ...5-9 Checking Things Under the Hood ...5-10 Hood Release ...5-10 Engine Compartment Overview ...5-12 Engine Oil ...5-13 Engine Air Cleaner/Filter ...5-17 Automatic Transmission Fluid ...5-19 Manual Transmission Fluid ...5-21 Hydraulic Clutch ...5-22...
... ...5-5 Gasoline Octane ...5-5 Gasoline Specifications ...5-5 California Fuel ...5-5 Additives ...5-6 Fuels in Foreign Countries ...5-6 Filling the Tank ...5-7 Filling a Portable Fuel Container ...5-9 Checking Things Under the Hood ...5-10 Hood Release ...5-10 Engine Compartment Overview ...5-12 Engine Oil ...5-13 Engine Air Cleaner/Filter ...5-17 Automatic Transmission Fluid ...5-19 Manual Transmission Fluid ...5-21 Hydraulic Clutch ...5-22...

Owner's Manual
Page 224
... washer and other fluids, and plastic or rubber. Be careful not to the left of the steering wheel. {CAUTION: An electric fan under the hood can get on it. Keep hands, clothing, and tools away from any underhood electric fan. {CAUTION: Things that will burn onto a hot engine. 5-10 It...
... washer and other fluids, and plastic or rubber. Be careful not to the left of the steering wheel. {CAUTION: An electric fan under the hood can get on it. Keep hands, clothing, and tools away from any underhood electric fan. {CAUTION: Things that will burn onto a hot engine. 5-10 It...

Owner's Manual
Page 225
... located near the middle of the vehicle, it straight up on properly. Make sure to return the hood prop rod carefully back to the side or toward the inside of the hood. 5-11 Release the hood prop rod from its retainer to the front of the vehicle and pull up . The lever is... moved to its retainer and put it into the slot, move it may become detached. Then go to avoid damaging the vehicle. 2. 3. Before closing the hood, be sure all the filler caps are on the secondary hood release. Lift the hood. 4. To insert the hood prop rod into the slot in the...
... located near the middle of the vehicle, it straight up on properly. Make sure to return the hood prop rod carefully back to the side or toward the inside of the hood. 5-11 Release the hood prop rod from its retainer to the front of the vehicle and pull up . The lever is... moved to its retainer and put it into the slot, move it may become detached. Then go to avoid damaging the vehicle. 2. 3. Before closing the hood, be sure all the filler caps are on the secondary hood release. Lift the hood. 4. To insert the hood prop rod into the slot in the...

Owner's Manual
Page 226
Engine Compartment Overview When you open the hood, here is what you will see: 5-12
Engine Compartment Overview When you open the hood, here is what you will see: 5-12

Owner's Manual
Page 240
If Steam Is Coming From Your Engine {CAUTION: Steam from an overheated engine can burn you badly, even if you open the hood. Wait until there is no coolant, your engine catches fire because you keep driving with no sign of the vehicle until it can be ... by your engine if it overheats, and get everyone away from it off and get out of steam or coolant before you just open the hood. Stop your warranty. Just turn it . Be sure the cap is not tightly installed, coolant loss and possible engine damage may occur.
If Steam Is Coming From Your Engine {CAUTION: Steam from an overheated engine can burn you badly, even if you open the hood. Wait until there is no coolant, your engine catches fire because you keep driving with no sign of the vehicle until it can be ... by your engine if it overheats, and get everyone away from it off and get out of steam or coolant before you just open the hood. Stop your warranty. Just turn it . Be sure the cap is not tightly installed, coolant loss and possible engine damage may occur.

Owner's Manual
Page 241
... hot at the highest fan speed and open the windows as necessary. 5-27 Stop after high-speed driving. You may decide not to lift the hood but see or hear no steam, the problem may not be safe, drive slower for about 10 minutes. If you are parked. In heavy traffic...
... hot at the highest fan speed and open the windows as necessary. 5-27 Stop after high-speed driving. You may decide not to lift the hood but see or hear no steam, the problem may not be safe, drive slower for about 10 minutes. If you are parked. In heavy traffic...

Owner's Manual
Page 242
The vehicle should be parked on a level surface. A. Cooling System When you decide it is safe to lift the hood, here is what you will see: {CAUTION: An electric engine cooling fan under the hood can injure you may have a leak at or above the FULL mark. If the coolant inside the coolant...
The vehicle should be parked on a level surface. A. Cooling System When you decide it is safe to lift the hood, here is what you will see: {CAUTION: An electric engine cooling fan under the hood can injure you may have a leak at or above the FULL mark. If the coolant inside the coolant...
Owner's Manual
Page 253
.... 3. If they could be damaged. Unplug unnecessary accessories plugged into the cigarette lighter. And it could cause a ground connection you do not want. Open the hoods and locate the batteries. Find the positive (+) and negative (−) terminal locations on both batteries. Notice: Ignoring these steps could result in costly damage to...
.... 3. If they could be damaged. Unplug unnecessary accessories plugged into the cigarette lighter. And it could cause a ground connection you do not want. Open the hoods and locate the batteries. Find the positive (+) and negative (−) terminal locations on both batteries. Notice: Ignoring these steps could result in costly damage to...

Owner's Manual
Page 258
To replace the headlamp, turn signal/parking lamp bulb socket counterclockwise to install a new bulb. 5-44 Open the hood and locate the lamp assembly. 2. Pull the bulb out of the fixture. 5. Remove the rubber cover and socket from you. Release the retainer clip holding the bulb on the headlamp by pressing down and moving the metal retainer away from the headlamp or turn signal/parking lamp. 3. Turn the turn signal, or parking lamp bulb: 1. Reverse the steps to remove. 4.
To replace the headlamp, turn signal/parking lamp bulb socket counterclockwise to install a new bulb. 5-44 Open the hood and locate the lamp assembly. 2. Pull the bulb out of the fixture. 5. Remove the rubber cover and socket from you. Release the retainer clip holding the bulb on the headlamp by pressing down and moving the metal retainer away from the headlamp or turn signal/parking lamp. 3. Turn the turn signal, or parking lamp bulb: 1. Reverse the steps to remove. 4.

Owner's Manual
Page 309
... Gap 0.043 inches (1.1 mm) 5-95 Application Capacities English Metric For the air conditioning system refrigerant charge amount, see the refrigerant caution label located under the hood. Capacities and Specifications The following approximate capacities are approximate.
... Gap 0.043 inches (1.1 mm) 5-95 Application Capacities English Metric For the air conditioning system refrigerant charge amount, see the refrigerant caution label located under the hood. Capacities and Specifications The following approximate capacities are approximate.

Owner's Manual
Page 324
... each fuel fill. See Engine Coolant on page 5-34. See Windshield Washer Fluid on page 5-23. Hood Latch Operation Check At Each Fuel Fill It is released. See Hood Release on page 5-13. Engine Coolant Level Check Check the engine coolant level and add DEX-COOL® coolant... mixture if necessary. Check the engine oil level and add the proper oil if necessary. Pull the primary hood latch release handle inside the vehicle. Whenever any necessary repairs are completed at the proper level. Windshield Washer Fluid Level Check Check the windshield...
... each fuel fill. See Engine Coolant on page 5-34. See Windshield Washer Fluid on page 5-23. Hood Latch Operation Check At Each Fuel Fill It is released. See Hood Release on page 5-13. Engine Coolant Level Check Check the engine coolant level and add DEX-COOL® coolant... mixture if necessary. Check the engine oil level and add the proper oil if necessary. Pull the primary hood latch release handle inside the vehicle. Whenever any necessary repairs are completed at the proper level. Windshield Washer Fluid Level Check Check the windshield...

Owner's Manual
Page 326
... pushing and pulling the seatback while it starts. 3. The vehicle should start only in position and all the way down all hood latch assembly, secondary latch, pivots, spring anchor, release pawl, hood and body door hinges, rear compartment, and any other position, contact your dealer/retailer for service. Body Lubrication Service Lubricate...
... pushing and pulling the seatback while it starts. 3. The vehicle should start only in position and all the way down all hood latch assembly, secondary latch, pivots, spring anchor, release pawl, hood and body door hinges, rear compartment, and any other position, contact your dealer/retailer for service. Body Lubrication Service Lubricate...

Owner's Manual
Page 332
...of NLGI #2, Category LB or GC-LB. Chassis Lubrication Weatherstrip Conditioning 6-20 Chassis Lubricant (GM Part No. Multi-Purpose Lubricant, Superlube Hood and Door (GM Part No. U.S. 12345579, in Canada 10953518) or Dielectric Silicone Grease (GM Part No. Floor Shift Linkage Lubriplate...U.S. 12377985, in Canada 992723) or lubricant meeting requirements of NLGI #2, Category LB or GC-LB. Usage Fluid/Lubricant Usage Hood Latch Assembly, Secondary Latch, Pivots, Spring Anchor, and Release Pawl Fluid/Lubricant Lubriplate Lubricant Aerosol (GM Part No. U.S. 12346293, in Canada...
...of NLGI #2, Category LB or GC-LB. Chassis Lubrication Weatherstrip Conditioning 6-20 Chassis Lubricant (GM Part No. Multi-Purpose Lubricant, Superlube Hood and Door (GM Part No. U.S. 12345579, in Canada 10953518) or Dielectric Silicone Grease (GM Part No. Floor Shift Linkage Lubriplate...U.S. 12377985, in Canada 992723) or lubricant meeting requirements of NLGI #2, Category LB or GC-LB. Usage Fluid/Lubricant Usage Hood Latch Assembly, Secondary Latch, Pivots, Spring Anchor, and Release Pawl Fluid/Lubricant Lubriplate Lubricant Aerosol (GM Part No. U.S. 12346293, in Canada...

Owner's Manual
Page 356
... Console Storage Area ...2-39 Center High-Mounted Stoplamp (CHMSL) ...5-45 Chains, Tire ...5-68 Charging System Light ...3-32 Check Engine Light ...3-36 Checking Things Under the Hood ...5-10 Chemical Paint Spotting ...5-88 Child Restraints Child Restraint Systems ...1-33 Infants and Young Children ...1-30 Lower Anchors and Tethers for Children ...1-37 Older Children...
... Console Storage Area ...2-39 Center High-Mounted Stoplamp (CHMSL) ...5-45 Chains, Tire ...5-68 Charging System Light ...3-32 Check Engine Light ...3-36 Checking Things Under the Hood ...5-10 Chemical Paint Spotting ...5-88 Child Restraints Child Restraint Systems ...1-33 Infants and Young Children ...1-30 Lower Anchors and Tethers for Children ...1-37 Older Children...

Owner's Manual
Page 360
... High/Low Beam Changer ...3-8 On Reminder ...3-15 Heater ...3-20 Height Adjuster, Driver Seat ...1-3 Highbeam On Light ...3-40 Highway Hypnosis ...4-13 Hill and Mountain Roads ...4-14 Hood Checking Things Under ...5-10 Release ...5-10 Horn ...3-6 How to Wear Safety Belts Properly ...1-15 Hydraulic Clutch ...5-22 I /P) Brightness ...3-16 Cluster ...3-26 Interior Lamps Control ...3-17...
... High/Low Beam Changer ...3-8 On Reminder ...3-15 Heater ...3-20 Height Adjuster, Driver Seat ...1-3 Highbeam On Light ...3-40 Highway Hypnosis ...4-13 Hill and Mountain Roads ...4-14 Hood Checking Things Under ...5-10 Release ...5-10 Horn ...3-6 How to Wear Safety Belts Properly ...1-15 Hydraulic Clutch ...5-22 I /P) Brightness ...3-16 Cluster ...3-26 Interior Lamps Control ...3-17...


