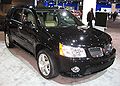

Owner's Manual
Page 5
... Vehicle ...1-70 Restraint System Check ...1-71 Checking the Restraint Systems ...1-71 Replacing Restraint System Parts After a Crash ...1-72 Front Seats ...1-2 Manual Seats ...1-2 Seat Height Adjuster ...1-3 Power Seat ...1-3 Manual Lumbar ...1-4 Heated Seats ...1-4 Manual Reclining Seatbacks ...1-5 Head Restraints ...1-7 Passenger Folding Seatback ...1-8 Rear Seats ...1-10 Split Folding Rear Seat ...1-10 Safety Belts ...1-12 Safety...
... Vehicle ...1-70 Restraint System Check ...1-71 Checking the Restraint Systems ...1-71 Replacing Restraint System Parts After a Crash ...1-72 Front Seats ...1-2 Manual Seats ...1-2 Seat Height Adjuster ...1-3 Power Seat ...1-3 Manual Lumbar ...1-4 Heated Seats ...1-4 Manual Reclining Seatbacks ...1-5 Head Restraints ...1-7 Passenger Folding Seatback ...1-8 Rear Seats ...1-10 Split Folding Rear Seat ...1-10 Safety Belts ...1-12 Safety...
Owner's Manual
Page 7
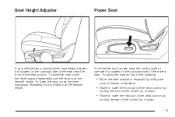
To lower the seat, move the lever upward repeatedly until the seat is at the desired height. If the vehicle has a power seat, the control used to operate it is located on the outboard side of the driver's seat. To adjust the seat do any of the ... down. • Raise or lower the rear part of the seat cushion by moving the rear of the control up or down. 1-3 Seat Height Adjuster Power Seat If your vehicle has a manual driver seat height adjuster, it is located on the outboard side of the seat near the front of the...
To lower the seat, move the lever upward repeatedly until the seat is at the desired height. If the vehicle has a power seat, the control used to operate it is located on the outboard side of the driver's seat. To adjust the seat do any of the ... down. • Raise or lower the rear part of the seat cushion by moving the rear of the control up or down. 1-3 Seat Height Adjuster Power Seat If your vehicle has a manual driver seat height adjuster, it is located on the outboard side of the seat near the front of the...
Owner's Manual
Page 77
...37 Manual Rearview Mirror ...2-37 Manual Rearview Mirror with OnStar® ...2-37 Automatic Dimming Rearview Mirror with OnStar® ...2-38 Outside Power Mirrors ...2-38 Outside Convex Mirrors ...2-39 Keys ...2-3 Remote Keyless Entry (RKE) System ...2-4 Remote Keyless Entry (RKE) System Operation ......2-5 Remote Vehicle Start ...2-8 Doors and Locks ...2-11 Door Locks ...2-11 Power Door Locks ...2-11 Delayed Locking ...2-12 Programmable Automatic Door Locks ...2-12 Rear Door Security Locks ...2-12 Lockout Protection ...2-13 Liftgate ...2-13...
...37 Manual Rearview Mirror ...2-37 Manual Rearview Mirror with OnStar® ...2-37 Automatic Dimming Rearview Mirror with OnStar® ...2-38 Outside Power Mirrors ...2-38 Outside Convex Mirrors ...2-39 Keys ...2-3 Remote Keyless Entry (RKE) System ...2-4 Remote Keyless Entry (RKE) System Operation ......2-5 Remote Vehicle Start ...2-8 Doors and Locks ...2-11 Door Locks ...2-11 Power Door Locks ...2-11 Delayed Locking ...2-12 Programmable Automatic Door Locks ...2-12 Rear Door Security Locks ...2-12 Lockout Protection ...2-13 Liftgate ...2-13...
Owner's Manual
Page 79
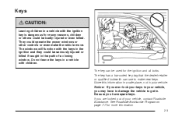
Keys {CAUTION: Leaving children in a vehicle with the ignition key is dangerous for many reasons, children or others could operate the power windows or other controls or even make new keys. Do not leave the keys in your vehicle. Notice: If you ever lock your keys in ...
Keys {CAUTION: Leaving children in a vehicle with the ignition key is dangerous for many reasons, children or others could operate the power windows or other controls or even make new keys. Do not leave the keys in your vehicle. Notice: If you ever lock your keys in ...
Owner's Manual
Page 87
... to get out. When a door is locked, the handle will not open the doors and fall out of the doors. 2-11 Always lock your vehicle. Power Door Locks The power door lock switches are not locked.
... to get out. When a door is locked, the handle will not open the doors and fall out of the doors. 2-11 Always lock your vehicle. Power Door Locks The power door lock switches are not locked.
Owner's Manual
Page 88
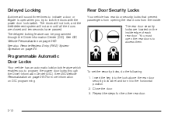
... will not lock, and the theft-deterrent system will sound three times to indicate a door or liftgate is open the rear doors to program the power door locks through the Driver Information Center (DIC). Rear Door Security Locks Your vehicle has rear door security locks that prevent passengers from opening the... each rear door. Insert the key into the lock above the rear door security lock label and turn it to lock the doors with the power door lock switch.
... will not lock, and the theft-deterrent system will sound three times to indicate a door or liftgate is open the rear doors to program the power door locks through the Driver Information Center (DIC). Rear Door Security Locks Your vehicle has rear door security locks that prevent passengers from opening the... each rear door. Insert the key into the lock above the rear door security lock label and turn it to lock the doors with the power door lock switch.
Owner's Manual
Page 89
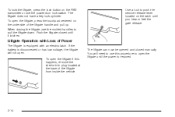
... key is on, do the following : 1. Insert the key into your vehicle. Unlock the door using the remote keyless entry transmitter, the front door power lock switch, or the rear door manual lock. 2. Liftgate {CAUTION: It can be dangerous to its highest speed and select the control setting that will... Repeat the steps for the other windows are shut. • Turn the fan on the Remote Keyless Entry (RKE) transmitter twice or use the power door lock switch. 2-13 Lockout Protection If you must pass through the seal between the body and the liftgate or liftglass: • Make sure all...
... key is on, do the following : 1. Insert the key into your vehicle. Unlock the door using the remote keyless entry transmitter, the front door power lock switch, or the rear door manual lock. 2. Liftgate {CAUTION: It can be dangerous to its highest speed and select the control setting that will... Repeat the steps for the other windows are shut. • Turn the fan on the Remote Keyless Entry (RKE) transmitter twice or use the power door lock switch. 2-13 Lockout Protection If you must pass through the seal between the body and the liftgate or liftglass: • Make sure all...
Owner's Manual
Page 90
... the vehicle. Push the liftgate closed manually. When closing the liftgate, use the power door lock switch. The liftgate can now be opened and closed until the power is equipped with an electric latch. Liftgate Operation with Loss of Power The liftgate is restored. 2-14 To lock the liftgate, press the lock button...
... the vehicle. Push the liftgate closed manually. When closing the liftgate, use the power door lock switch. The liftgate can now be opened and closed until the power is equipped with an electric latch. Liftgate Operation with Loss of Power The liftgate is restored. 2-14 To lock the liftgate, press the lock button...
Owner's Manual
Page 92
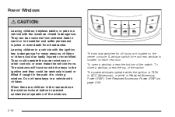
... doors are children in a vehicle with the keys in the ignition and they could operate the power windows or other controls or even make the vehicle move. See Retained Accessory Power (RAP) on page 2-22. 2-16 Power Windows {CAUTION: Leaving children, helpless adults, or pets in the path of a closing window. They could... a window, press the top of the switch. When there are located on each rear window is RUN or ACC (Accessory), or while in Retained Accessory Power (RAP). The power windows operate when the ignition is located on the center console.
... doors are children in a vehicle with the keys in the ignition and they could operate the power windows or other controls or even make the vehicle move. See Retained Accessory Power (RAP) on page 2-22. 2-16 Power Windows {CAUTION: Leaving children, helpless adults, or pets in the path of a closing window. They could... a window, press the top of the switch. When there are located on each rear window is RUN or ACC (Accessory), or while in Retained Accessory Power (RAP). The power windows operate when the ignition is located on the center console.
Owner's Manual
Page 93
... from side-to be lowered without holding the switch. o (Window Lockout): Theft-Deterrent Systems Vehicle theft is active. Press the lockout button, located with the power window switches, to steal. 2-17 To stop the window while it impossible to turn the feature on both the driver's and passenger's side. The window...
... from side-to be lowered without holding the switch. o (Window Lockout): Theft-Deterrent Systems Vehicle theft is active. Press the lockout button, located with the power window switches, to steal. 2-17 To stop the window while it impossible to turn the feature on both the driver's and passenger's side. The window...
Owner's Manual
Page 94
... cause undesired operation. This device must accept any interference received, including interference that may cause undesired operation of the following: 1. Unlock the doors with the power door lock switch or the Remote Keyless Entry (RKE) transmitter. This device may not cause harmful interference. 2. If the theft-deterrent system is activated and...
... cause undesired operation. This device must accept any interference received, including interference that may cause undesired operation of the following: 1. Unlock the doors with the power door lock switch or the Remote Keyless Entry (RKE) transmitter. This device may not cause harmful interference. 2. If the theft-deterrent system is activated and...

Owner's Manual
Page 98
...when you leave the key in ON/RUN or ACC/ACCESSORY. 2-22 Starting Procedure 1. Starting the Engine Move your ignition and transmission. Retained Accessory Power (RAP) These vehicle accessories can be able to PARK (P) if your vehicle is moving parts. This will sound, when you . Shift to ... key in START for joy riders or thieves. Always remember to remove your foot off : • Audio System • Power Windows • Sunroof (if equipped) Power to START. If you do, you could be stopped after starting the engine and protects components. The idle speed will be...
...when you leave the key in ON/RUN or ACC/ACCESSORY. 2-22 Starting Procedure 1. Starting the Engine Move your ignition and transmission. Retained Accessory Power (RAP) These vehicle accessories can be able to PARK (P) if your vehicle is moving parts. This will sound, when you . Shift to ... key in START for joy riders or thieves. Always remember to remove your foot off : • Audio System • Power Windows • Sunroof (if equipped) Power to START. If you do, you could be stopped after starting the engine and protects components. The idle speed will be...

Owner's Manual
Page 103
... is for passing, and you need to prevent repetitive types of grade. Towing or driving on page 4-12. If it on page 3-35 for more power for normal driving with the automatic transmission.
... is for passing, and you need to prevent repetitive types of grade. Towing or driving on page 4-12. If it on page 3-35 for more power for normal driving with the automatic transmission.
Owner's Manual
Page 106
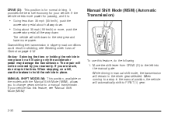
... Shift Mode (MSM) (Automatic Transmission) • Going less than 35 mph (55 km/h), push the accelerator pedal about 35 mph (55 km/h) or more power. Downshifting the transmission in slippery road conditions could result in the manual position, the vehicle will not be covered by your warranty. The repair will... shift lever from DRIVE (D) to hold the vehicle in the driver gear selected. The vehicle will remain in place. If the vehicle needs more power for passing, and it is for your vehicle has this feature, see Skidding under Loss of Control on a hill, use this feature, do ...
... Shift Mode (MSM) (Automatic Transmission) • Going less than 35 mph (55 km/h), push the accelerator pedal about 35 mph (55 km/h) or more power. Downshifting the transmission in slippery road conditions could result in the manual position, the vehicle will not be covered by your warranty. The repair will... shift lever from DRIVE (D) to hold the vehicle in the driver gear selected. The vehicle will remain in place. If the vehicle needs more power for passing, and it is for your vehicle has this feature, see Skidding under Loss of Control on a hill, use this feature, do ...
Owner's Manual
Page 107
... or rearward toward the minus (−) to the normal shift patterns. When using the MSM feature the vehicle will default into gears appropriate for more power or engine braking. Once the fluid temperature lowers to the normal temperature range, the transmission will not cool, you to shift into a different shift...
... or rearward toward the minus (−) to the normal shift patterns. When using the MSM feature the vehicle will default into gears appropriate for more power or engine braking. Once the fluid temperature lowers to the normal temperature range, the transmission will not cool, you to shift into a different shift...
Owner's Manual
Page 114
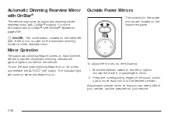
.... Adjust each outside mirror so that you can see OnStar® System on . Automatic dimming reduces the glare of the mirror, is used for the power mirrors are located on the instrument panel. Press the corresponding edges of your vehicle, and the area behind the vehicle. Mirror Operation The automatic dimming...
.... Adjust each outside mirror so that you can see OnStar® System on . Automatic dimming reduces the glare of the mirror, is used for the power mirrors are located on the instrument panel. Press the corresponding edges of your vehicle, and the area behind the vehicle. Mirror Operation The automatic dimming...
Owner's Manual
Page 118
... important parts of OnStar Hands-Free Calling, your vehicle also sends OnStar your vehicle in (e.g. Your vehicle must have a working electrical system (including adequate battery power) for that area has coverage, network capacity and reception when the service is needed, and technology that area. How OnStar Service Works Your vehicle's OnStar...
... important parts of OnStar Hands-Free Calling, your vehicle also sends OnStar your vehicle in (e.g. Your vehicle must have a working electrical system (including adequate battery power) for that area has coverage, network capacity and reception when the service is needed, and technology that area. How OnStar Service Works Your vehicle's OnStar...
Owner's Manual
Page 124
... on the front of the switch. To express-open . The ignition must be in RUN or ACC, or Retained Accessory Power (RAP) must be active, to store heavy loads. See Retained Accessory Power (RAP) on the switch again, to close the sunroof, press forward and hold the switch until the sunroof stops...
... on the front of the switch. To express-open . The ignition must be in RUN or ACC, or Retained Accessory Power (RAP) must be active, to store heavy loads. See Retained Accessory Power (RAP) on the switch again, to close the sunroof, press forward and hold the switch until the sunroof stops...

Owner's Manual
Page 125
...) ...3-15 Automatic Headlamp System ...3-15 Fog Lamps ...3-16 Instrument Panel Brightness ...3-16 Dome Lamp ...3-17 Entry Lighting ...3-17 Map Lamps ...3-17 Cargo Lamp ...3-18 Electric Power Management ...3-18 Battery Run-Down Protection ...3-19 Accessory Power Outlet(s) ...3-19 Ashtray(s) and Cigarette Lighter ...3-20
...) ...3-15 Automatic Headlamp System ...3-15 Fog Lamps ...3-16 Instrument Panel Brightness ...3-16 Dome Lamp ...3-17 Entry Lighting ...3-17 Map Lamps ...3-17 Cargo Lamp ...3-18 Electric Power Management ...3-18 Battery Run-Down Protection ...3-19 Accessory Power Outlet(s) ...3-19 Ashtray(s) and Cigarette Lighter ...3-20
Owner's Manual
Page 126
... ...3-101 Rear Seat Entertainment (RSE) System ...3-101 Theft-Deterrent Feature ...3-110 Audio Steering Wheel Controls ...3-110 Radio Reception ...3-111 Multi-Band Antenna ...3-112 Reduced Engine Power Light ...3-41 Highbeam On Light ...3-41 Service All-Wheel Drive Light ...3-42 All-Wheel Drive Disabled Light ...3-42 Gate Ajar Light ...3-42 Door Ajar Light...
... ...3-101 Rear Seat Entertainment (RSE) System ...3-101 Theft-Deterrent Feature ...3-110 Audio Steering Wheel Controls ...3-110 Radio Reception ...3-111 Multi-Band Antenna ...3-112 Reduced Engine Power Light ...3-41 Highbeam On Light ...3-41 Service All-Wheel Drive Light ...3-42 All-Wheel Drive Disabled Light ...3-42 Gate Ajar Light ...3-42 Door Ajar Light...


