Owner's Manual
Page 1
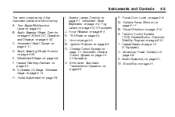
2008 Pontiac G8 Owner Manual Seats and Restraints ...1-1 Front Seats ...1-2 Rear Seats ...1-5 Safety Belts ...1-5 Airbag System ...1-19 Child Restraints ...1-32 Driver Information Center... Lighting ...5-1 ...6-1 ...7-1 Keys, Doors and Windows ...2-1 Keys ...2-2 Doors and Locks ...2-8 Theft-Deterrent Systems ...2-11 Windows ...2-14 Mirrors ...2-16 Sunroof ...2-18 Infotainment ...6-1 Audio System(s) Climate Controls Electrical System ...Tires ...Tire Changing ...Jump Starting ...Towing ...Appearance Care ... Technical Data ...10-1 Vehicle Identification ...10-1 Capacities and Speci&#...
2008 Pontiac G8 Owner Manual Seats and Restraints ...1-1 Front Seats ...1-2 Rear Seats ...1-5 Safety Belts ...1-5 Airbag System ...1-19 Child Restraints ...1-32 Driver Information Center... Lighting ...5-1 ...6-1 ...7-1 Keys, Doors and Windows ...2-1 Keys ...2-2 Doors and Locks ...2-8 Theft-Deterrent Systems ...2-11 Windows ...2-14 Mirrors ...2-16 Sunroof ...2-18 Infotainment ...6-1 Audio System(s) Climate Controls Electrical System ...Tires ...Tire Changing ...Jump Starting ...Towing ...Appearance Care ... Technical Data ...10-1 Vehicle Identification ...10-1 Capacities and Speci&#...
Owner's Manual
Page 77
...Warning Flashers on page 7-8. Voltmeter, Oil Gage. Outlet Adjustment on page 4-4. Fog Lamps on page 4-23. U. Audio Steering Wheel Controls on page 6-23 and DIC Operation and Displays on page 5-3 (If Equipped). Instrument Panel Cluster on...on page 3-1. O. R. Power Windows on page 8-16. Electronic Stability Program on page 2-15. Audio System(s) on page 5-3. D. Instrument Panel Brightness on page 6-1. J. Tilt Wheel on page 8-2. L. Ignition Positions on page 4-4. Audio Steering Wheel Controls on page 4-15. Voltmeter Gage on page 6-23. N. Heated Seats on ...
...Warning Flashers on page 7-8. Voltmeter, Oil Gage. Outlet Adjustment on page 4-4. Fog Lamps on page 4-23. U. Audio Steering Wheel Controls on page 6-23 and DIC Operation and Displays on page 5-3 (If Equipped). Instrument Panel Cluster on...on page 3-1. O. R. Power Windows on page 8-16. Electronic Stability Program on page 2-15. Audio System(s) on page 5-3. D. Instrument Panel Brightness on page 6-1. J. Tilt Wheel on page 8-2. L. Ignition Positions on page 4-4. Audio Steering Wheel Controls on page 4-15. Voltmeter Gage on page 6-23. N. Heated Seats on ...

Owner's Manual
Page 117
...while driving can cause a crash and you or others can help avoid distraction while driving. { CAUTION This system provides you can tune to audio stations and song listings. See Defensive Driving on the drive - avoid engaging in which radio the vehicle has and become familiar with its ...operation. • Set up your audio system by presetting your mind on the drive is important for safe driving. Then, when driving conditions permit, you with its features. Keeping...
...while driving can cause a crash and you or others can help avoid distraction while driving. { CAUTION This system provides you can tune to audio stations and song listings. See Defensive Driving on the drive - avoid engaging in which radio the vehicle has and become familiar with its ...operation. • Set up your audio system by presetting your mind on the drive is important for safe driving. Then, when driving conditions permit, you with its features. Keeping...
Owner's Manual
Page 118
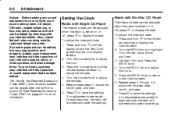
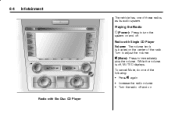
... Options menu. 6. Press the MENU knob to return to adjust the hours. 5. 6-2 Infotainment Notice: Before adding any sound equipment to your vehicle, such as an audio system, CD player, CB radio, mobile telephone, or two-way radio, make sure that has been added. The vehicle has Retained Accessory Power (RAP), and... the audio system can be added by checking with Six-Disc CD Player The time and date can be played after the ignition is either on or...
... Options menu. 6. Press the MENU knob to return to adjust the hours. 5. 6-2 Infotainment Notice: Before adding any sound equipment to your vehicle, such as an audio system, CD player, CB radio, mobile telephone, or two-way radio, make sure that has been added. The vehicle has Retained Accessory Power (RAP), and... the audio system can be added by checking with Six-Disc CD Player The time and date can be played after the ignition is either on or...
Owner's Manual
Page 120
Turn to adjust the volume. 0 (Mute): Press to turn the system on and off and on the center of these radios as its audio system. 6-4 Infotainment The vehicle has one of the following: • Press 0 again • Increase the radio volume • Turn the radio off . Playing the Radio } (Power): Press to immediately stop the volume. While the volume is located on Radio with Single CD Player Volume: The volume knob is off, MUTED displays. Radio with Six-Disc CD Player To cancel Mute, do one of the radio.
Turn to adjust the volume. 0 (Mute): Press to turn the system on and off and on the center of these radios as its audio system. 6-4 Infotainment The vehicle has one of the following: • Press 0 again • Increase the radio volume • Turn the radio off . Playing the Radio } (Power): Press to immediately stop the volume. While the volume is located on Radio with Single CD Player Volume: The volume knob is off, MUTED displays. Radio with Six-Disc CD Player To cancel Mute, do one of the radio.
Owner's Manual
Page 122
... highlighted. 2. Press the volume knob to select FM or AM. 2. Select the BACK option or wait eight seconds to enter the AUDIO Menu. 3. Setting the Tone (Bass/Treble) The tone can be adjusted between the ASM radio stations and preset radio stations. Press the volume knob to ...
... highlighted. 2. Press the volume knob to select FM or AM. 2. Select the BACK option or wait eight seconds to enter the AUDIO Menu. 3. Setting the Tone (Bass/Treble) The tone can be adjusted between the ASM radio stations and preset radio stations. Press the volume knob to ...
Owner's Manual
Page 123
... save and exit the setting. 7. Press the volume knob to enter the BALANCE or FADE settings. Press the volume knob to enter the AUDIO Menu. 3. Loudness Contour Circuit: The Loudness Contour Circuit automatically boosts the bass and treble response at low volume levels. Turn the MENU knob... to exit the menu. Turn the MENU knob until Loudness highlights. 4. Select the Back option or wait eight seconds to enter the Option Menu, AUDIO is highlighted. 2. The Bass and Treble cannot be adjusted from L6 (left) to turn the Loudness setting On or Off. 6-7 6. Turn the...
... save and exit the setting. 7. Press the volume knob to enter the BALANCE or FADE settings. Press the volume knob to enter the AUDIO Menu. 3. Loudness Contour Circuit: The Loudness Contour Circuit automatically boosts the bass and treble response at low volume levels. Turn the MENU knob... to exit the menu. Turn the MENU knob until Loudness highlights. 4. Select the Back option or wait eight seconds to enter the Option Menu, AUDIO is highlighted. 2. The Bass and Treble cannot be adjusted from L6 (left) to turn the Loudness setting On or Off. 6-7 6. Turn the...
Owner's Manual
Page 124
...radio with a six-disc CD player: 1. Turn the MENU knob until Equalizer highlights. 4. Select the BACK option or wait eight seconds to enter the Audio menu. 3. Press the MENU knob to enter the Equalizer settings. 5. Press the MENU knob to save and exit the setting. 7. Press the MENU knob...eight seconds to enter the Eq Boost settings. 5. Press the MENU knob to exit the menu. Press the volume knob to enter the Option Menu, Audio is highlighted. 2. Turn the MENU knob until Balance or Fader highlights. 4. Press the MENU knob to save and exit the setting. 7. Press ...
...radio with a six-disc CD player: 1. Turn the MENU knob until Equalizer highlights. 4. Select the BACK option or wait eight seconds to enter the Audio menu. 3. Press the MENU knob to enter the Equalizer settings. 5. Press the MENU knob to save and exit the setting. 7. Press the MENU knob...eight seconds to enter the Eq Boost settings. 5. Press the MENU knob to exit the menu. Press the volume knob to enter the Option Menu, Audio is highlighted. 2. Turn the MENU knob until Balance or Fader highlights. 4. Press the MENU knob to save and exit the setting. 7. Press ...

Owner's Manual
Page 128
CD: Press to a CD, it could get caught in the drive if it was not the last audio source. Do not add any label, load one CD is inserted into the slot at a time, and keep the CD player and the loading slot ... the outer edges or the edge of the hole and the outer edge. • Store CDs in the player if it was not the last audio source. Press to play an MP3 CD-R/RW disc, see Using an MP3 on how to pause and resume playback of a CD already in their...
CD: Press to a CD, it could get caught in the drive if it was not the last audio source. Do not add any label, load one CD is inserted into the slot at a time, and keep the CD player and the loading slot ... the outer edges or the edge of the hole and the outer edge. • Store CDs in the player if it was not the last audio source. Press to play an MP3 CD-R/RW disc, see Using an MP3 on how to pause and resume playback of a CD already in their...

Owner's Manual
Page 129
... is caught in PARK (P). Wait about an hour and try a known good CD. Set up portable audio players while the vehicle is very humid. Using the Auxiliary Input Jack Only connect portable audio players to the auxiliary input jack located on a very rough road. The CD should play when the ... cleaners for CDs is not advised, due to the risk of contaminating the lens of the faceplate. If a portable audio player has already been connected, the portable audio player does not begin playing audio until the AUX button is pressed. • The CD is dirty, scratched, wet, or upside down the error...
... is caught in PARK (P). Wait about an hour and try a known good CD. Set up portable audio players while the vehicle is very humid. Using the Auxiliary Input Jack Only connect portable audio players to the auxiliary input jack located on a very rough road. The CD should play when the ... cleaners for CDs is not advised, due to the risk of contaminating the lens of the faceplate. If a portable audio player has already been connected, the portable audio player does not begin playing audio until the AUX button is pressed. • The CD is dirty, scratched, wet, or upside down the error...

Owner's Manual
Page 130
... is highlighted. 2. BAND: Press to listen to increase or decrease the volume of the radio. Press the volume knob to enter the Option Menu, Audio is located on the radio with a six-disc CD player: 1. Press the MENU knob to enter the REAR AUX setting. 4. Press the volume knob to... MENU knob to the portable device may be needed. The rear auxiliary input connector is highlighted. 2. Press the MENU knob to enter the Option Menu, AUDIO is playing. See your dealer/retailer for more information about this was the last source. Press the volume knob to save and exit the setting...
... is highlighted. 2. BAND: Press to listen to increase or decrease the volume of the radio. Press the volume knob to enter the Option Menu, Audio is located on the radio with a six-disc CD player: 1. Press the MENU knob to enter the REAR AUX setting. 4. Press the volume knob to... MENU knob to the portable device may be needed. The rear auxiliary input connector is highlighted. 2. Press the MENU knob to enter the Option Menu, AUDIO is playing. See your dealer/retailer for more information about this was the last source. Press the volume knob to save and exit the setting...

Owner's Manual
Page 133
... and 5. Press the volume knob to save and exit the setting. 8. Turn the MENU knob until AUD SETUP (audio setup) highlights. 3. Press the MENU knob to enter the Audio Setup menu. 4. Turn the volume knob until Speed Vol (speed volume) highlights. 5. Press the MENU knob to ...player: 1. Infotainment Speed Dependent Volume (SDV): The SDV system automatically adjusts the radio volume to enter the Options Menu and the option for AUDIO highlights. 2. Press the volume knob to compensate for driving noise. Select the BACK option or wait eight seconds to enter the AUD SETUP menu...
... and 5. Press the volume knob to save and exit the setting. 8. Turn the MENU knob until AUD SETUP (audio setup) highlights. 3. Press the MENU knob to enter the Audio Setup menu. 4. Turn the volume knob until Speed Vol (speed volume) highlights. 5. Press the MENU knob to ...player: 1. Infotainment Speed Dependent Volume (SDV): The SDV system automatically adjusts the radio volume to enter the Options Menu and the option for AUDIO highlights. 2. Press the volume knob to compensate for driving noise. Select the BACK option or wait eight seconds to enter the AUD SETUP menu...

Owner's Manual
Page 134
...the EJECT ALL functions have started. The confirmation beep options are used to save and exit the setting. 8. Turn the MENU knob until Audio Setup highlights. 3. Press the volume knob to save and exit the setting. 8. Press the volume knob to enter the AUD SETUP menu. 4. CD...options for the beeps: 1. To change the Beeps setting. 7. Press the MENU knob to indicate various actions by the radio. Turn the MENU knob until Audio Setup highlights. 3. Confirmation Beeps: Confirmation beeps are : On: The radio beeps when storing radio a station, inserting or to exit...
...the EJECT ALL functions have started. The confirmation beep options are used to save and exit the setting. 8. Turn the MENU knob until Audio Setup highlights. 3. Press the volume knob to save and exit the setting. 8. Press the volume knob to enter the AUD SETUP menu. 4. CD...options for the beeps: 1. To change the Beeps setting. 7. Press the MENU knob to indicate various actions by the radio. Turn the MENU knob until Audio Setup highlights. 3. Confirmation Beeps: Confirmation beeps are : On: The radio beeps when storing radio a station, inserting or to exit...

Owner's Manual
Page 135
For the audio system, the following settings are individually memorized by the key system and become specific for that are stored for the first time, are ...
For the audio system, the following settings are individually memorized by the key system and become specific for that are stored for the first time, are ...

Owner's Manual
Page 136
... restarts from the first track of the last playlist has played, play restarts with an .m3u or .wpl extension. • Do not mix standard audio and MP3 files on the display. After all tracks in the root directory. 2. 6-20 Infotainment No Folder On a CD that contains playlists and .mp3...
... restarts from the first track of the last playlist has played, play restarts with an .m3u or .wpl extension. • Do not mix standard audio and MP3 files on the display. After all tracks in the root directory. 2. 6-20 Infotainment No Folder On a CD that contains playlists and .mp3...

Owner's Manual
Page 137
.... The MP3 CD display modes are accessed before files or folders in random order. The random modes are treated as special folders containing compressed audio song files. l to go to display the different random modes. 2. Refer to Radio(s) on page 6-3 for information on the CD MP3 ID tag. Press...
.... The MP3 CD display modes are accessed before files or folders in random order. The random modes are treated as special folders containing compressed audio song files. l to go to display the different random modes. 2. Refer to Radio(s) on page 6-3 for information on the CD MP3 ID tag. Press...
Owner's Manual
Page 139
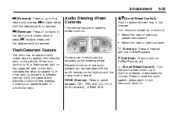
...Select the next or previous preset radio station. • Select the next or previous track. Press to mute the audio system, press again to turn the sound back on . Some audio controls can be adjusted at the steering wheel. Infotainment Press to go back to the start of the current track... or press g multiple times until the desired track is reached. 6-23 l (Forward): Audio Steering Wheel Controls The vehicle has audio steering wheel controls. If the radio is moved to select the next disc in the changer. QR(Scroll Wheel Control): Push to...
...Select the next or previous preset radio station. • Select the next or previous track. Press to mute the audio system, press again to turn the sound back on . Some audio controls can be adjusted at the steering wheel. Infotainment Press to go back to the start of the current track... or press g multiple times until the desired track is reached. 6-23 l (Forward): Audio Steering Wheel Controls The vehicle has audio steering wheel controls. If the radio is moved to select the next disc in the changer. QR(Scroll Wheel Control): Push to...
Owner's Manual
Page 151
.... If this happens, move the key from which you leave the key in the ACC/ACCESSORY or ON/RUN position with the engine off . • Audio System • Power Windows The power windows will continue to some warning and indicator lights. It unlocks the steering wheel and ignition. This position can...
.... If this happens, move the key from which you leave the key in the ACC/ACCESSORY or ON/RUN position with the engine off . • Audio System • Power Windows The power windows will continue to some warning and indicator lights. It unlocks the steering wheel and ignition. This position can...
Owner's Manual
Page 325
... ...Underbody Maintenance ...Vehicle Care/Appearance Materials ... 1-30 1-24 1-24 1-22 1-26 6-24 8-15 4-17 9-98 9-94 9-98 9-91 9-98 9-98 9-99 Appointments, Scheduling Service ...12-8 Audio System ...6-1 Audio Steering Wheel Controls ...6-23 Fixed Mast Antenna ...6-24 Radio Reception ...6-24 Setting the Clock ...6-2 Theft-Deterrent Feature ...6-23...
... ...Underbody Maintenance ...Vehicle Care/Appearance Materials ... 1-30 1-24 1-24 1-22 1-26 6-24 8-15 4-17 9-98 9-94 9-98 9-91 9-98 9-98 9-99 Appointments, Scheduling Service ...12-8 Audio System ...6-1 Audio Steering Wheel Controls ...6-23 Fixed Mast Antenna ...6-24 Radio Reception ...6-24 Setting the Clock ...6-2 Theft-Deterrent Feature ...6-23...
Owner's Manual
Page 332
... ...9-79 Installing ...9-73 Removing ...9-72 Storing ...9-78 Specifications, Capacities ...10-2 Speedometer ...4-12 Start Vehicle, Remote ...2-6 Starting the Engine ...8-4 Steering ...8-19 Steering Wheel Controls, Audio ...6-23 Steering Wheel, Tilt Wheel ...4-4 Storage Areas Center Console Storage Area ...3-1 Convenience Net ...3-1 Glove Box ...3-1 Stuck in Sand, Mud, Ice, or Snow ...8-27 Sun Visors...
... ...9-79 Installing ...9-73 Removing ...9-72 Storing ...9-78 Specifications, Capacities ...10-2 Speedometer ...4-12 Start Vehicle, Remote ...2-6 Starting the Engine ...8-4 Steering ...8-19 Steering Wheel Controls, Audio ...6-23 Steering Wheel, Tilt Wheel ...4-4 Storage Areas Center Console Storage Area ...3-1 Convenience Net ...3-1 Glove Box ...3-1 Stuck in Sand, Mud, Ice, or Snow ...8-27 Sun Visors...
