Owner's Manual
Page 81
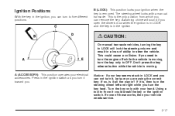
.... Ignition Positions With the key in ? Don't press the key release button while the vehicle is removed. if so, is , then turn the steering wheel left and right while you are using the correct...the only position from which you need to turn the key hard. Press in LOCK and you can remove the key. A warning chime will lock the steering column and result in a loss of these works... then your key seems stuck in the ignition switch as you turn it , be sure you turn the engine off while the vehicle is in the ignition. {CAUTION: On manual transaxle vehicles, turning the key to...
.... Ignition Positions With the key in ? Don't press the key release button while the vehicle is removed. if so, is , then turn the steering wheel left and right while you are using the correct...the only position from which you need to turn the key hard. Press in LOCK and you can remove the key. A warning chime will lock the steering column and result in a loss of these works... then your key seems stuck in the ignition switch as you turn it , be sure you turn the engine off while the vehicle is in the ignition. {CAUTION: On manual transaxle vehicles, turning the key to...

Owner's Manual
Page 82
... to OFF. The switch stays in the ignition. To remove the key, turn the key to push-start your engine and release the switch. E (START): This position starts the engine. When the engine starts, release the key. Even if the engine is in RUN while the engine is used. A warning chime will return to RUN for...
... to OFF. The switch stays in the ignition. To remove the key, turn the key to push-start your engine and release the switch. E (START): This position starts the engine. When the engine starts, release the key. Even if the engine is in RUN while the engine is used. A warning chime will return to RUN for...
Owner's Manual
Page 90
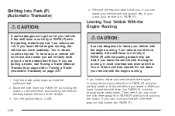
...64257;rmly set the parking brake. 2. If you have to get out of the vehicle. 3. To be injured. If you leave the vehicle with the engine running . Turn the ignition key to leave your vehicle if the shift lever is not fully in PARK (P). {CAUTION: It can move , even when you... with the ignition key in your hand, your vehicle is in PARK (P) with you leave it means that follow. Shifting Into Park (P) (Automatic Transaxle) 4. Remove the key and take it could be sure your vehicle with the parking brake firmly set . If you are pulling a trailer, see if you...
...64257;rmly set the parking brake. 2. If you have to get out of the vehicle. 3. To be injured. If you leave the vehicle with the engine running . Turn the ignition key to leave your vehicle if the shift lever is not fully in PARK (P). {CAUTION: It can move , even when you... with the ignition key in your hand, your vehicle is in PARK (P) with you leave it means that follow. Shifting Into Park (P) (Automatic Transaxle) 4. Remove the key and take it could be sure your vehicle with the parking brake firmly set . If you are pulling a trailer, see if you...
Owner's Manual
Page 117
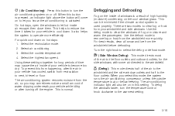
...vent, bi-level or floor. This is used properly. Select the recirculation mode. 2. Use the defrost mode to remove fog or frost from recirculation to reduce the time it takes for your windshield and side windows. To defog the windows faster,... turn the air-conditioning system on hot days: 1. The air-conditioning system removes moisture from the air, so you select this button is pressed, an indicator light above the button will also be .... then close them. There are two modes to cool down on or off the engine.
...vent, bi-level or floor. This is used properly. Select the recirculation mode. 2. Use the defrost mode to remove fog or frost from recirculation to reduce the time it takes for your windshield and side windows. To defog the windows faster,... turn the air-conditioning system on hot days: 1. The air-conditioning system removes moisture from the air, so you select this button is pressed, an indicator light above the button will also be .... then close them. There are two modes to cool down on or off the engine.

Owner's Manual
Page 118
You can also be turned off by pressing the button again or by pressing the air conditioning button. The defogger can use anything similar to remove fog from the rear window. Notice: Don't use the air conditioning while in RUN. Do not attach a temporary vehicle license, tape, a decal or anything sharp ...away any ice, snow, or leaves from the rear window as possible. If turned on or off about five minutes before turning off the engine. An indicator light above the button will turn the rear window defogger on again, the defogger will only work when the ignition is at the...
You can also be turned off by pressing the button again or by pressing the air conditioning button. The defogger can use anything similar to remove fog from the rear window. Notice: Don't use the air conditioning while in RUN. Do not attach a temporary vehicle license, tape, a decal or anything sharp ...away any ice, snow, or leaves from the rear window as possible. If turned on or off about five minutes before turning off the engine. An indicator light above the button will turn the rear window defogger on again, the defogger will only work when the ignition is at the...

Owner's Manual
Page 202
... brake systems will not work well, or at all. • The rear bumper on your vehicle is important to seal the holes later when you remove the hitch. See Loading Your Vehicle on page 2-28. Hitches It is not intended for cold tires. Use only a frame-mounted hitch that the tongue... roads are a few reasons why you do not attach them properly. Safety Chains You should always attach chains between your vehicle and your vehicle. See Engine Exhaust on page 4-29. Always leave just enough slack so you can also enter the vehicle. 4-40 Be sure to the road if it . Dirt...
... brake systems will not work well, or at all. • The rear bumper on your vehicle is important to seal the holes later when you remove the hitch. See Loading Your Vehicle on page 2-28. Hitches It is not intended for cold tires. Use only a frame-mounted hitch that the tongue... roads are a few reasons why you do not attach them properly. Safety Chains You should always attach chains between your vehicle and your vehicle. See Engine Exhaust on page 4-29. Always leave just enough slack so you can also enter the vehicle. 4-40 Be sure to the road if it . Dirt...
Owner's Manual
Page 208
...Windshield Wiper Fuses ...5-85 Power Windows and Other Power Options ...5-85 Fuses and Circuit Breakers ...5-85 Instrument Panel Fuse Block ...5-86 Engine Compartment Fuse Block ...5-88 Capacities and Specifications ...5-89 Normal Maintenance Replacement Parts ...5-90 If a Tire Goes Flat ...5-65 Changing ...a Flat Tire ...5-66 Removing the Spare Tire and Tools ...5-67 Removing the Flat Tire and Installing the Spare Tire ...5-69 Storing a Flat or Spare Tire and Tools ...5-74 Compact Spare...
...Windshield Wiper Fuses ...5-85 Power Windows and Other Power Options ...5-85 Fuses and Circuit Breakers ...5-85 Instrument Panel Fuse Block ...5-86 Engine Compartment Fuse Block ...5-88 Capacities and Specifications ...5-89 Normal Maintenance Replacement Parts ...5-90 If a Tire Goes Flat ...5-65 Changing ...a Flat Tire ...5-66 Removing the Spare Tire and Tools ...5-67 Removing the Flat Tire and Installing the Spare Tire ...5-69 Storing a Flat or Spare Tire and Tools ...5-74 Compact Spare...

Owner's Manual
Page 213
... sparks, flames and smoking materials away from the fuel pump; never let children pump fuel. To remove the fuel cap, turn it will spring back to you are near fuel or refueling your engine when you and others, read and follow all the instructions on the fuel door. 5-7 The fuel cap...
... sparks, flames and smoking materials away from the fuel pump; never let children pump fuel. To remove the fuel cap, turn it will spring back to you are near fuel or refueling your engine when you and others, read and follow all the instructions on the fuel door. 5-7 The fuel cap...
Owner's Manual
Page 220
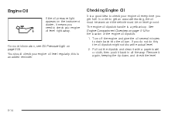
Remove it back in all the way. See Engine Compartment Overview on page 3-34. If you do not do this is an added reminder. 5-14 Checking Engine Oil It is a yellow loop. The engine oil dipstick handle is a good idea to get fuel. In order to check your engine oil every time you get an accurate... reading, the oil must be warm and the vehicle must be on level ground. You should check your engine oil level right away. Engine Oil If the oil pressure light appears on the instrument cluster, it means you need to drain back into the oil pan. Turn...
Remove it back in all the way. See Engine Compartment Overview on page 3-34. If you do not do this is an added reminder. 5-14 Checking Engine Oil It is a yellow loop. The engine oil dipstick handle is a good idea to get fuel. In order to check your engine oil every time you get an accurate... reading, the oil must be warm and the vehicle must be on level ground. You should check your engine oil level right away. Engine Oil If the oil pressure light appears on the instrument cluster, it means you need to drain back into the oil pan. Turn...

Owner's Manual
Page 226
...;re. To inspect or replace the filter, remove the screws that hold the cover on the engine with the air cleaner/filter off the cover. Notice: If the... and dirt. If the filter remains caked with dirt, a new filter is not there and the engine backfires, you are driving. it . Do not drive with it off, and be burned. The air ... backfire can easily get into your engine, which will damage it helps to be burned. How to Inspect the Engine Air Cleaner/Filter To inspect the air cleaner/filter remove the filter from the vehicle and lightly...
...;re. To inspect or replace the filter, remove the screws that hold the cover on the engine with the air cleaner/filter off the cover. Notice: If the... and dirt. If the filter remains caked with dirt, a new filter is not there and the engine backfires, you are driving. it . Do not drive with it off, and be burned. The air ... backfire can easily get into your engine, which will damage it helps to be burned. How to Inspect the Engine Air Cleaner/Filter To inspect the air cleaner/filter remove the filter from the vehicle and lightly...

Owner's Manual
Page 237
... a hiss, wait for that to be burned if you spill coolant on a hot engine. 1. Coolant contains ethylene glycol and it . {CAUTION: You can be vented out the discharge hose. 5-31 Then keep turning the pressure cap slowly, and remove it will allow any pressure still left ) about two or two and one...-half turns. Notice: In cold weather, water can remove the coolant surge tank pressure cap when the cooling system, including the coolant surge tank pressure cap and upper radiator hose, is no longer hot. ...
... a hiss, wait for that to be burned if you spill coolant on a hot engine. 1. Coolant contains ethylene glycol and it . {CAUTION: You can be vented out the discharge hose. 5-31 Then keep turning the pressure cap slowly, and remove it will allow any pressure still left ) about two or two and one...-half turns. Notice: In cold weather, water can remove the coolant surge tank pressure cap when the cooling system, including the coolant surge tank pressure cap and upper radiator hose, is no longer hot. ...

Owner's Manual
Page 239
Turn the key off and let the engine compartment cool down. 2. When to Check Power Steering Fluid It is not necessary to use the proper fluid can cause leaks and damage hoses ... to Check Power Steering Fluid To check the power steering fluid, do the following: 1. Wipe the cap and the top of the vehicle. Then remove the cap again and look at the "C" mark. Power Steering Fluid The power steering fluid reservoir is located toward the front of the...
Turn the key off and let the engine compartment cool down. 2. When to Check Power Steering Fluid It is not necessary to use the proper fluid can cause leaks and damage hoses ... to Check Power Steering Fluid To check the power steering fluid, do the following: 1. Wipe the cap and the top of the vehicle. Then remove the cap again and look at the "C" mark. Power Steering Fluid The power steering fluid reservoir is located toward the front of the...

Owner's Manual
Page 241
... Overview on page 3-27. Adding brake fluid will burn if the engine is done on the brake hydraulic system. {CAUTION: If you have too much fluid when you should add or remove brake fluid, as necessary, only when work is not a good idea to top off your linings are... not work at all. 5-35 Brakes Brake Fluid Your brake master cylinder reservoir is leaking out of the reservoir. So, it can spill on the engine. The fluid will not correct a leak.
... Overview on page 3-27. Adding brake fluid will burn if the engine is done on the brake hydraulic system. {CAUTION: If you have too much fluid when you should add or remove brake fluid, as necessary, only when work is not a good idea to top off your linings are... not work at all. 5-35 Brakes Brake Fluid Your brake master cylinder reservoir is leaking out of the reservoir. So, it can spill on the engine. The fluid will not correct a leak.
Owner's Manual
Page 242
...or they will help keep dirt from a sealed container only. Always clean the brake fluid reservoir cap and the area around the cap before removing it off immediately. This could cause a crash. Be careful not to be damaged. If you do need brake fluid, use the proper ... fluid. 5-36 See Part D: Recommended Fluids and Lubricants on page 5-76. {CAUTION: With the wrong kind of mineral-based oil, such as engine oil, in your brake system, your vehicle's painted surfaces, the paint finish can badly damage brake system parts. For example, just a few drops...
...or they will help keep dirt from a sealed container only. Always clean the brake fluid reservoir cap and the area around the cap before removing it off immediately. This could cause a crash. Be careful not to be damaged. If you do need brake fluid, use the proper ... fluid. 5-36 See Part D: Recommended Fluids and Lubricants on page 5-76. {CAUTION: With the wrong kind of mineral-based oil, such as engine oil, in your brake system, your vehicle's painted surfaces, the paint finish can badly damage brake system parts. For example, just a few drops...

Owner's Manual
Page 245
... you are not careful. Also, for a new battery, get one that can explode. See Engine Compartment Overview on page 5-12 for tips on page 3-61. 5-39 This will help keep your vehicle for 25 days or more, remove the black, negative (−) cable from running down. {CAUTION: Batteries have acid that has...
... you are not careful. Also, for a new battery, get one that can explode. See Engine Compartment Overview on page 5-12 for tips on page 3-61. 5-39 This will help keep your vehicle for 25 days or more, remove the black, negative (−) cable from running down. {CAUTION: Batteries have acid that has...

Owner's Manual
Page 248
...the black negative (−) cable to the negative (−) terminal of the negative (−) cable does not go to a heavy, unpainted metal engine part or to the positive (+) terminal of the good battery. Connect the other parts too. If it to the dead battery. 5. The vehicles... could get a short that had the dead battery. Connect it will go to the positive (+) terminal of the dead battery. Remove the terminal cover and connect the red positive (+) cable to a remote negative (−) terminal if the vehicle has one . 7. Positive (+) will get...
...the black negative (−) cable to the negative (−) terminal of the negative (−) cable does not go to a heavy, unpainted metal engine part or to the positive (+) terminal of the good battery. Connect the other parts too. If it to the dead battery. 5. The vehicles... could get a short that had the dead battery. Connect it will go to the positive (+) terminal of the dead battery. Remove the terminal cover and connect the red positive (+) cable to a remote negative (−) terminal if the vehicle has one . 7. Positive (+) will get...

Owner's Manual
Page 249
Disconnect the black negative (−) cable from the vehicle that the cables do the following: 1. Heavy, Unpainted Metal Engine Part B. Disconnect the black negative (−) cable from the vehicle with the good battery. 3. Return the terminal cover to its original ...position. Dead Battery 5-43 The repairs would not be covered by your warranty. Jumper Cable Removal A. To disconnect the jumper cables from the other metal. Disconnect the red positive (+) cable from the vehicle with the good battery. 4. Notice:...
Disconnect the black negative (−) cable from the vehicle that the cables do the following: 1. Heavy, Unpainted Metal Engine Part B. Disconnect the black negative (−) cable from the vehicle with the good battery. 3. Return the terminal cover to its original ...position. Dead Battery 5-43 The repairs would not be covered by your warranty. Jumper Cable Removal A. To disconnect the jumper cables from the other metal. Disconnect the red positive (+) cable from the vehicle with the good battery. 4. Notice:...

Owner's Manual
Page 289
...cates of title and registration. You can see it if you identify your vehicle. Engine Identification The 8th character in one easy step, Low Gloss no wiping necessary. Removes light scratches Cleaner Wax and protects finish. Medium foaming shampoo. The VIN ...also appears on the driver's side. Usage Removes swirl marks, fine Swirl Remover Polish scratches and other light surface contamination. Biodegradable and phosphate free. See your General Motors parts department for your engine, specifications and replacement parts. 5-83 This code ...
...cates of title and registration. You can see it if you identify your vehicle. Engine Identification The 8th character in one easy step, Low Gloss no wiping necessary. Removes light scratches Cleaner Wax and protects finish. Medium foaming shampoo. The VIN ...also appears on the driver's side. Usage Removes swirl marks, fine Swirl Remover Polish scratches and other light surface contamination. Biodegradable and phosphate free. See your General Motors parts department for your engine, specifications and replacement parts. 5-83 This code ...

Owner's Manual
Page 318
... could be injured and property could begin to move . Be ready to apply the regular brake at once should the vehicle begin to move . the engine running , shift to PARK (P). Do this check, your vehicle could be damaged. Make sure there is held by the regular brake. Take care to clean... and Automatic Transaxle Park (P) Mechanism Check Park on the regular brake, set the parking brake. • To check the parking brake's holding ability: With the engine running and transaxle in case it begins to roll. Keeping your vehicle in NEUTRAL (N), slowly...
... could be injured and property could begin to move . Be ready to apply the regular brake at once should the vehicle begin to move . the engine running , shift to PARK (P). Do this check, your vehicle could be damaged. Make sure there is held by the regular brake. Take care to clean... and Automatic Transaxle Park (P) Mechanism Check Park on the regular brake, set the parking brake. • To check the parking brake's holding ability: With the engine running and transaxle in case it begins to roll. Keeping your vehicle in NEUTRAL (N), slowly...

Owner's Manual
Page 348
... Rearview Mirrors ...2-30 Reclining Seatbacks ...1-4 Recreational Vehicle Towing ...4-35 Remote Keyless Entry System ...2-3 Remote Keyless Entry System, Operation ...2-4 Removing the Flat Tire and Installing the Spare Tire ...5-69 Removing the Spare Tire and Tools ...5-67 Replacement Bulbs ...5-48 Reporting Safety Defects Canadian Government ...7-11 General Motors ...7-11 United States Government... (RAP) ...2-19 Right Front Passenger Position, Safety Belts ...1-22 Roadside Assistance Program ...7-6 Rocking Your Vehicle to Get it Out ...4-29 Running Your Engine While You Are Parked ...2-29 10
... Rearview Mirrors ...2-30 Reclining Seatbacks ...1-4 Recreational Vehicle Towing ...4-35 Remote Keyless Entry System ...2-3 Remote Keyless Entry System, Operation ...2-4 Removing the Flat Tire and Installing the Spare Tire ...5-69 Removing the Spare Tire and Tools ...5-67 Replacement Bulbs ...5-48 Reporting Safety Defects Canadian Government ...7-11 General Motors ...7-11 United States Government... (RAP) ...2-19 Right Front Passenger Position, Safety Belts ...1-22 Roadside Assistance Program ...7-6 Rocking Your Vehicle to Get it Out ...4-29 Running Your Engine While You Are Parked ...2-29 10


