
Owner's Manual
Page 7
... Restraint System Check ...1-61 Checking Your Restraint Systems ...1-61 Replacing Restraint System Parts After a Crash ...1-61 1-1 Front Seats ...1-2 Manual Seats ...1-2 Six-Way Power Driver Seat ...1-3 Reclining Seatbacks ...1-3 Head Restraints ...1-5 Seatback Latches ...1-5 Easy Entry Seat ...1-6 Power Lift Seat ...1-7 Rear Seats ...1-8 Rear Seat Operation ...1-8 Safety Belts ...1-9 Safety Belts: They Are for Everyone ...1-9 Questions and Answers About Safety Belts ...1-13 How...
... Restraint System Check ...1-61 Checking Your Restraint Systems ...1-61 Replacing Restraint System Parts After a Crash ...1-61 1-1 Front Seats ...1-2 Manual Seats ...1-2 Six-Way Power Driver Seat ...1-3 Reclining Seatbacks ...1-3 Head Restraints ...1-5 Seatback Latches ...1-5 Easy Entry Seat ...1-6 Power Lift Seat ...1-7 Rear Seats ...1-8 Rear Seat Operation ...1-8 Safety Belts ...1-9 Safety Belts: They Are for Everyone ...1-9 Questions and Answers About Safety Belts ...1-13 How...

Owner's Manual
Page 8
Try to move the seat with your body to adjust a manual driver's seat while the vehicle is moving . Front Seats Manual Seats {CAUTION: You can lose control of the seat to unlock it and release the bar. Slide the seat to . Adjust the driver's seat only when the vehicle is locked in place. 1-2 The sudden movement could startle and confuse you, or make you push a pedal when you do not want it . Lift the bar located under the front of the vehicle if you want to where you try to be sure the seat is not moving .
Try to move the seat with your body to adjust a manual driver's seat while the vehicle is moving . Front Seats Manual Seats {CAUTION: You can lose control of the seat to unlock it and release the bar. Slide the seat to . Adjust the driver's seat only when the vehicle is locked in place. 1-2 The sudden movement could startle and confuse you, or make you push a pedal when you do not want it . Lift the bar located under the front of the vehicle if you want to where you try to be sure the seat is not moving .
Owner's Manual
Page 9
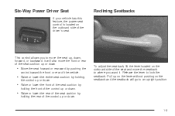
... lever without pushing on the outboard side of the seat and move the seatback to move the front or rear of the seat cushion up or down. • Move the seat forward or rearward by pushing the control toward the front or rear of the driver's seat. Release the lever to an upright position. •...; Raise or lower the front of the seat cushion by holding the front of the...
... lever without pushing on the outboard side of the seat and move the seatback to move the front or rear of the seat cushion up or down. • Move the seat forward or rearward by pushing the control toward the front or rear of the driver's seat. Release the lever to an upright position. •...; Raise or lower the front of the seat cushion by holding the front of the...

Owner's Manual
Page 13
To raise or lower the power lift seat, hold the switch located on the outboard side of the driver's seat up on the lever located under the front of the driver's seat to unlock it and release the lever. Slide the seat to where you want it . Try to move the power lift seat forward or rearward, pull up or down. 1-7 Power Lift Seat If your vehicle has this feature, to move the seat with your body to make sure the seat is locked into place.
To raise or lower the power lift seat, hold the switch located on the outboard side of the driver's seat up on the lever located under the front of the driver's seat to unlock it and release the lever. Slide the seat to where you want it . Try to move the power lift seat forward or rearward, pull up or down. 1-7 Power Lift Seat If your vehicle has this feature, to move the seat with your body to make sure the seat is locked into place.
Owner's Manual
Page 14
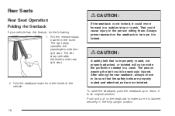
...protection needed in a sudden stop or crash. Fold the seatback down from the inside of the vehicle. 1-8 The left strap operates the driver's side rear split seat. After raising the rear seatback, always check to return it is locked. {CAUTION: A safety belt that the safety belts are properly ...attached, and are not twisted. If the seatback is latched securely in the trunk. The right strap operates the passenger's side rear split seat. To raise the seatback, push the seatback up to be seriously injured. The person wearing the belt could cause injury to its original ...
...protection needed in a sudden stop or crash. Fold the seatback down from the inside of the vehicle. 1-8 The left strap operates the driver's side rear split seat. After raising the rear seatback, always check to return it is locked. {CAUTION: A safety belt that the safety belts are properly ...attached, and are not twisted. If the seatback is latched securely in the trunk. The right strap operates the passenger's side rear split seat. To raise the seatback, push the seatback up to be seriously injured. The person wearing the belt could cause injury to its original ...
Owner's Manual
Page 20
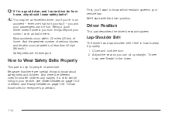
... know about safety belts and children. Most accidents occur within 25 miles (40 km) of less than 40 mph (65 km/h). Lap-Shoulder Belt The driver has a lap-shoulder belt. Be aware that isn't your fault - you 'll want to know which restraint systems your vehicle has. If a child ... your passengers can sit up straight. Here is only for everyone 's protection. 1-14 A: You may be an excellent driver, but if you can be riding in your vehicle, see "Seats" in the Index. Adjust the seat so you 're in an accident - even one that there are different rules for everyone . Q: If I'm a...
... know about safety belts and children. Most accidents occur within 25 miles (40 km) of less than 40 mph (65 km/h). Lap-Shoulder Belt The driver has a lap-shoulder belt. Be aware that isn't your fault - you 'll want to know which restraint systems your vehicle has. If a child ... your passengers can sit up straight. Here is only for everyone 's protection. 1-14 A: You may be an excellent driver, but if you can be riding in your vehicle, see "Seats" in the Index. Adjust the seat so you 're in an accident - even one that there are different rules for everyone . Q: If I'm a...

Owner's Manual
Page 29
...the same way as for one properly. 1-23 For pregnant women, as the driver's safety belt - except for anyone, the key to making safety belts effective is to protect the mother. Rear Seat Outside Passenger Positions Lap-Shoulder Belt The positions next to wear the right front passenger...'s safety belt properly, see Driver Position on page 1-14. When a safety belt is worn properly, it's more ...
...the same way as for one properly. 1-23 For pregnant women, as the driver's safety belt - except for anyone, the key to making safety belts effective is to protect the mother. Rear Seat Outside Passenger Positions Lap-Shoulder Belt The positions next to wear the right front passenger...'s safety belt properly, see Driver Position on page 1-14. When a safety belt is worn properly, it's more ...

Owner's Manual
Page 99
... away from the parking pawl in PARK (P) with the engine running . To find out how, see if you leave it. After you leave the driver's seat. Then, see "Shifting Into Park (P)" previously in PARK (P) and your automatic transaxle vehicle with the engine running . Do not leave your automatic transaxle into PARK...
... away from the parking pawl in PARK (P) with the engine running . To find out how, see if you leave it. After you leave the driver's seat. Then, see "Shifting Into Park (P)" previously in PARK (P) and your automatic transaxle vehicle with the engine running . Do not leave your automatic transaxle into PARK...
Owner's Manual
Page 103
... the mirror, by turning the knob to the daytime position, move the lever away from headlamps behind your vehicle when you are sitting in the driver's seat and have a passenger adjust the mirror for you. To reduce glare from you. Outside Power Mirrors If your vehicle has this feature, this selector ...knob controls both outside mirror with the control lever on the driver's door. Select the mirror you want to adjust by moving the mirror to a position that allows you to the night position. Adjust the...
... the mirror, by turning the knob to the daytime position, move the lever away from headlamps behind your vehicle when you are sitting in the driver's seat and have a passenger adjust the mirror for you. To reduce glare from you. Outside Power Mirrors If your vehicle has this feature, this selector ...knob controls both outside mirror with the control lever on the driver's door. Select the mirror you want to adjust by moving the mirror to a position that allows you to the night position. Adjust the...
Owner's Manual
Page 104
...If you cut too sharply into the right lane, you could hit a vehicle on the rear of the center console to use the rear seat cupholders. Cupholder(s) Pull down the door on your shoulder before changing lanes. Check your inside mirror or glance over your right. Center Console ... console has two separate storage areas. To open , pull the glove box latch toward you. {CAUTION: A convex mirror can see more from the driver's seat. A convex mirror's surface is convex. Outside Convex Mirror Your passenger's side mirror is curved so you can make things (like other vehicles) look ...
...If you cut too sharply into the right lane, you could hit a vehicle on the rear of the center console to use the rear seat cupholders. Cupholder(s) Pull down the door on your shoulder before changing lanes. Check your inside mirror or glance over your right. Center Console ... console has two separate storage areas. To open , pull the glove box latch toward you. {CAUTION: A convex mirror can see more from the driver's seat. A convex mirror's surface is convex. Outside Convex Mirror Your passenger's side mirror is curved so you can make things (like other vehicles) look ...
Owner's Manual
Page 214
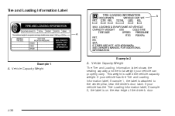
Vehicle Capacity Weight A. Tire and Loading Information Label Example 2 Example 1 A. Vehicle Capacity Weight The Tire and Loading Information label shows the seating capacity and the total weight your vehicle has the Tire and Loading Information label, Example 1, the label is on the rear edge of the driver's door. 4-36 If your vehicle has the Tire-Loading Information label, Example 2, the label is attached to the center pillar, near the driver's door latch. If your vehicle can properly carry. This weight is called the vehicle capacity weight.
Vehicle Capacity Weight A. Tire and Loading Information Label Example 2 Example 1 A. Vehicle Capacity Weight The Tire and Loading Information label shows the seating capacity and the total weight your vehicle has the Tire and Loading Information label, Example 1, the label is on the rear edge of the driver's door. 4-36 If your vehicle has the Tire-Loading Information label, Example 2, the label is attached to the center pillar, near the driver's door latch. If your vehicle can properly carry. This weight is called the vehicle capacity weight.
Owner's Manual
Page 217
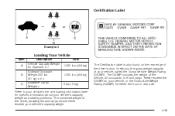
Refer to your vehicle's capacity weight and seating positions. The combined weight of your vehicle's capacity weight. 4-39 The GVWR includes the weight of the driver's door. Never exceed the GVWR for your vehicle, or the Gross Axle Weight Rating (GAWR) for specific information about your vehicle's tire and loading ... label is also found on the rear edge of the vehicle, all occupants, fuel and cargo. It tells you the gross weight capacity of the driver, passengers and cargo should never exceed your vehicle, called the Gross Vehicle Weight Rating (GVWR).
Refer to your vehicle's capacity weight and seating positions. The combined weight of your vehicle's capacity weight. 4-39 The GVWR includes the weight of the driver's door. Never exceed the GVWR for your vehicle, or the Gross Axle Weight Rating (GAWR) for specific information about your vehicle's tire and loading ... label is also found on the rear edge of the vehicle, all occupants, fuel and cargo. It tells you the gross weight capacity of the driver, passengers and cargo should never exceed your vehicle, called the Gross Vehicle Weight Rating (GVWR).

Owner's Manual
Page 314
.... Fuses AIR BAG BFC BATT PCM ACC DR LOCK IPC/BFC ACC STOP LPS HAZARD LPS IPC/HVAC BATT Circuit Breakers PWR SEAT Relay TRUNK REL DR UNLOCK DR LOCK DRIVER DR UNLOCK Usage Air Bags Body Computer (BFC) Power Control Module (PCM) Door Lock Motors Cluster, Body Computer (BFC) Stop... Lamps Hazard Lamps HVAC Head, Cluster, Data Link Connector Usage Power Seats Usage Trunk Relay Door Unlock Relay Door Lock Relay Driver's Door Unlock Relay Fuses WIPER TRUNK REL/ RADIO AMP TURN LPS PWR MIRROR 5-88 Usage Windshield Wiper Motor, Washer Pump Trunk...
.... Fuses AIR BAG BFC BATT PCM ACC DR LOCK IPC/BFC ACC STOP LPS HAZARD LPS IPC/HVAC BATT Circuit Breakers PWR SEAT Relay TRUNK REL DR UNLOCK DR LOCK DRIVER DR UNLOCK Usage Air Bags Body Computer (BFC) Power Control Module (PCM) Door Lock Motors Cluster, Body Computer (BFC) Stop... Lamps Hazard Lamps HVAC Head, Cluster, Data Link Connector Usage Power Seats Usage Trunk Relay Door Unlock Relay Door Lock Relay Driver's Door Unlock Relay Fuses WIPER TRUNK REL/ RADIO AMP TURN LPS PWR MIRROR 5-88 Usage Windshield Wiper Motor, Washer Pump Trunk...

Owner's Manual
Page 316
... 17 18 Usage Left Electrical Center-Stop Lamps, Hazard Lamps, Body Function Control Module, Cluster, Climate Control System Anti-Lock Brakes Left Electrical Center-Power Seats, Power Mirrors, Door Locks, Trunk Release, Audio Amplifier, Remote Keyless Entry Not Used Ignition Switch Cooling Fan #1 Usage Rear Defog Not Used Starter... Compartment Fuse Block Your vehicle may not be equipped with all the fuses and features listed. The engine compartment fuse block is located on the driver's side of the vehicle, near the battery.
... 17 18 Usage Left Electrical Center-Stop Lamps, Hazard Lamps, Body Function Control Module, Cluster, Climate Control System Anti-Lock Brakes Left Electrical Center-Power Seats, Power Mirrors, Door Locks, Trunk Release, Audio Amplifier, Remote Keyless Entry Not Used Ignition Switch Cooling Fan #1 Usage Rear Defog Not Used Starter... Compartment Fuse Block Your vehicle may not be equipped with all the fuses and features listed. The engine compartment fuse block is located on the driver's side of the vehicle, near the battery.
Owner's Manual
Page 352
... Towing ...4-34 Dome Lamp ...3-17 Door Delayed Locking ...2-8 Locks ...2-7 Power Door Locks ...2-8 Programmable Automatic Door Locks ...2-8 Rear Door Security Locks ...2-10 Driver Position, Safety Belt ...1-14 Six-Way Power Seat ...1-3 Driving At Night ...4-17 City ...4-21 Defensive ...4-2 Drunken ...4-2 Freeway ...4-22 Hill and Mountain Roads ...4-25 In Rain and on Wet Roads ...4-19...
... Towing ...4-34 Dome Lamp ...3-17 Door Delayed Locking ...2-8 Locks ...2-7 Power Door Locks ...2-8 Programmable Automatic Door Locks ...2-8 Rear Door Security Locks ...2-10 Driver Position, Safety Belt ...1-14 Six-Way Power Seat ...1-3 Driving At Night ...4-17 City ...4-21 Defensive ...4-2 Drunken ...4-2 Freeway ...4-22 Hill and Mountain Roads ...4-25 In Rain and on Wet Roads ...4-19...
Owner's Manual
Page 360
... and Symbols ...iii Scheduled Maintenance ...6-4 Seatback Latches ...1-5 Seats Easy Entry Seat ...1-6 Head Restraints ...1-5 Manual ...1-2 Power Lift Seat ...1-7 Rear Seat Operation ...1-8 Seats (cont.) Reclining Seatbacks ...1-3 Seatback Latches ...1-5 Six-Way Power Driver ...1-3 Securing a Child Restraint Center Rear Seat Position ...1-49 Designed for the LATCH System ...1-47 Rear Outside Seat Position ...1-47 Right Front Seat Position ...1-51 Security Light ...3-35 Security While...
... and Symbols ...iii Scheduled Maintenance ...6-4 Seatback Latches ...1-5 Seats Easy Entry Seat ...1-6 Head Restraints ...1-5 Manual ...1-2 Power Lift Seat ...1-7 Rear Seat Operation ...1-8 Seats (cont.) Reclining Seatbacks ...1-3 Seatback Latches ...1-5 Six-Way Power Driver ...1-3 Securing a Child Restraint Center Rear Seat Position ...1-49 Designed for the LATCH System ...1-47 Rear Outside Seat Position ...1-47 Right Front Seat Position ...1-51 Security Light ...3-35 Security While...


