
Owner's Manual
Page 129
Count the number of chimes you to the right of the glove box. The content theft-deterrent system must be disarmed. See "Fuses and Circuit Breakers" in this section. 2. Turn the ignition key towards you hear. To exit the programming mode, follow the steps listed under "... 3. Programmable Modes Mode 1: Both Features Off (The interior lamps will turn on or off at the same instant that a door is equipped with. Remove fuse 47 from the ignition. See "Content Theft-Deterrent System" in the programming mode. Close the driver's door. 4. Refer to four chimes depending on for ...
Count the number of chimes you to the right of the glove box. The content theft-deterrent system must be disarmed. See "Fuses and Circuit Breakers" in this section. 2. Turn the ignition key towards you hear. To exit the programming mode, follow the steps listed under "... 3. Programmable Modes Mode 1: Both Features Off (The interior lamps will turn on or off at the same instant that a door is equipped with. Remove fuse 47 from the ignition. See "Content Theft-Deterrent System" in the programming mode. Close the driver's door. 4. Refer to four chimes depending on for ...
Owner's Manual
Page 197
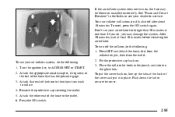
.... 6. Your air inflator will automatically shut off the inflator, do the following : 1. Turn the ignition key to inflate. 4. To put it in the glove box. See "Fuses and Circuit Breakers" in the Index or see your dealer for longer than 30 minutes at one time. If you do, you wish to ACCESSORY... system does not turn off after about 10 minutes. Place the inflator kit tools in the pouch, and store in place. To turn on, the fuse may damage the system. Press the ON switch. 2.
.... 6. Your air inflator will automatically shut off the inflator, do the following : 1. Turn the ignition key to inflate. 4. To put it in the glove box. See "Fuses and Circuit Breakers" in the Index or see your dealer for longer than 30 minutes at one time. If you do, you wish to ACCESSORY... system does not turn off after about 10 minutes. Place the inflator kit tools in the pouch, and store in place. To turn on, the fuse may damage the system. Press the ON switch. 2.
Owner's Manual
Page 207
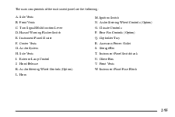
... Warning Flasher Switch E. Instrument Panel Cluster F. Audio System H. Horn M. Instrument Panel Switchbank U. Glove Box V. Side Vents B. Audio Steering Wheel Controls (Option) O. Front Vents C. Hood Release K. Audio Steering Wheel Controls (Option) L. Accessory Power Outlet S. Front Vents W. Instrument Panel Fuse Block 2-95 The main components of the instrument panel are the following: A. Turn Signal...
... Warning Flasher Switch E. Instrument Panel Cluster F. Audio System H. Horn M. Instrument Panel Switchbank U. Glove Box V. Side Vents B. Audio Steering Wheel Controls (Option) O. Front Vents C. Hood Release K. Audio Steering Wheel Controls (Option) L. Accessory Power Outlet S. Front Vents W. Instrument Panel Fuse Block 2-95 The main components of the instrument panel are the following: A. Turn Signal...

Owner's Manual
Page 406
... circuits in your vehicle: the instrument panel fuse block and the underhood fuse and relay center. If the band is the right amperage. Instrument Panel Fuse Block The instrument panel fuse block is located to access the instrument panel fuse block. 6-60 and use one of the glove box. Replace it is broken or melted, replace...
... circuits in your vehicle: the instrument panel fuse block and the underhood fuse and relay center. If the band is the right amperage. Instrument Panel Fuse Block The instrument panel fuse block is located to access the instrument panel fuse block. 6-60 and use one of the glove box. Replace it is broken or melted, replace...


