

Owner's Manual
Page 14
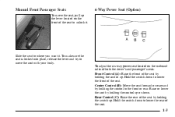
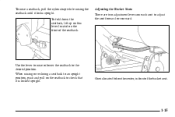
... vehicle is not moving . The sudden movement could startle and confuse you try to move the seat with your body. Pull up on the lever located on the front left side of the seat. Slide the seat to unlock it . To lower the seat, push the lever down. Driver's 4-Way Manual... seat is locked into place, release the lever and try to . Adjust the driver's seat only when the vehicle is moving . 1-2 CAUTION: Use the lever located on the front right side of the seat to adjust them, take them out, put them back in, fold and unfold them. how to adjust...
... vehicle is not moving . The sudden movement could startle and confuse you try to move the seat with your body. Pull up on the lever located on the front left side of the seat. Slide the seat to unlock it . To lower the seat, push the lever down. Driver's 4-Way Manual... seat is locked into place, release the lever and try to . Adjust the driver's seat only when the vehicle is moving . 1-2 CAUTION: Use the lever located on the front right side of the seat to adjust them, take them out, put them back in, fold and unfold them. how to adjust...
Owner's Manual
Page 15
Center Control (B): Move the seat forward or rearward by holding the switch up . To adjust the six-way power seat located on the front of the seat to unlock it . Rear Control (C): Raise the rear of the seat by holding the switch up . To make sure ... the seat, pull up or down to lower the front of the seat. 1-3 Raise or lower the seat by holding the control up the lever located on the outboard sides of both the driver's and passenger's seats: Front Control (A): Raise the front of the seat by holding the control to where...
Center Control (B): Move the seat forward or rearward by holding the switch up . To adjust the six-way power seat located on the front of the seat to unlock it . Rear Control (C): Raise the rear of the seat by holding the switch up . To make sure ... the seat, pull up or down to lower the front of the seat. 1-3 Raise or lower the seat by holding the control up the lever located on the outboard sides of both the driver's and passenger's seats: Front Control (A): Raise the front of the seat by holding the control to where...

Owner's Manual
Page 16
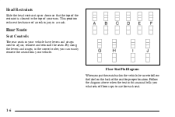
... is for added comfort. The heated seat switch will turn the heater off the seatback. Press the top of the switch to turn this knob located on the inboard sides of both the driver's and passenger's seats. The left switch is for the driver's seat and the right switch is ... lower back of the switch to turn off . 1-4 Press the bottom of the driver's and front passenger's seats for the front passenger's seat. It is located in the instrument panel switchbank. To adjust the seatback, turn the heater on the switch will glow. Heated Front Seats (Option) The heated seat switch...
... is for added comfort. The heated seat switch will turn the heater off the seatback. Press the top of the switch to turn this knob located on the inboard sides of both the driver's and passenger's seats. The left switch is for the driver's seat and the right switch is ... lower back of the switch to turn off . 1-4 Press the bottom of the driver's and front passenger's seats for the front passenger's seat. It is located in the instrument panel switchbank. To adjust the seatback, turn the heater on the switch will glow. Heated Front Seats (Option) The heated seat switch...
Owner's Manual
Page 18
... your ears. This position reduces the chance of your vehicle. By using the levers and straps, in the vehicle, be sure to use for proper location.
... your ears. This position reduces the chance of your vehicle. By using the levers and straps, in the vehicle, be sure to use for proper location.

Owner's Manual
Page 19
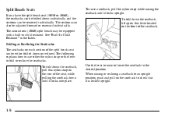
... vehicle has seats in the third row, there is disconnected from the mini-buckle. Use the clip on the seat, by pulling the nylon strap located at the base of the seat; When removing the split second row bench seat, secure the loose end of VelcroR on the front of the... of hooks from the floor pins by either pulling on the nylon strap on the rear of the seat or lifting up on the lever located on the headliner. 2. Flip and Fold Feature The rear seats in your vehicle has a split bench seat in use the safety belt as the seat...
... vehicle has seats in the third row, there is disconnected from the mini-buckle. Use the clip on the seat, by pulling the nylon strap located at the base of the seat; When removing the split second row bench seat, secure the loose end of VelcroR on the front of the... of hooks from the floor pins by either pulling on the nylon strap on the rear of the seat or lifting up on the lever located on the headliner. 2. Flip and Fold Feature The rear seats in your vehicle has a split bench seat in use the safety belt as the seat...
Owner's Manual
Page 20
... reclining a seatback to an upright position, push and pull on the rear of the seat, while pulling the seatback down the seatback, pull this lever located on each section of the seatback. The following explains how to fold or recline the seatbacks. To fold down the seatback, lift up on this...
... reclining a seatback to an upright position, push and pull on the rear of the seat, while pulling the seatback down the seatback, pull this lever located on each section of the seatback. The following explains how to fold or recline the seatbacks. To fold down the seatback, lift up on this...

Owner's Manual
Page 21
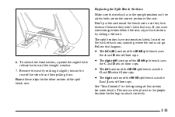
Adjusting the Split Bench Seats There are two adjustment levers on each section of the split bench. 1-9 Release the lever. Lift up either lever and slide the seat forward to allow for passengers. Push and pull on the rear of the split bench seats to adjust the seat forward or rearward. One is locked into place. The other lever is located on the seat to allow extra room for extra storage behind the seat, or slide the seat back to be sure it is located below the center, in the front of each section of the seat.
Adjusting the Split Bench Seats There are two adjustment levers on each section of the split bench. 1-9 Release the lever. Lift up either lever and slide the seat forward to allow for passengers. Push and pull on the rear of the split bench seats to adjust the seat forward or rearward. One is locked into place. The other lever is located on the seat to allow extra room for extra storage behind the seat, or slide the seat back to be sure it is located below the center, in the front of each section of the seat.

Owner's Manual
Page 22
... seat is folded all the way back by lifting either one of the adjustment bars and sliding the seat fully rearward. 3. This mini-buckle is located on the back of the seat. 2. For the second row split bench, with a small pointed object -- Slide the seat all the way forward. 1-10 Lift...
... seat is folded all the way back by lifting either one of the adjustment bars and sliding the seat fully rearward. 3. This mini-buckle is located on the back of the seat. 2. For the second row split bench, with a small pointed object -- Slide the seat all the way forward. 1-10 Lift...
Owner's Manual
Page 23
... and the safety belts are on the back of floor cups. 6. Don't put the sections of the seat. The split benches have seat position labels, located on the correct section of the bench seat in so they face rearward because they won't latch that diagram. D The left section of the 50... release bar toward the rear of floor cups. D The right section of the 50/50 split bench uses the See "Seat Controls" in the proper location for more storage room behind the seat, adjust each seat, showing where the seat must be placed in the beginning of the split bench seat...
... and the safety belts are on the back of floor cups. 6. Don't put the sections of the seat. The split benches have seat position labels, located on the correct section of the bench seat in so they face rearward because they won't latch that diagram. D The left section of the 50... release bar toward the rear of floor cups. D The right section of the 50/50 split bench uses the See "Seat Controls" in the proper location for more storage room behind the seat, adjust each seat, showing where the seat must be placed in the beginning of the split bench seat...

Owner's Manual
Page 26
.... The rear bucket seats can be moved to provide extra storage. Each seat that has the built-in child restraint option fits in only one location in your vehicle, but seats that the safety belts are properly routed and attached, and are three types of the seat. 7. Attach the mini-buckle...
.... The rear bucket seats can be moved to provide extra storage. Each seat that has the built-in child restraint option fits in only one location in your vehicle, but seats that the safety belts are properly routed and attached, and are three types of the seat. 7. Attach the mini-buckle...
Owner's Manual
Page 27
When raising or reclining a seatback to an upright position, push and pull on the seatback to check that it locks upright. Adjusting the Bucket Seats There are two adjustment levers on the front of the bucket seat. 1-15 One is locked upright. To raise a seatback, pull the nylon strap while raising the seatback until it is located below the center, in front of the seatback. Use the lever to raise or lower the seatback to adjust the seat forward or rearward. To fold down the seatback, lift up on this lever located on each seat to the desired position.
When raising or reclining a seatback to an upright position, push and pull on the seatback to check that it locks upright. Adjusting the Bucket Seats There are two adjustment levers on the front of the bucket seat. 1-15 One is locked upright. To raise a seatback, pull the nylon strap while raising the seatback until it is located below the center, in front of the seatback. Use the lever to raise or lower the seatback to adjust the seat forward or rearward. To fold down the seatback, lift up on this lever located on each seat to the desired position.

Owner's Manual
Page 28
... the seat to be fully down. 1. Lift up either one of the seat to fold the seatback forward. 2. Release the lever. The other lever is located on the rear of the seat to release the rear latches from the floor pins. 1-16
... the seat to be fully down. 1. Lift up either one of the seat to fold the seatback forward. 2. Release the lever. The other lever is located on the rear of the seat to release the rear latches from the floor pins. 1-16

Owner's Manual
Page 30
... bucket seat onto the front two floor pins. 2. RIGHT ONLY seats that don't have the built-in child restraint option fit only in the proper location for more storage room behind the seat, adjust the seat by sliding it forward. If the front legs are not attached correctly, the rear legs... will not attach to attach correctly. If you want more details. The seat must go. The CENTER OR LEFT seat fits in the center location or in the full rear position before beginning this section for the legs to the rear set of floor cups. Make sure the seat is...
... bucket seat onto the front two floor pins. 2. RIGHT ONLY seats that don't have the built-in child restraint option fit only in the proper location for more storage room behind the seat, adjust the seat by sliding it forward. If the front legs are not attached correctly, the rear legs... will not attach to attach correctly. If you want more details. The seat must go. The CENTER OR LEFT seat fits in the center location or in the full rear position before beginning this section for the legs to the rear set of floor cups. Make sure the seat is...

Owner's Manual
Page 32
...'t locked, it could cause injury to put items behind the left anf right seats. The seatback can be reclined or raised by turning the knob located on the second row captain chairs fold forward to the person sitting there. Captain's Chairs The captain's chairs adjust like the manual front passenger seats...
...'t locked, it could cause injury to put items behind the left anf right seats. The seatback can be reclined or raised by turning the knob located on the second row captain chairs fold forward to the person sitting there. Captain's Chairs The captain's chairs adjust like the manual front passenger seats...
Owner's Manual
Page 55
...." The threshold level can say whether an air bag should an air bag inflate? If your vehicle goes straight into that is determined by the location and severity of what the repair costs were. For frontal air bags, inflation is struck. For side impact air bags, inflation is about 12 to...
...." The threshold level can say whether an air bag should an air bag inflate? If your vehicle goes straight into that is determined by the location and severity of what the repair costs were. For frontal air bags, inflation is struck. For side impact air bags, inflation is about 12 to...

Owner's Manual
Page 71
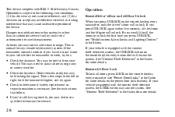
In both types of your vehicle. If your vehicle has this option in a 60/40 bench seat, this option in a bucket seat, each bucket seat that has a built-in child restraint must be located in your vehicle, see "Removable Rear Bucket Seats" in your vehicle. To find out where a bucket seat that has the built-in child restraint fits in only one location in the Index. Built-in Child Restraint (Option) 60/40 Bench Seat Bucket Seat If your vehicle has this bench seat will only fit in the second row of seats, the built-in child restraint works the same way. 1-59
In both types of your vehicle. If your vehicle has this option in a 60/40 bench seat, this option in a bucket seat, each bucket seat that has a built-in child restraint must be located in your vehicle, see "Removable Rear Bucket Seats" in your vehicle. To find out where a bucket seat that has the built-in child restraint fits in only one location in the Index. Built-in Child Restraint (Option) 60/40 Bench Seat Bucket Seat If your vehicle has this bench seat will only fit in the second row of seats, the built-in child restraint works the same way. 1-59

Owner's Manual
Page 87
An anchor bar for a top strap is located at the rear of the seat cushion for each second and third row outboard seating position, and for the center position of a third row seat, ...
An anchor bar for a top strap is located at the rear of the seat cushion for each second and third row outboard seating position, and for the center position of a third row seat, ...
Owner's Manual
Page 111
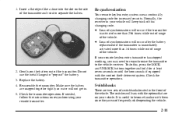
... to the following two conditions: (1) this device may cause undesired operation of Industry Canada. See "Content Theft-Deterrent" in the Index. If your D Check the location. You may D Check to stand closer during rainy or snowy weather. Other vehicles or objects may need to determine if battery replacement or vehicle. qualified...
... to the following two conditions: (1) this device may cause undesired operation of Industry Canada. See "Content Theft-Deterrent" in the Index. If your D Check the location. You may D Check to stand closer during rainy or snowy weather. Other vehicles or objects may need to determine if battery replacement or vehicle. qualified...
Owner's Manual
Page 113
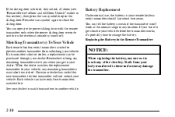
... only when the power sliding door override switch on the overhead console is weak if the transmitter won't work at the normal range in any location. See your body transferred to another transmitter from your dealer to match transmitters to these surfaces may damage the transmitter. 2-10 Static from unlocking your...
... only when the power sliding door override switch on the overhead console is weak if the transmitter won't work at the normal range in any location. See your body transferred to another transmitter from your dealer to match transmitters to these surfaces may damage the transmitter. 2-10 Static from unlocking your...
Owner's Manual
Page 114
... get in. 5. Normally, the receiver in the front of the vehicle. D Loss of synchronization will vary with the options that are two sets of switchbanks located in your remote transmitter. Do not use the metal flanges to the vehicle receiver. Insert a flat object like a dime into the slot on resynchronizing your...
... get in. 5. Normally, the receiver in the front of the vehicle. D Loss of synchronization will vary with the options that are two sets of switchbanks located in your remote transmitter. Do not use the metal flanges to the vehicle receiver. Insert a flat object like a dime into the slot on resynchronizing your...


