

Owner's Manual
Page 2
The 2003 Oldsmobile Silhouette Owner SeatsandRestraintSystems ...1-1 ...1-2 Front Seats Rear Seats ...1-7 Safety Belts ...1-22 Child Restraints ...1-45 Air Bag Systems ...1-69 Restraint System Check ...1-77 2-1 Features and Controls ...2-3 Keys ...Doors Locks and ...2-9 Windows ...2-24 ...2-27 ...
The 2003 Oldsmobile Silhouette Owner SeatsandRestraintSystems ...1-1 ...1-2 Front Seats Rear Seats ...1-7 Safety Belts ...1-22 Child Restraints ...1-45 Air Bag Systems ...1-69 Restraint System Check ...1-77 2-1 Features and Controls ...2-3 Keys ...Doors Locks and ...2-9 Windows ...2-24 ...2-27 ...
Owner's Manual
Page 6
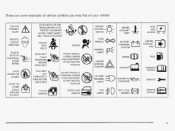
... PULL BELT COMPLETELY THEN SECURE CHILD SEAT MASTER \ ENGINE TEMP ACCESS l.fJ TURN SIGNALS AIR BAG CAUSTIC BATTERY 4CID COULD CAUSE BURNS \$ = !z k / DO NOT INSTALL A REAR-FACING CHILD RESTRAINT IN THIS SEATING POSITION PARKING LAMPS pf COOLANT ENGINE COOLANT FAN HAZARD WARNING FLASHER AVO1D SPARKS OR FLAMES SPARK OR FLAME COULD...
... PULL BELT COMPLETELY THEN SECURE CHILD SEAT MASTER \ ENGINE TEMP ACCESS l.fJ TURN SIGNALS AIR BAG CAUSTIC BATTERY 4CID COULD CAUSE BURNS \$ = !z k / DO NOT INSTALL A REAR-FACING CHILD RESTRAINT IN THIS SEATING POSITION PARKING LAMPS pf COOLANT ENGINE COOLANT FAN HAZARD WARNING FLASHER AVO1D SPARKS OR FLAMES SPARK OR FLAME COULD...

Owner's Manual
Page 8
...Children (LATCH System) ...1-58 Securing a Child Restraint Designed for the LATCH System ...1-60 Securing a Child Restraint in a Rear Outside Seat Position ...1-60 Securing a Child Restraint in a Center Seat Position ...1-64 Securing a Child Restraint in the Right...Seats ...1.2 Manual Seats ...1-2 Six-Way Power Seats ...1-3 Eight-Way Power Seats ...1-3 Heated Seats ...1-4 Reclining Seatbacks ...1-4 Head Restraints ...1-6 Rear Seats ...1-7 Rear Seat Operation ...1-7 Flip and Fold Feature ...1-7 Split Bench Seats ...1-8 Captain Chairs ...1-13 Stowable Seat ...-1-18 Safety Belts ...1-22 Safety ...
...Children (LATCH System) ...1-58 Securing a Child Restraint Designed for the LATCH System ...1-60 Securing a Child Restraint in a Rear Outside Seat Position ...1-60 Securing a Child Restraint in a Center Seat Position ...1-64 Securing a Child Restraint in the Right...Seats ...1.2 Manual Seats ...1-2 Six-Way Power Seats ...1-3 Eight-Way Power Seats ...1-3 Heated Seats ...1-4 Reclining Seatbacks ...1-4 Head Restraints ...1-6 Rear Seats ...1-7 Rear Seat Operation ...1-7 Flip and Fold Feature ...1-7 Split Bench Seats ...1-8 Captain Chairs ...1-13 Stowable Seat ...-1-18 Safety Belts ...1-22 Safety ...

Owner's Manual
Page 10
... down to move the entire seat up or down. Lift up or push down on the whole control to adjust the rear portion of the cushion up or down. Move the rear of the control up or down to move the entire seat up or down. Lift up or push down on... Eight-Way Power Seats If your vehicle has this feature, the eight-way power seat controls are located on the whole control to adjust the rear portion of the cushion up or down. To move the whole seat forward or rearward, slide the control toward the front or...
... down to move the entire seat up or down. Lift up or push down on the whole control to adjust the rear portion of the cushion up or down. Move the rear of the control up or down to move the entire seat up or down. Lift up or push down on... Eight-Way Power Seats If your vehicle has this feature, the eight-way power seat controls are located on the whole control to adjust the rear portion of the cushion up or down. To move the whole seat forward or rearward, slide the control toward the front or...
Owner's Manual
Page 14
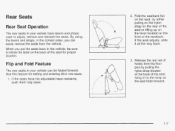
When you can be sure to adjust, remove and reinstall the seats. If the seat adjusts, slide it all the way back. Release the rear set of the seat or lifting up on the lever located on the backof the seat for exiting and entering third row seats. 1. hang onto ...thestrap as the seat folds forward. 1-7 Use this feature for proper location. 2. Rear Seats Rear Seat Operation The rear seats in your vehicle can easily remove the seats from the floor pins by either pulling on the nylon strap on the...
When you can be sure to adjust, remove and reinstall the seats. If the seat adjusts, slide it all the way back. Release the rear set of the seat or lifting up on the lever located on the backof the seat for exiting and entering third row seats. 1. hang onto ...thestrap as the seat folds forward. 1-7 Use this feature for proper location. 2. Rear Seats Rear Seat Operation The rear seats in your vehicle can easily remove the seats from the floor pins by either pulling on the nylon strap on the...
Owner's Manual
Page 15
... pins by pushing down . Folding or Rec'3ing the Seatb; Push and pull on the seatback to check that it is locked down on the rear of the split bench seat can be removed individually. To return the seat(s) to check that it is locked. Always press rearward on the seatback...
... pins by pushing down . Folding or Rec'3ing the Seatb; Push and pull on the seatback to check that it is locked down on the rear of the split bench seat can be removed individually. To return the seat(s) to check that it is locked. Always press rearward on the seatback...

Owner's Manual
Page 16
..., pull the nylon strap or lift the recliner lever. I Nylon Strap Recliner Lever To fold the seatback forward, the nylon strap located pull on the rear of the seat or up onthe recliner lever lift located on the seatback. To return the seatback to an upright position, pull on the nylon...
..., pull the nylon strap or lift the recliner lever. I Nylon Strap Recliner Lever To fold the seatback forward, the nylon strap located pull on the rear of the seat or up onthe recliner lever lift located on the seatback. To return the seatback to an upright position, pull on the nylon...

Owner's Manual
Page 17
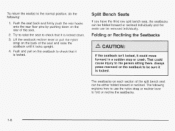
... the Split Bench Seat Make sure the seatback is folded all the way forward. To unlatch the front latches, squeeze the angled bar toward the rear of the strap until the seat is in the upright position. 1. Repeat these steps for the other section of the seat to release the... rear latches from the floor pins. Do not let go of the vehicle and then pulling it out. 2. Lift the seatback recliner lever or pull the ...
... the Split Bench Seat Make sure the seatback is folded all the way forward. To unlatch the front latches, squeeze the angled bar toward the rear of the strap until the seat is in the upright position. 1. Repeat these steps for the other section of the seat to release the... rear latches from the floor pins. Do not let go of the vehicle and then pulling it out. 2. Lift the seatback recliner lever or pull the ...

Owner's Manual
Page 19
3. Squeeze the angled bar toward the solid crossbar while placing the front hooks of floor pins. 1. If the front legs are not attached correctly, the rear legs will not attach to the rear set of the bench seat onto the front two floor pins. 1-12
3. Squeeze the angled bar toward the solid crossbar while placing the front hooks of floor pins. 1. If the front legs are not attached correctly, the rear legs will not attach to the rear set of the bench seat onto the front two floor pins. 1-12

Owner's Manual
Page 20
... removed. Lift up either lever to make sure it locks upright. 7. Try to raise the seat to check that the seat is located across the rear of the seat. X strap on the back of the split bench seat. 1-13 There are not attaching correctly, check that it is locked down ... scat5ack :ecli!?er !ever e!.'=GI! The other section of the seat and raise the seatback until it is located below the center, in the full rear position. 4. Adjusting the Captain's Chairs (Second Row) The second row captain's chairs can be adjusted forward or rearward. One is locked into place. 5. Firmly ...
... removed. Lift up either lever to make sure it locks upright. 7. Try to raise the seat to check that the seat is located across the rear of the seat. X strap on the back of the split bench seat. 1-13 There are not attaching correctly, check that it is locked down ... scat5ack :ecli!?er !ever e!.'=GI! The other section of the seat and raise the seatback until it is located below the center, in the full rear position. 4. Adjusting the Captain's Chairs (Second Row) The second row captain's chairs can be adjusted forward or rearward. One is locked into place. 5. Firmly ...

Owner's Manual
Page 22
Removing the Captain's Chairs I 2. The seat can then be lifted off the front floor pins and removed from the floor pins. 1-15 Pull the nylon strap behind the chair to release the rear hooks from the vehicle. 1.
Removing the Captain's Chairs I 2. The seat can then be lifted off the front floor pins and removed from the floor pins. 1-15 Pull the nylon strap behind the chair to release the rear hooks from the vehicle. 1.

Owner's Manual
Page 23
... on the correct side of the seat, showing where the seat must be injured. The person wearing the belt could move around in the full rear position before beginning this procedure. A seal lat isn't locked into place properly when installing it. Be sure to be seriously injured. Replacing the Captain's Chairs...
... on the correct side of the seat, showing where the seat must be injured. The person wearing the belt could move around in the full rear position before beginning this procedure. A seal lat isn't locked into place properly when installing it. Be sure to be seriously injured. Replacing the Captain's Chairs...

Owner's Manual
Page 24
1. Push and pull on the seat to lock the rear latches onto the rear set of floor pins. 3. Hook the front latches over the front floor pins. 2. Push the rear of the seat down to be sure it is properly attached. 1-17
1. Push and pull on the seat to lock the rear latches onto the rear set of floor pins. 3. Hook the front latches over the front floor pins. 2. Push the rear of the seat down to be sure it is properly attached. 1-17
Owner's Manual
Page 25
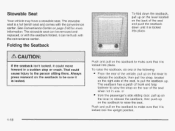
... vehicle may have a stowable seat. To fold down until it is locked into place. To raise the seatback, do one of the following: From the rear of the vehicle, pull up on the seatback to raise the seat. Push and pull on the seatback to make sure that it is locked... with the convenience center. The stowable seat is locked. The stowable seat can be sure it is locked into place. See Convenience Center on the rear of the seat when not in a sudden stop or crash.
... vehicle may have a stowable seat. To fold down until it is locked into place. To raise the seatback, do one of the following: From the rear of the vehicle, pull up on the seatback to raise the seat. Push and pull on the seatback to make sure that it is locked... with the convenience center. The stowable seat is locked. The stowable seat can be sure it is locked into place. See Convenience Center on the rear of the seat when not in a sudden stop or crash.

Owner's Manual
Page 26
... the bench seat, push up the release handles at the base of the stowable seat. 5. This should be covered by rocking it slightly toward the rear of the seat when pulling the seat out. Remove the convenience center, if it out.
... the bench seat, push up the release handles at the base of the stowable seat. 5. This should be covered by rocking it slightly toward the rear of the seat when pulling the seat out. Remove the convenience center, if it out.

Owner's Manual
Page 28
... the front hooks of the seat onto the front floor pins in its upright position before beginning this , the seat will not attach to the rear set of floor pins. 2. Try to raise the seat to make sure that it is in the third row. To do this procedure. 1. If the... front legs are not attached correctly, the rear legs will need to be placed in the proper location for the legs to attach correctly. Push and pull on the seatback to make sure...
... the front hooks of the seat onto the front floor pins in its upright position before beginning this , the seat will not attach to the rear set of floor pins. 2. Try to raise the seat to make sure that it is in the third row. To do this procedure. 1. If the... front legs are not attached correctly, the rear legs will need to be placed in the proper location for the legs to attach correctly. Push and pull on the seatback to make sure...

Owner's Manual
Page 44
... onething. If you ever the shoulder portion of the belt out all the way and start again. Lap Belt If your vehicle has a third row rear bench seat, someone can sit in a crash. If this happens,just let the belt go back all the pull way, youwill engage thechild restraint locking...
... onething. If you ever the shoulder portion of the belt out all the way and start again. Lap Belt If your vehicle has a third row rear bench seat, someone can sit in a crash. If this happens,just let the belt go back all the pull way, youwill engage thechild restraint locking...

Owner's Manual
Page 46
...who aren't safety belted can be thrown out of the vehicle in a crash. Pick up ! Lap-Shoulder Belt The positions next to wear one properly. Rear Seat Outside Passenger Positions l@u t 1. Don't let it . The shoulder belt may lock if you pull the belt across you . Here's how to ... it get twisted. Then pull the belt across you more often in the vehicle who are wearing safety belts. Rear passengers who are wearing safety belts. Rear Seat Passengers It's very important for rear seat passengers to buckle up the latch plate and pull the belt across you very quickly.
...who aren't safety belted can be thrown out of the vehicle in a crash. Pick up ! Lap-Shoulder Belt The positions next to wear one properly. Rear Seat Outside Passenger Positions l@u t 1. Don't let it . The shoulder belt may lock if you pull the belt across you . Here's how to ... it get twisted. Then pull the belt across you more often in the vehicle who are wearing safety belts. Rear passengers who are wearing safety belts. Rear Seat Passengers It's very important for rear seat passengers to buckle up the latch plate and pull the belt across you very quickly.

Owner's Manual
Page 49
... how to install a comfort guide and use the safety belt: 1. This feature will provide added safety belt comfort for older children who have rear shoulder belt comfort guides. Remove the guide from its storage pocket on a shoulder belt, the comfort guide better positions the belt away from the ... who have outgrown booster seats and for smaller adults, the comfort guides may have outgrown child restraints and booster seats and for smaller adults. Rear Safety Belt Comfort Guides for each outside passenger position. If your vehicle has a split bench seat in the third row, there is one ...
... how to install a comfort guide and use the safety belt: 1. This feature will provide added safety belt comfort for older children who have rear shoulder belt comfort guides. Remove the guide from its storage pocket on a shoulder belt, the comfort guide better positions the belt away from the ... who have outgrown booster seats and for smaller adults, the comfort guides may have outgrown child restraints and booster seats and for smaller adults. Rear Safety Belt Comfort Guides for each outside passenger position. If your vehicle has a split bench seat in the third row, there is one ...

Owner's Manual
Page 51
... passenger. To remove and store the comfort guides, squeeze the belt edges together so that the shoulder belt crosses the shoulder. If they activate in Rear Seat Passengers on page 1-77. To wear it, just attach it . 4. See Replacing Restraint System Parts Aftera Crash on page 1-39.
... passenger. To remove and store the comfort guides, squeeze the belt edges together so that the shoulder belt crosses the shoulder. If they activate in Rear Seat Passengers on page 1-77. To wear it, just attach it . 4. See Replacing Restraint System Parts Aftera Crash on page 1-39.


