
Owner's Manual
Page 38
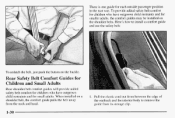
When installed on a shoulder belt, the comfort guide pulls the belt away from between the edge of the seatback and the interior body to install a comfort guide and use the safety belt: To unlatch the belt, just push the button on the shoulder belts. Here's how to ...
When installed on a shoulder belt, the comfort guide pulls the belt away from between the edge of the seatback and the interior body to install a comfort guide and use the safety belt: To unlatch the belt, just push the button on the shoulder belts. Here's how to ...
Owner's Manual
Page 40
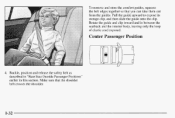
Buckle, position and release the safety belt as described in "Rear Seat OutsidePassenger Positions'' earlier in between the seatback and the interior body, leaving only the loop of elastic cord exposed. Rotate theguide and clip inward and in this section. Center Passenger Position u 4. Pull the guide upward to expose its storage clip, and then slide the guide ontothe clip. To remove and store the comfort guides, squeeze the belt edges together so that the shoulder belt crossesthe shoulder. 1-32 Make sure that you can take them out from the guides.
Buckle, position and release the safety belt as described in "Rear Seat OutsidePassenger Positions'' earlier in between the seatback and the interior body, leaving only the loop of elastic cord exposed. Rotate theguide and clip inward and in this section. Center Passenger Position u 4. Pull the guide upward to expose its storage clip, and then slide the guide ontothe clip. To remove and store the comfort guides, squeeze the belt edges together so that the shoulder belt crossesthe shoulder. 1-32 Make sure that you can take them out from the guides.

Owner's Manual
Page 61
... 2-55 Parking Over Things That Burn Engine Exhaust Running Your Engine While You're Parked Windows Tilt Steering Wheel Turn Signal/Multifunction Lever Exterior Lamps Interior Lamps Mirrors Storage Compartments Power Sunroof (If Equipped) Instrument Panel -- and what to do if you can learn aboutthe many standard and optional featureson your...
... 2-55 Parking Over Things That Burn Engine Exhaust Running Your Engine While You're Parked Windows Tilt Steering Wheel Turn Signal/Multifunction Lever Exterior Lamps Interior Lamps Mirrors Storage Compartments Power Sunroof (If Equipped) Instrument Panel -- and what to do if you can learn aboutthe many standard and optional featureson your...

Owner's Manual
Page 69
... the transmitter to work, try again. See the instructions that follow. You may be too far fromyour vehicle. If you may need to turn the interior lampson (see your vehicle for any remote keyless entry system.
... the transmitter to work, try again. See the instructions that follow. You may be too far fromyour vehicle. If you may need to turn the interior lampson (see your vehicle for any remote keyless entry system.

Owner's Manual
Page 71
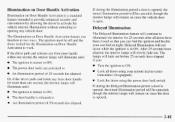
The interior illumination will be activated when an RKE door unlock command is included vehicles with you when you have only four transmitters matched to your vehicle. ... transmitter works, it . You can tell the battery is turned to change the programmed mode of the circuitry. Theignition must also be canceled, though the interior lamps willremain on Keyless Entry (RKE) system. If you go to touch any location. If a transmitter is opened, the timed illumination period will be matched...
The interior illumination will be activated when an RKE door unlock command is included vehicles with you when you have only four transmitters matched to your vehicle. ... transmitter works, it . You can tell the battery is turned to change the programmed mode of the circuitry. Theignition must also be canceled, though the interior lamps willremain on Keyless Entry (RKE) system. If you go to touch any location. If a transmitter is opened, the timed illumination period will be matched...
Owner's Manual
Page 100
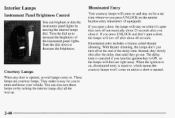
... theater dimming, the lamps don't just turn off after about 40 seconds. Illuminated Entry Your courtesy lamps will stay on by moving the interior lamps dial. Courtesy Lamps When any door is opened . You can brighten or dim the instrument panel lights by turning the...). These lamps are courtesy lamps. Instead, they slowly dim after you close it easy for a set time whenever you to decrease the brightness. Interior Lamps Instrument Panel Brightness Control You can also turn these lamps on while it's open then turn off automatically about 25 seconds after the delay...
... theater dimming, the lamps don't just turn off after about 40 seconds. Illuminated Entry Your courtesy lamps will stay on by moving the interior lamps dial. Courtesy Lamps When any door is opened . You can brighten or dim the instrument panel lights by turning the...). These lamps are courtesy lamps. Instead, they slowly dim after you close it easy for a set time whenever you to decrease the brightness. Interior Lamps Instrument Panel Brightness Control You can also turn these lamps on while it's open then turn off automatically about 25 seconds after the delay...
Owner's Manual
Page 101
... so that you : Turn the ignition to ON. Or, if the driver pulls and holds any front door handle for more than one second, the interior lamps will illuminate until : The ignition is turned to ON, 0 0 Lock the doors using your seat belt at night. Lock all doors have elapsed,... seconds haveelapsed if you can function in ON. If during theillumination period a door is opened, the timed illumination period will be canceled, though the interior lamps will remain on since the door is opened , thetimed illumination period will be off and the doors locked for 25 seconds after all doors...
... so that you : Turn the ignition to ON. Or, if the driver pulls and holds any front door handle for more than one second, the interior lamps will illuminate until : The ignition is turned to ON, 0 0 Lock the doors using your seat belt at night. Lock all doors have elapsed,... seconds haveelapsed if you can function in ON. If during theillumination period a door is opened, the timed illumination period will be canceled, though the interior lamps will remain on since the door is opened , thetimed illumination period will be off and the doors locked for 25 seconds after all doors...

Owner's Manual
Page 102
...a door that if your vehicle has lessthan 15 miles (25 k ) m on forup to 25 seconds after all doors using the power door lock switch. The interior lamps may stay on the odometer, the battery saver will turn off the lamps after 20 minutes. See "Delayed Illumination" earlier in case you leave... will stay on while any of these lamps on until you remove your remote keyless entry transmitter (if equipped). After 25 seconds have elapsed, the interior lamps will illuminate for up to 25 seconds when you do oneof the following: Turn the ignition to ON. 0 Battery Saver Your vehicle has a...
...a door that if your vehicle has lessthan 15 miles (25 k ) m on forup to 25 seconds after all doors using the power door lock switch. The interior lamps may stay on the odometer, the battery saver will turn off the lamps after 20 minutes. See "Delayed Illumination" earlier in case you leave... will stay on while any of these lamps on until you remove your remote keyless entry transmitter (if equipped). After 25 seconds have elapsed, the interior lamps will illuminate for up to 25 seconds when you do oneof the following: Turn the ignition to ON. 0 Battery Saver Your vehicle has a...
Owner's Manual
Page 275
... can burst into flameif you can all damage your retailer. (See "Appearance Care and Materials" in a closed space. Your retailer has two cleaners, Multi-Purpose Interior Cleaner and Capture Non-Solvent Dry Spot and Soil Remover for cleaning fabric carpet. They will damage your vehicle: 0 0 0 Don't use anything froma container toclean...
... can burst into flameif you can all damage your retailer. (See "Appearance Care and Materials" in a closed space. Your retailer has two cleaners, Multi-Purpose Interior Cleaner and Capture Non-Solvent Dry Spot and Soil Remover for cleaning fabric carpet. They will damage your vehicle: 0 0 0 Don't use anything froma container toclean...
Owner's Manual
Page 276
...( 5 ml) of baking soda to form thick suds. 4. Use a clean cloth or sponge, and change to remove any loose dirt. 2. Using Multi-Purpose Interior Cleaner on the container label to 1 cup (250 ml) of lukewarm water. 4. If a stain remains, follow instructions for Multi-Purpose... with a clean,damp towel or cloth. 7. Don't saturate the material and don't rub it roughly. 5 . If a stain remains, follow the multi-purpose interior cleaner instructions described earlier. 2. Use suds only and apply with cool water and allow to remove the suds. 6. Stains caused by such things as catsup...
...( 5 ml) of baking soda to form thick suds. 4. Use a clean cloth or sponge, and change to remove any loose dirt. 2. Using Multi-Purpose Interior Cleaner on the container label to 1 cup (250 ml) of lukewarm water. 4. If a stain remains, follow instructions for Multi-Purpose... with a clean,damp towel or cloth. 7. Don't saturate the material and don't rub it roughly. 5 . If a stain remains, follow the multi-purpose interior cleaner instructions described earlier. 2. Use suds only and apply with cool water and allow to remove the suds. 6. Stains caused by such things as catsup...

Owner's Manual
Page 277
... a clean, damp clothto remove dirt. You may severely weaken them off quickly. Use a clean cloth and a vinyuleather cleaner. See your retailer for this product. 0 Cleaning Interior Plastic Components Use only a mild soap and water solution on leather. Then, let the leather drynaturally. Incrash, they a might not be cleaned immediately.
... a clean, damp clothto remove dirt. You may severely weaken them off quickly. Use a clean cloth and a vinyuleather cleaner. See your retailer for this product. 0 Cleaning Interior Plastic Components Use only a mild soap and water solution on leather. Then, let the leather drynaturally. Incrash, they a might not be cleaned immediately.

Owner's Manual
Page 278
... Ami@Powder (non-scratching glass cleaning powder), GM Part No. 105001I. Weatherstrips Silicone greaseon weatherstrips will stick to be damaged. Don't use abrasive cleaners on interior glass. replace blades that look worn. Clean the outside of the Windshield and Wiper Blades If the windshield is clean if beads do not form...
... Ami@Powder (non-scratching glass cleaning powder), GM Part No. 105001I. Weatherstrips Silicone greaseon weatherstrips will stick to be damaged. Don't use abrasive cleaners on interior glass. replace blades that look worn. Clean the outside of the Windshield and Wiper Blades If the windshield is clean if beads do not form...

Owner's Manual
Page 282
... use on instrument panel vinyl. Protects leather, wood, acrylics, Plexiglas T M , plastic, Armor All TM Protectant 8 oz. (0.237 L) 1052918** rubber and vinyl Multi-Purpose Interior Cleans carpets, seats, interior trim, door panels 16 oz. (0.473 L) 1052925 Cleaner and floor mats Wheel Cleaner water on Spray with rinse and 16 oz. (0.473 L) 1052929 Capture...
... use on instrument panel vinyl. Protects leather, wood, acrylics, Plexiglas T M , plastic, Armor All TM Protectant 8 oz. (0.237 L) 1052918** rubber and vinyl Multi-Purpose Interior Cleans carpets, seats, interior trim, door panels 16 oz. (0.473 L) 1052925 Cleaner and floor mats Wheel Cleaner water on Spray with rinse and 16 oz. (0.473 L) 1052929 Capture...

Owner's Manual
Page 289
Fuse Description Relay 16 Description Horn Fog Lamps Fuel Pump 7 Interior Lamps, Retained Accessory Power, ABS, Keyless Entry, CEL TEL, Data Link, HVAC Head, Cluster, Radio, AUX Power, Cigarette Lighter 17 18 19 Fuse 20 21 ...
Fuse Description Relay 16 Description Horn Fog Lamps Fuel Pump 7 Interior Lamps, Retained Accessory Power, ABS, Keyless Entry, CEL TEL, Data Link, HVAC Head, Cluster, Radio, AUX Power, Cigarette Lighter 17 18 19 Fuse 20 21 ...

Owner's Manual
Page 328
... Seat Position ...1-44 Securing i the Right Front Seat Position ...1-46 n TopStrap ...1-42 WheretoPut ...,...l-41 Children ,,...,...l-34 Circuit Breakers and Fuses ...6-56 Cleaner. Air ...6-16 Cleaning Interior Plastic Components ...6-49 6-52 AluminumWheels ...Exterior Lamphnses ...6-51 Fabric ...6-48 Glass ...6-50 Inside of Your Vehicle ...6-47 6-49 InstrumentPanel ...Leather ...6-49 6-50 Outside of Your...
... Seat Position ...1-44 Securing i the Right Front Seat Position ...1-46 n TopStrap ...1-42 WheretoPut ...,...l-41 Children ,,...,...l-34 Circuit Breakers and Fuses ...6-56 Cleaner. Air ...6-16 Cleaning Interior Plastic Components ...6-49 6-52 AluminumWheels ...Exterior Lamphnses ...6-51 Fabric ...6-48 Glass ...6-50 Inside of Your Vehicle ...6-47 6-49 InstrumentPanel ...Leather ...6-49 6-50 Outside of Your...

Owner's Manual
Page 332
...4-7 2-56 Brake System Warning ...Change Oil Light ...2-64 2-56 Charging System Indicator ...Enhanced Traction System Warning ...2-58, 4-9 2-40 Interior ...Low Coolant Warning ...2-60, 6-23 Low Level ...2-63 Low Traction ...2-59, 4-9 Low Washer Fluid Warning ...2-64 Oilwarning ...2-62 ... Service Parts Identification ...4-29 Tire-LoadingInformation ...Number Identification 1 Vehicle I Lamps Exterior ...4-14 2-38 2-40 Interior ...2-7 Last Door Closed Locking ...Leaving Your Vehicle with a Trailer ...Malfunction Indicator Lamp ...2-60 ManualFrontSeat ...,...l-2 Matching Transmitters To Your Vehicle...
...4-7 2-56 Brake System Warning ...Change Oil Light ...2-64 2-56 Charging System Indicator ...Enhanced Traction System Warning ...2-58, 4-9 2-40 Interior ...Low Coolant Warning ...2-60, 6-23 Low Level ...2-63 Low Traction ...2-59, 4-9 Low Washer Fluid Warning ...2-64 Oilwarning ...2-62 ... Service Parts Identification ...4-29 Tire-LoadingInformation ...Number Identification 1 Vehicle I Lamps Exterior ...4-14 2-38 2-40 Interior ...2-7 Last Door Closed Locking ...Leaving Your Vehicle with a Trailer ...Malfunction Indicator Lamp ...2-60 ManualFrontSeat ...,...l-2 Matching Transmitters To Your Vehicle...


