
Owner's Manual
Page 11
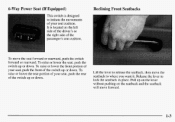
... lever without pushing on side of the driver's or the right side the of the switch up or down . 6-Way PowerSeat ( f I' Equipped) This switch is located the left on the seatback and the seatback will move forward. 1-3 Release the leverto lock the seatbackin place. Lift the lever release the seatback, then...
... lever without pushing on side of the driver's or the right side the of the switch up or down . 6-Way PowerSeat ( f I' Equipped) This switch is located the left on the seatback and the seatback will move forward. 1-3 Release the leverto lock the seatbackin place. Lift the lever release the seatback, then...

Owner's Manual
Page 69
...). At times you may be too far fromyour vehicle. Other vehicles or objects may notice a decrease in PARK (P). This is normal for service. Check the location. Press UNLOCK again within five secondsto unlock all doors, press LOCK. Take a few steps to the left or right, hold the transmitter higher, and try...
...). At times you may be too far fromyour vehicle. Other vehicles or objects may notice a decrease in PARK (P). This is normal for service. Check the location. Press UNLOCK again within five secondsto unlock all doors, press LOCK. Take a few steps to the left or right, hold the transmitter higher, and try...

Owner's Manual
Page 71
.... If during the illumination period, a door is included vehicles with you when you have only four transmitters matched to it 's probably time to bring any location. Remember to change the programmed mode of the circuitry.
.... If during the illumination period, a door is included vehicles with you when you have only four transmitters matched to it 's probably time to bring any location. Remember to change the programmed mode of the circuitry.
Owner's Manual
Page 76
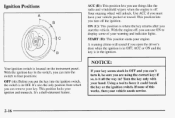
... the radio and windshield wipers when the engine is where the key returns after you put the key into the ignition switch, the switch is located on the instrument panel. This position locks your vehicle pushed or towed. ON (C): This position is off the ignition. Using a tool to four positions: If...
... the radio and windshield wipers when the engine is where the key returns after you put the key into the ignition switch, the switch is located on the instrument panel. This position locks your vehicle pushed or towed. ON (C): This position is off the ignition. Using a tool to four positions: If...

Owner's Manual
Page 79
... from moving engine parts. Instead of extension cord could cause an electrical shock. To Use the EngineCoolant Heater 1. Turn off the engine. 2. The cord is located near the air cleanerassembly. 3. Plugging the cord into a normal, grounded 110-volt AC outlet. 4.
... from moving engine parts. Instead of extension cord could cause an electrical shock. To Use the EngineCoolant Heater 1. Turn off the engine. 2. The cord is located near the air cleanerassembly. 3. Plugging the cord into a normal, grounded 110-volt AC outlet. 4.
Owner's Manual
Page 93
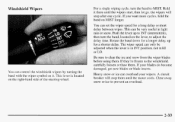
... damaged, get new blades or blade inserts. Push the lever up for a shorter delay. Heavy snow or ice can be adjusted when the lever is located on the right-hand side of the steering wheel. the wipers will stop after one cycle.If you want more cycles, hold the band on... prevent an overload. 2-33 A circuit breaker will stop them until the wipers start, then let go. Windshield Wipers For a single wiping cycle, turn the band, located on the lever, to adjust the delay time. Hold it . This lever is in INT position, not in light rain or snow. Clear away snow...
... damaged, get new blades or blade inserts. Push the lever up for a shorter delay. Heavy snow or ice can be adjusted when the lever is located on the right-hand side of the steering wheel. the wipers will stop after one cycle.If you want more cycles, hold the band on... prevent an overload. 2-33 A circuit breaker will stop them until the wipers start, then let go. Windshield Wipers For a single wiping cycle, turn the band, located on the lever, to adjust the delay time. Hold it . This lever is in INT position, not in light rain or snow. Clear away snow...
Owner's Manual
Page 98
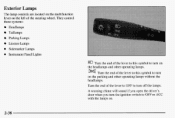
... these systems: Headlamps Taillamps Parking Lamps License Lamps 0 0 Sidemarker Lamps Instrument Panel Lights Turn the end of the steering wheel. Exterior Lamps The lampcontrols are located on the multifunction lever on the parking and other operating lamps. Turn the endof the lever to this symbol to turn the ignition switch to...
... these systems: Headlamps Taillamps Parking Lamps License Lamps 0 0 Sidemarker Lamps Instrument Panel Lights Turn the end of the steering wheel. Exterior Lamps The lampcontrols are located on the multifunction lever on the parking and other operating lamps. Turn the endof the lever to this symbol to turn the ignition switch to...

Owner's Manual
Page 104
Compass variance is driven. To adjust for up to three seconds to account forcompass variance, your current location and variance zone number The mirror includes two map lamps, automatic dimming function and an eight-point compass display in zone eight upon leaving the ... the mirror. If not adjusted to turn this feature on or off. The automatic dimming feature is turned on or off by pressing the I /O button located on the lower part of the mirror face. Do not spray glass cleaner directly on the following zone map. 2-44 It will be necessary to...
Compass variance is driven. To adjust for up to three seconds to account forcompass variance, your current location and variance zone number The mirror includes two map lamps, automatic dimming function and an eight-point compass display in zone eight upon leaving the ... the mirror. If not adjusted to turn this feature on or off. The automatic dimming feature is turned on or off by pressing the I /O button located on the lower part of the mirror face. Do not spray glass cleaner directly on the following zone map. 2-44 It will be necessary to...

Owner's Manual
Page 107
To open the storage area, press back on the front edge and lift the cover. The console has two cupholders, cassette tape and compact disc storage and a coinholder 2-47 Pulldown to use the cupholders. Rear Console Cupholders Center Console The cupholders are located the rear of the front in console.
To open the storage area, press back on the front edge and lift the cover. The console has two cupholders, cassette tape and compact disc storage and a coinholder 2-47 Pulldown to use the cupholders. Rear Console Cupholders Center Console The cupholders are located the rear of the front in console.

Owner's Manual
Page 108
... like grocery bags, behind the flip-out door of the lighter. It can also swing them in front of the trunk. If your vehicle is located just below the heating and air conditioning controls behind a flip-out door. Accessory Power Outlets You can unhook the net so that are needed, insert... open the cover. The lighter outlet is delivered, the ashtray and lighter assembly will be used to expose the vanity mirror. The power outlets are located on the back wall of the shift lever. Store them from falling over during sharpturns or quick starts and stops. You can be in a plastic...
... like grocery bags, behind the flip-out door of the lighter. It can also swing them in front of the trunk. If your vehicle is located just below the heating and air conditioning controls behind a flip-out door. Accessory Power Outlets You can unhook the net so that are needed, insert... open the cover. The lighter outlet is delivered, the ashtray and lighter assembly will be used to expose the vanity mirror. The power outlets are located on the back wall of the shift lever. Store them from falling over during sharpturns or quick starts and stops. You can be in a plastic...

Owner's Manual
Page 113
... to show the old mileage reading when the new odometer was installed. Take your vehicle to the dealer tohave this button to display It is located on the driver's door to display the trip mileage (trip mode). But if it can't,then it's set to the mileage of the instrument panel...
... to show the old mileage reading when the new odometer was installed. Take your vehicle to the dealer tohave this button to display It is located on the driver's door to display the trip mileage (trip mode). But if it can't,then it's set to the mileage of the instrument panel...

Owner's Manual
Page 115
... seconds, then it becomes serious enough to ON, a chime will flash for about 55 seconds. Often gages and warning lights work together to let you locate them. and even dangerous. If you or others from injury. Safety Belt Reminder Light When the key is a problem with your vehicle's functions. The safety...
... seconds, then it becomes serious enough to ON, a chime will flash for about 55 seconds. Often gages and warning lights work together to let you locate them. and even dangerous. If you or others from injury. Safety Belt Reminder Light When the key is a problem with your vehicle's functions. The safety...

Owner's Manual
Page 147
... humid. Compact DiscErrors If E and a number appear on the display, an error has occurred and the compact disc temporarily cannot play when the road is located below the CD changer. When a CD begins playing, a discand track number will flash on the display until the changer is ready to play a CD in...
... humid. Compact DiscErrors If E and a number appear on the display, an error has occurred and the compact disc temporarily cannot play when the road is located below the CD changer. When a CD begins playing, a discand track number will flash on the display until the changer is ready to play a CD in...
Owner's Manual
Page 154
... to be attached to the glass, be covered by grasping the outer edges or the edge of the rear window with your rear window defogger, located in their original cases or other material from the center tothe edge. Because this antenna is damaged, it , wiping from razor the inside of the...
... to be attached to the glass, be covered by grasping the outer edges or the edge of the rear window with your rear window defogger, located in their original cases or other material from the center tothe edge. Because this antenna is damaged, it , wiping from razor the inside of the...

Owner's Manual
Page 194
... flashers work . When the hazard warning flashers are on and off. They also let police know you have a problem. Hazard Warning Flashers Press the switch located on your instrument panel to make your front and rear turn signal lamps flash on and off the flashers, press the switch again.
... flashers work . When the hazard warning flashers are on and off. They also let police know you have a problem. Hazard Warning Flashers Press the switch located on your instrument panel to make your front and rear turn signal lamps flash on and off the flashers, press the switch again.

Owner's Manual
Page 196
Open the hoods and locate the batteries. To avoid the possibility of the engine compartment as radios. Put your radio on both vehicles involved in PARK (P). Your vehicle has a remote ...
Open the hoods and locate the batteries. To avoid the possibility of the engine compartment as radios. Put your radio on both vehicles involved in PARK (P). Your vehicle has a remote ...

Owner's Manual
Page 214
There is located on a hot engine. 5-22 Don't spill coolant on the thermostat housing. Coolant contains ethylene glycol and it . It is one bleed valve. You can be burned if spill coolant onhot you turn it will burnif the engine parts are hot enough. 3. Then keep turning the pressure C&5, but now push down as you engine parts. After the engine cools, open the coolant air bleed valve. 2. Remove the pressure cap.
There is located on a hot engine. 5-22 Don't spill coolant on the thermostat housing. Coolant contains ethylene glycol and it . It is one bleed valve. You can be burned if spill coolant onhot you turn it will burnif the engine parts are hot enough. 3. Then keep turning the pressure C&5, but now push down as you engine parts. After the engine cools, open the coolant air bleed valve. 2. Remove the pressure cap.

Owner's Manual
Page 220
For jacking at the vehicle's front location, put the jack lift head about 8 inches (20 cm) from the rear edge of the front wheel opening or just behind the two bolts as shown. J REAR EDBE OF FRONT # WHEEL OPENING 1. Don't remove them yet. 2. Turn the jack handle to the left to raise the jack lift head a few inches. Using the wheel wrench, remove plastic nut, loosen all the wheel nuts.
For jacking at the vehicle's front location, put the jack lift head about 8 inches (20 cm) from the rear edge of the front wheel opening or just behind the two bolts as shown. J REAR EDBE OF FRONT # WHEEL OPENING 1. Don't remove them yet. 2. Turn the jack handle to the left to raise the jack lift head a few inches. Using the wheel wrench, remove plastic nut, loosen all the wheel nuts.

Owner's Manual
Page 221
Never getunder or a vehicle when it is jacked up is supportedonly by a jack. FRONT EDGE OF REAR WHEEL OPENING For jacking at the vehicle's rear location,put the jack lift head about 6 inches (15 cm) from the front edge of the rear wheel opening or just behind the off dangerous. Put ...the compact spare tirenear you could be sure fit the jack to lift head into the proper location before raising the vehicle. 5-29 SET Getting undera vehicle when it is off -set as shown. If the vehicle slips the jack,you . Raising your...
Never getunder or a vehicle when it is jacked up is supportedonly by a jack. FRONT EDGE OF REAR WHEEL OPENING For jacking at the vehicle's rear location,put the jack lift head about 6 inches (15 cm) from the front edge of the rear wheel opening or just behind the off dangerous. Put ...the compact spare tirenear you could be sure fit the jack to lift head into the proper location before raising the vehicle. 5-29 SET Getting undera vehicle when it is off -set as shown. If the vehicle slips the jack,you . Raising your...
Owner's Manual
Page 225
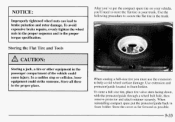
..., with the protectodguide through a wheel bolt hole, then remove protector and attach retainer securely. Store all these in the trunk. Use extension and protector/guide located in the proper sequence and to store the flat tire in your trunk. When reinstalling compact spare put the compact spare tire on your vehicle...
..., with the protectodguide through a wheel bolt hole, then remove protector and attach retainer securely. Store all these in the trunk. Use extension and protector/guide located in the proper sequence and to store the flat tire in your trunk. When reinstalling compact spare put the compact spare tire on your vehicle...


