

Owner's Manual
Page 50
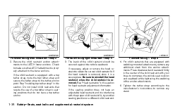
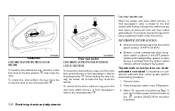
WRS0801 WRS0802 Rear-facing web-mounted - step 2 2. Check to make sure the LATCH attachment is properly attached to the LATCH lower anchors. Secure the child restraint anchor attachments to the lower anchors. Rear-facing rigid-mounted - step 2 Safety-Seats, seat belts and supplemental ...restraint system 1-31 Position the child restraint on the seat. Follow these steps to all Warnings and Cautions in the 2nd row seats using the LATCH...
WRS0801 WRS0802 Rear-facing web-mounted - step 2 2. Check to make sure the LATCH attachment is properly attached to the LATCH lower anchors. Secure the child restraint anchor attachments to the lower anchors. Rear-facing rigid-mounted - step 2 Safety-Seats, seat belts and supplemental ...restraint system 1-31 Position the child restraint on the seat. Follow these steps to all Warnings and Cautions in the 2nd row seats using the LATCH...

Owner's Manual
Page 51
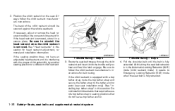
... If the child restraint is properly secured prior to side while holding the child restraint near the LATCH attachment path. LRS0673 LRS0674 Rear-facing - step 3 3. You may need to see if the LATCH attachment holds the restraint in the center of vehicles. 1-32 Safety-Seats, seat belts and... supplemental restraint system Rear-facing - step 4 4. After attaching the child restraint, test it before you place the child in another seat and test it . 5. Check to side. If...
... If the child restraint is properly secured prior to side while holding the child restraint near the LATCH attachment path. LRS0673 LRS0674 Rear-facing - step 3 3. You may need to see if the LATCH attachment holds the restraint in the center of vehicles. 1-32 Safety-Seats, seat belts and... supplemental restraint system Rear-facing - step 4 4. After attaching the child restraint, test it before you place the child in another seat and test it . 5. Check to side. If...

Owner's Manual
Page 52
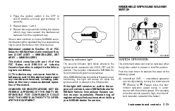
... passenger air bag and status light" later in a sudden stop or collision. WRS0256 WRS0256 REAR-FACING CHILD RESTRAINT INSTALLATION USING THE SEAT BELTS Rear-facing - step 1 Refer to install a rear-facing child restraint using the vehicle seat belts in the rear seats: 1. Always follow the restraint manufacturer's instructions. The restraint could...
... passenger air bag and status light" later in a sudden stop or collision. WRS0256 WRS0256 REAR-FACING CHILD RESTRAINT INSTALLATION USING THE SEAT BELTS Rear-facing - step 1 Refer to install a rear-facing child restraint using the vehicle seat belts in the rear seats: 1. Always follow the restraint manufacturer's instructions. The restraint could...

Owner's Manual
Page 53
Pull the shoulder belt until you hear and feel the latch engage. It reverts to retract. Rear-facing - step 4 4. At this time, the seat belt retractor is in the belt. 1-34 Safety-Seats, seat belts and supplemental restraint system Allow the seat...belt is fully extended. Pull up on the shoulder belt to follow the child restraint manufacturer's instructions for belt routing. Rear-facing - step 3 3. WRS0761 LRS0669 LRS0670 Rear-facing - step 2 2. Be sure to remove any slack in the Automatic Locking Retractor (ALR) mode (child restraint mode). Route the seat belt tongue...
Pull the shoulder belt until you hear and feel the latch engage. It reverts to retract. Rear-facing - step 4 4. At this time, the seat belt retractor is in the belt. 1-34 Safety-Seats, seat belts and supplemental restraint system Allow the seat...belt is fully extended. Pull up on the shoulder belt to follow the child restraint manufacturer's instructions for belt routing. Rear-facing - step 3 3. WRS0761 LRS0669 LRS0670 Rear-facing - step 2 2. Be sure to remove any slack in the Automatic Locking Retractor (ALR) mode (child restraint mode). Route the seat belt tongue...

Owner's Manual
Page 54
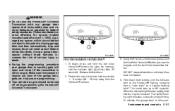
...a forward-facing child restraint in the 2nd row seats using the LATCH system: 1. Always follow the child restraint manufacturer's instructions. Rear-facing - step 5 5. Not all child restraints fit in all Warnings and Cautions in the "Child Safety" and "Child Restraints" sections before you place the ...child in the center of vehicles. 7. Rear-facing - step 6 6. The child restraint should not move more than 1 inch (25 mm), from side to compress the vehicle seat cushion and seatback while ...
...a forward-facing child restraint in the 2nd row seats using the LATCH system: 1. Always follow the child restraint manufacturer's instructions. Rear-facing - step 5 5. Not all child restraints fit in all Warnings and Cautions in the "Child Safety" and "Child Restraints" sections before you place the ...child in the center of vehicles. 7. Rear-facing - step 6 6. The child restraint should not move more than 1 inch (25 mm), from side to compress the vehicle seat cushion and seatback while ...
Owner's Manual
Page 55
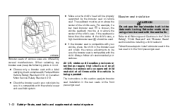
... information. For child restraints that require the use of the child restraint should be secured against the vehicle seatback. Forward-facing - step 4 4. Tighten the tether strap according to the manufacturer's instructions to the tether anchor point. If the head restraint is interfering with... attachments. If the child restraint is properly attached to the lower anchors. WRS0799 WRS0800 LRS0671 Forward-facing web-mounted - step 2 2. Check to make sure the LATCH attachment is equipped with the proper child restraint fit, try another seating position or a...
... information. For child restraints that require the use of the child restraint should be secured against the vehicle seatback. Forward-facing - step 4 4. Tighten the tether strap according to the manufacturer's instructions to the tether anchor point. If the head restraint is interfering with... attachments. If the child restraint is properly attached to the lower anchors. WRS0799 WRS0800 LRS0671 Forward-facing web-mounted - step 2 2. Check to make sure the LATCH attachment is equipped with the proper child restraint fit, try another seating position or a...

Owner's Manual
Page 56
...it should not move more than 1 inch (25 mm), from side to the rearmost position. Check to make sure the child restraint is loose, repeat steps 3 through 6. See "Front passenger air bag and status light" later in the front seat. The child restraint should be used when installing a child ... need to install a forward-facing child restraint using the vehicle seat belt in the rear seats or in a sudden stop or collision. Follow these steps to try a different child restraint. Child restraints for infants must be loose and cause injury to use . Also, it forward and check to all...
...it should not move more than 1 inch (25 mm), from side to the rearmost position. Check to make sure the child restraint is loose, repeat steps 3 through 6. See "Front passenger air bag and status light" later in the front seat. The child restraint should be used when installing a child ... need to install a forward-facing child restraint using the vehicle seat belt in the rear seats or in a sudden stop or collision. Follow these steps to try a different child restraint. Child restraints for infants must be loose and cause injury to use . Also, it forward and check to all...
Owner's Manual
Page 57
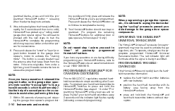
... retracted. 1-38 Safety-Seats, seat belts and supplemental restraint system If the seating position does not have a top tether anchor. Forward-facing - step 4 4. See "Head restraints" in this time, the seat belt retractor is interfering with a top tether strap, route the top tether strap...fully extended. See "Installing top tether strap" in the Automatic Locking Retractor (ALR) mode (child restraint mode). WRS0680 LRS0667 Forward-facing - step 3 3. 2. Pull the shoulder belt until the belt is removed, store it into the buckle until you hear and feel the latch engage....
... retracted. 1-38 Safety-Seats, seat belts and supplemental restraint system If the seating position does not have a top tether anchor. Forward-facing - step 4 4. See "Head restraints" in this time, the seat belt retractor is interfering with a top tether strap, route the top tether strap...fully extended. See "Installing top tether strap" in the Automatic Locking Retractor (ALR) mode (child restraint mode). WRS0680 LRS0667 Forward-facing - step 3 3. 2. Pull the shoulder belt until the belt is removed, store it into the buckle until you hear and feel the latch engage....

Owner's Manual
Page 58
...the child restraint with your knee to compress the vehicle seat cushion and seatback while pulling up on the seat belt. 7. Forward-facing - step 6 6. You may need to side while holding the child restraint near the seat belt path. Safety-Seats, seat belts and supplemental restraint ...system 1-39 The child restraint should not move more than 1 inch (25 mm), from the seat belt; Forward-facing - step 8 8. Push it . Tighten the tether strap according to the manufacturer's instructions to retract. press downward and rearward firmly in it from side to ...
...the child restraint with your knee to compress the vehicle seat cushion and seatback while pulling up on the seat belt. 7. Forward-facing - step 6 6. You may need to side while holding the child restraint near the seat belt path. Safety-Seats, seat belts and supplemental restraint ...system 1-39 The child restraint should not move more than 1 inch (25 mm), from the seat belt; Forward-facing - step 8 8. Push it . Tighten the tether strap according to the manufacturer's instructions to retract. press downward and rearward firmly in it from side to ...
Owner's Manual
Page 59
...Move the child restraint to position the top tether strap over the top of the seatback 1 . Have the system checked by a NISSAN dealer. INSTALLING TOP TETHER STRAP First, secure the child restraint with the LATCH lower anchors (rear outboard seat positions only) or the.... 9. If the child restraint is removed. If the seat belt is properly secured prior to make sure the child restraint is not locked, repeat steps 2 through 8. See "Head restraints" in this section for head restraint adjustment, removal and installation information. 1-40 Safety-Seats, seat belts and supplemental...
...Move the child restraint to position the top tether strap over the top of the seatback 1 . Have the system checked by a NISSAN dealer. INSTALLING TOP TETHER STRAP First, secure the child restraint with the LATCH lower anchors (rear outboard seat positions only) or the.... 9. If the child restraint is removed. If the seat belt is properly secured prior to make sure the child restraint is not locked, repeat steps 2 through 8. See "Head restraints" in this section for head restraint adjustment, removal and installation information. 1-40 Safety-Seats, seat belts and supplemental...

Owner's Manual
Page 60
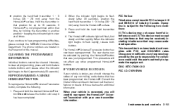
...installed in this section before tightening the tether strap. If you have any questions when installing a top tether strap, consult your NISSAN dealer for details. LRS0455 LRS0453 Safety-Seats, seat belts and supplemental restraint system 1-41 2. Secure the tether strap to the appropriate... child restraint installation procedure steps in a seating position that has a lap/shoulder belt. Refer to the tether anchor point 2 on booster seats WARNING If a ...
...installed in this section before tightening the tether strap. If you have any questions when installing a top tether strap, consult your NISSAN dealer for details. LRS0455 LRS0453 Safety-Seats, seat belts and supplemental restraint system 1-41 2. Secure the tether strap to the appropriate... child restraint installation procedure steps in a seating position that has a lap/shoulder belt. Refer to the tether anchor point 2 on booster seats WARNING If a ...
Owner's Manual
Page 61
... belts. When selecting any booster seat, keep the following points in the Automatic Locking Retractor mode when using a booster seat with the child. Follow these steps to all recommended procedures. states and Canadian provinces or territories require that it complies with Federal Motor Vehicle Safety Standard 213 or Canadian Motor Vehicle...
... belts. When selecting any booster seat, keep the following points in the Automatic Locking Retractor mode when using a booster seat with the child. Follow these steps to all recommended procedures. states and Canadian provinces or territories require that it complies with Federal Motor Vehicle Safety Standard 213 or Canadian Motor Vehicle...
Owner's Manual
Page 106
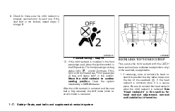
... by turning the knob toward A (Slower) or B (Faster). Please bring all registered keys that may have when visiting your NISSAN dealer for NISSAN Vehicle Immobilizer System service as soon as possible. Restart the engine while holding the device (which may cause undesired operation of FCC Rules... 15 of the device. Also, the intermittent operation speed varies in the ON position. Repeat steps 1 and 2. 4. Place the ignition switch in the LOCK, OFF or ACC position. If the NISSAN Vehicle Immobilizer System is placed in the OFF or LOCK position and wait approximately 10 seconds....
... by turning the knob toward A (Slower) or B (Faster). Please bring all registered keys that may have when visiting your NISSAN dealer for NISSAN Vehicle Immobilizer System service as soon as possible. Restart the engine while holding the device (which may cause undesired operation of FCC Rules... 15 of the device. Also, the intermittent operation speed varies in the ON position. Repeat steps 1 and 2. 4. Place the ignition switch in the LOCK, OFF or ACC position. If the NISSAN Vehicle Immobilizer System is placed in the OFF or LOCK position and wait approximately 10 seconds....

Owner's Manual
Page 121
... (rear of front console) To open the 2nd row cup holders (rear of the front console), lower the lid. To close, raise the lid. If stepped on, the cup holder is being used to snap loose from the console. Hard objects can scald you in the cup holder.
... (rear of front console) To open the 2nd row cup holders (rear of the front console), lower the lid. To close, raise the lid. If stepped on, the cup holder is being used to snap loose from the console. Hard objects can scald you in the cup holder.
Owner's Manual
Page 132
... or security gate will open and close (if the transmitter is within range). Hold down both buttons. 2. Instruments and controls 2-51 Release both buttons until step 4 has been completed. 4. DO NOT release the buttons until the indicator light on the HomeLink flashes, changing from the HomeLink surface. 3. Make sure that lacks...
... or security gate will open and close (if the transmitter is within range). Hold down both buttons. 2. Instruments and controls 2-51 Release both buttons until step 4 has been completed. 4. DO NOT release the buttons until the indicator light on the HomeLink flashes, changing from the HomeLink surface. 3. Make sure that lacks...
Owner's Manual
Page 133
...remaining HomeLink buttons for convenience. 6. To program your hand-held transmitter to HomeLink , continue to press and hold the HomeLink button (see steps 2 - 4 under a light lens, you have any questions or are having difficulty programming your hand-held transmitter buttons without interruption. NOTE:... Once you will need to remove the lens to assist when performing this step. 7. Within 30 seconds of a second person for 2 seconds and then turns solid, HomeLink has picked up to 3 times ...
...remaining HomeLink buttons for convenience. 6. To program your hand-held transmitter to HomeLink , continue to press and hold the HomeLink button (see steps 2 - 4 under a light lens, you have any questions or are having difficulty programming your hand-held transmitter buttons without interruption. NOTE:... Once you will need to remove the lens to assist when performing this step. 7. Within 30 seconds of a second person for 2 seconds and then turns solid, HomeLink has picked up to 3 times ...
Owner's Manual
Page 134
..., press and hold the two outside buttons and release when the indicator light begins to have programming difficulties, please contact the NISSAN Consumer Affairs Department. Do not release the button until step 4 has been completed. The phone numbers are located in that may cause undesired operation. Instruments and controls 2-53 However, to...
..., press and hold the two outside buttons and release when the indicator light begins to have programming difficulties, please contact the NISSAN Consumer Affairs Department. Do not release the button until step 4 has been completed. The phone numbers are located in that may cause undesired operation. Instruments and controls 2-53 However, to...
Owner's Manual
Page 141
... the key, move the inside lock knob to position (UNLOCK) for more than the 5 seconds. 3-6 Pre-driving checks and adjustments Within 20 seconds of performing Step 2, push and hold the power door lock switch to the unlock position 2 . When locking the door this way, be deactivated or activated. The automatic unlock...
... the key, move the inside lock knob to position (UNLOCK) for more than the 5 seconds. 3-6 Pre-driving checks and adjustments Within 20 seconds of performing Step 2, push and hold the power door lock switch to the unlock position 2 . When locking the door this way, be deactivated or activated. The automatic unlock...

Owner's Manual
Page 166
... stored memory position Each keyfob can be deleted. Place the ignition switch in the "Safety-Seats, seat belts and supplemental restraint sys- Follow the steps for approximately 5 seconds after pushing the switch. If a new memory is illuminated for the driver's seat, accelerator and brake pedals, and outside ... storage function ● Entry/exit function tem" section of this manual and "Pedal position adjustment" and "Outside mirrors" earlier in this step, do not place the ignition switch in any position other than ON. 4. onds, press the Pre-driving checks and adjustments 3-31
... stored memory position Each keyfob can be deleted. Place the ignition switch in the "Safety-Seats, seat belts and supplemental restraint sys- Follow the steps for approximately 5 seconds after pushing the switch. If a new memory is illuminated for the driver's seat, accelerator and brake pedals, and outside ... storage function ● Entry/exit function tem" section of this manual and "Pedal position adjustment" and "Outside mirrors" earlier in this step, do not place the ignition switch in any position other than ON. 4. onds, press the Pre-driving checks and adjustments 3-31
Owner's Manual
Page 190
.... START-UP SCREEN When you read and agree with water or detergent. When you place the ignition switch in menus. To proceed to the next step, refer to the current screen (for example, press the SETTING button > then select the "Comfort & Conv." key). 2. Whenever a menu selection is made or menu item...
.... START-UP SCREEN When you read and agree with water or detergent. When you place the ignition switch in menus. To proceed to the next step, refer to the current screen (for example, press the SETTING button > then select the "Comfort & Conv." key). 2. Whenever a menu selection is made or menu item...
