
Owner's Manual
Page 10
Engine hood (P. 3-18) Windshield wiper and washer switch (P. 2-26) Windshield (P. 8-19) Moonroof (if so equipped) (P. 2-45) Power windows (P. 2-42) Door locks, NISSAN Intelligent Key™, keys, request button (P. 3-4, 3-2, 3-2, 3-2) Mirrors (P. 3-25) Tire pressure (P. 8-31) Flat tire (P. 6-2) Tire chains (P. 8-39) Headlight and turn signal switch (P. 2-28) Replacing bulbs (P. 8-29) Fog light switch (if so equipped...
Engine hood (P. 3-18) Windshield wiper and washer switch (P. 2-26) Windshield (P. 8-19) Moonroof (if so equipped) (P. 2-45) Power windows (P. 2-42) Door locks, NISSAN Intelligent Key™, keys, request button (P. 3-4, 3-2, 3-2, 3-2) Mirrors (P. 3-25) Tire pressure (P. 8-31) Flat tire (P. 6-2) Tire chains (P. 8-39) Headlight and turn signal switch (P. 2-28) Replacing bulbs (P. 8-29) Fog light switch (if so equipped...
Owner's Manual
Page 12
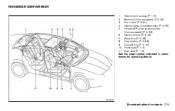
Interior mirrors (P. 3-25) 7. Cup holders (P. 2-38) 9. Interior trunk access (P. 1-5) Moonroof (if so equipped) (P. 2-45) Sun visors (P. 3-24) Interior lights, illuminated entry (P. 2-50) HomeLink universal transceiver (if so equipped) (P. 2-53) 6. Console box (P. 2-40) 10. PASSENGER COMPARTMENT 1. 2. 3. 4. 5. WII0126 Illustrated table of contents 0-5 Front seat (P. 1-2) 11. Rear seat (P. 1-5) See the page number indicated in parentheses for operating details. Glove box (P. 2-39) 8.
Interior mirrors (P. 3-25) 7. Cup holders (P. 2-38) 9. Interior trunk access (P. 1-5) Moonroof (if so equipped) (P. 2-45) Sun visors (P. 3-24) Interior lights, illuminated entry (P. 2-50) HomeLink universal transceiver (if so equipped) (P. 2-53) 6. Console box (P. 2-40) 10. PASSENGER COMPARTMENT 1. 2. 3. 4. 5. WII0126 Illustrated table of contents 0-5 Front seat (P. 1-2) 11. Rear seat (P. 1-5) See the page number indicated in parentheses for operating details. Glove box (P. 2-39) 8.
Owner's Manual
Page 14
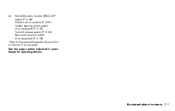
24. Illustrated table of contents 0-7 See the page number indicated in parentheses for operating details. Vehicle Dynamic Control (VDC) OFF switch (P. 2-36) Outside mirror controls (P. 3-27) Heated steering wheel switch (if so equipped) (P. 2-35) Trunk lid release switch (P. 3-20) Rear control cancel switch (if so equipped) (P. 2-49) * Refer to the separate Navigation System Owner's Manual (if so equipped).
24. Illustrated table of contents 0-7 See the page number indicated in parentheses for operating details. Vehicle Dynamic Control (VDC) OFF switch (P. 2-36) Outside mirror controls (P. 3-27) Heated steering wheel switch (if so equipped) (P. 2-35) Trunk lid release switch (P. 3-20) Rear control cancel switch (if so equipped) (P. 2-49) * Refer to the separate Navigation System Owner's Manual (if so equipped).

Owner's Manual
Page 73
... display...2-17 How to use the vehicle information display ...2-17 Security systems ...2-24 Vehicle security system...2-24 NISSAN vehicle immobilizer system ...2-25 Windshield wiper and washer switch ...2-26 Switch operation ...2-26 Rear window and outside mirror (if so equipped) defroster switch ...2-27 Headlight and turn signal switch...2-28 Xenon headlights (if so...
... display...2-17 How to use the vehicle information display ...2-17 Security systems ...2-24 Vehicle security system...2-24 NISSAN vehicle immobilizer system ...2-25 Windshield wiper and washer switch ...2-26 Switch operation ...2-26 Rear window and outside mirror (if so equipped) defroster switch ...2-27 Headlight and turn signal switch...2-28 Xenon headlights (if so...
Owner's Manual
Page 76
Vehicle Dynamic Control (VDC) OFF switch (P. 2-36) Outside mirror controls (P. 3-27) Heated steering wheel switch (if so equipped) (P. 2-35) Trunk lid release switch (P. 3-20) Rear control cancel switch (if so equipped) (P. 2-49) * Refer to ...
Vehicle Dynamic Control (VDC) OFF switch (P. 2-36) Outside mirror controls (P. 3-27) Heated steering wheel switch (if so equipped) (P. 2-35) Trunk lid release switch (P. 3-20) Rear control cancel switch (if so equipped) (P. 2-49) * Refer to ...

Owner's Manual
Page 79
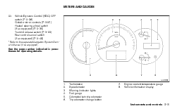
... placed in the ON position, press button as possible. Refuel as soon as described in the charts bethe low to "Automatic anti-glare rearview mirror" in the "Pre-driving checks and adjustments" section. 2-6 Instruments and controls If the the light remains on /off . button for about ...change settings) CAUTION ● If the vehicle runs out of the vehicle. After a few driving trips, have the vehicle inspected by a NISSAN dealer. LIC1385 FUEL GAUGE The gauge indicates the approximate fuel level in this section. The low fuel warning light comes on . COMPASS DISPLAY ...
... placed in the ON position, press button as possible. Refuel as soon as described in the charts bethe low to "Automatic anti-glare rearview mirror" in the "Pre-driving checks and adjustments" section. 2-6 Instruments and controls If the the light remains on /off . button for about ...change settings) CAUTION ● If the vehicle runs out of the vehicle. After a few driving trips, have the vehicle inspected by a NISSAN dealer. LIC1385 FUEL GAUGE The gauge indicates the approximate fuel level in this section. The low fuel warning light comes on . COMPASS DISPLAY ...

Owner's Manual
Page 82
... paper towel or similar material dampened with glass cleaner. They affect the operation of 5 MPH (8 km/h). 3. With the display turned on the mirror as it may cause the liquid cleaner to the vehicle by driving the vehicle in the compass display will illuminate. 2. CAUTION ● Do not... install a ski rack, antenna, etc., which are attached to enter the mirror housing. Do not spray glass cleaner directly on , press and hold the for about 10 seconds. Instruments and controls 2-9 After completing the circles, the...
... paper towel or similar material dampened with glass cleaner. They affect the operation of 5 MPH (8 km/h). 3. With the display turned on the mirror as it may cause the liquid cleaner to the vehicle by driving the vehicle in the compass display will illuminate. 2. CAUTION ● Do not... install a ski rack, antenna, etc., which are attached to enter the mirror housing. Do not spray glass cleaner directly on , press and hold the for about 10 seconds. Instruments and controls 2-9 After completing the circles, the...

Owner's Manual
Page 100
... lever toward you wash the windshield. The wiper will also operate several times. Type A To defrost the rear window glass and outside mirrors (if so equipped), start the engine and push the rear window defroster switch on the windshield and obscure your vision which may freeze on... . Instruments and controls 2-27 Warm the windshield with water to the manufacturer's recommended levels before you 5 to an accident. REAR WINDOW AND OUTSIDE MIRROR (if so equipped) DEFROSTER SWITCH NOTE: You can turn on . Do not use the windshieldwasher fluid reservoir tank to "Comfort settings" in the...
... lever toward you wash the windshield. The wiper will also operate several times. Type A To defrost the rear window glass and outside mirrors (if so equipped), start the engine and push the rear window defroster switch on the windshield and obscure your vision which may freeze on... . Instruments and controls 2-27 Warm the windshield with water to the manufacturer's recommended levels before you 5 to an accident. REAR WINDOW AND OUTSIDE MIRROR (if so equipped) DEFROSTER SWITCH NOTE: You can turn on . Do not use the windshieldwasher fluid reservoir tank to "Comfort settings" in the...

Owner's Manual
Page 130
... with power door lock switch ...3-5 Automatic door locks ...3-6 Child safety rear door lock ...3-6 NISSAN Intelligent Key™ ...3-7 Operating range...3-9 Door locks/unlocks precaution ...3-9 NISSAN Intelligent Key™ Operation...3-10 How to use the remote keyless entry function ...3-13 Warning ... (if so equipped)...3-23 Manual operation (if so equipped) ...3-24 Sun visors ...3-24 Vanity mirrors ...3-25 Mirrors ...3-25 Automatic anti-glare rearview mirror ...3-25 Outside mirrors ...3-27 Automatic drive positioner (if so equipped) ...3-29 Memory storage function ...3-29 Entry/exit function...
... with power door lock switch ...3-5 Automatic door locks ...3-6 Child safety rear door lock ...3-6 NISSAN Intelligent Key™ ...3-7 Operating range...3-9 Door locks/unlocks precaution ...3-9 NISSAN Intelligent Key™ Operation...3-10 How to use the remote keyless entry function ...3-13 Warning ... (if so equipped)...3-23 Manual operation (if so equipped) ...3-24 Sun visors ...3-24 Vanity mirrors ...3-25 Mirrors ...3-25 Automatic anti-glare rearview mirror ...3-25 Outside mirrors ...3-27 Automatic drive positioner (if so equipped) ...3-29 Memory storage function ...3-29 Entry/exit function...
Owner's Manual
Page 154
...9679; Do not pull the extension sun visor forcedly downward. The automatic anti-glare feature is activated when the ignition switch is open the mirror cover. The vanity mirror will reduce the sensitivity of the sensors, resulting in improper operation. 2 3 CAUTION ● Do not store the sun visor before ...returning the extension to the intensity of the headlights of the vehicle following you. Doing so will illuminate when the mirror cover is placed in or out as needed. Pre-driving checks and adjustments 3-25 To block glare from the side, remove the ...
...9679; Do not pull the extension sun visor forcedly downward. The automatic anti-glare feature is activated when the ignition switch is open the mirror cover. The vanity mirror will reduce the sensitivity of the sensors, resulting in improper operation. 2 3 CAUTION ● Do not store the sun visor before ...returning the extension to the intensity of the headlights of the vehicle following you. Doing so will illuminate when the mirror cover is placed in or out as needed. Pre-driving checks and adjustments 3-25 To block glare from the side, remove the ...

Owner's Manual
Page 155
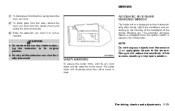
To turn off the anti-glare feature, press button. button for inside mirrors with ● the compass. The indicator light will illuminate when the automatic anti-glare feature is operating. 2 Type B and Type C The indicator light 2 will turn ...off . ● To turn the off . The indicator light will turn off the automatic anti-glare feature, press: ● the O button for inside mirrors without compass. With the ignition switch placed in the "Instruments and controls" section of this manual. The indicator light the will turn on . 3-26 Pre...
To turn off the anti-glare feature, press button. button for inside mirrors with ● the compass. The indicator light will illuminate when the automatic anti-glare feature is operating. 2 Type B and Type C The indicator light 2 will turn ...off . ● To turn the off . The indicator light will turn off the automatic anti-glare feature, press: ● the O button for inside mirrors without compass. With the ignition switch placed in the "Instruments and controls" section of this manual. The indicator light the will turn on . 3-26 Pre...

Owner's Manual
Page 156
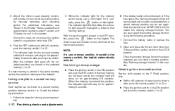
... the ignition switch is in the ACC or ON position. OUTSIDE MIRRORS The outside mirrors. Some vehicles are also equipped with ● the compass. button for inside mirrors with automatic anti-glare outside mirror remote control will turn on the automatic anti-glare feature again, press...: ● the | button for inside mirrors without compass. For additional information, see "Automatic anti-glare outside mirrors" in this manual. Adjust each mirror to select the right or left mirror. For information on the compass display (if so equipped), see ...
... the ignition switch is in the ACC or ON position. OUTSIDE MIRRORS The outside mirrors. Some vehicles are also equipped with ● the compass. button for inside mirrors with automatic anti-glare outside mirror remote control will turn on the automatic anti-glare feature again, press...: ● the | button for inside mirrors without compass. For additional information, see "Automatic anti-glare outside mirrors" in this manual. Adjust each mirror to select the right or left mirror. For information on the compass display (if so equipped), see ...

Owner's Manual
Page 157
...feature will be heated to the vehicle when the small switch is moved to any position other objects. ● Do not adjust the mirrors while driving. Push the rear window defogger switch to the right. Reverse tilt-down feature (if so equipped) The reverse tilt-down feature...B). To turn downward. The indicator light will turn on the automatic anti-glare feature again, press: ● the | button on rearview mirror with compass (Type C). mirror Move the shift selector to other than they appear. The automatic anti-glare feature operates only when the ignition switch is set to R ...
...feature will be heated to the vehicle when the small switch is moved to any position other objects. ● Do not adjust the mirrors while driving. Push the rear window defogger switch to the right. Reverse tilt-down feature (if so equipped) The reverse tilt-down feature...B). To turn downward. The indicator light will turn on the automatic anti-glare feature again, press: ● the | button on rearview mirror with compass (Type C). mirror Move the shift selector to other than they appear. The automatic anti-glare feature operates only when the ignition switch is set to R ...

Owner's Manual
Page 158
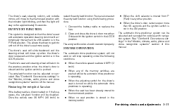
... the P (Park) position. 2. Place the ignition in the automatic drive positioner memory. MEMORY STORAGE FUNCTION Two positions for the driver's seat, steering column, and outside mirror toward the door to fold it. AUTOMATIC DRIVE POSITIONER (if so equipped) The automatic drive positioner system has two features: ● Memory storage function ●...
... the P (Park) position. 2. Place the ignition in the automatic drive positioner memory. MEMORY STORAGE FUNCTION Two positions for the driver's seat, steering column, and outside mirror toward the door to fold it. AUTOMATIC DRIVE POSITIONER (if so equipped) The automatic drive positioner system has two features: ● Memory storage function ●...
Owner's Manual
Page 159
...driving checks and adjustments While the indicator light for the memory switch being set again. The tion, press the driver's seat and outside mirrors to the memorized position. Connect the battery cable or replace the fuse. 2. With the ignition switch placed in the ON position and..., see "Seats" in the "Safety-Seats, seat belts and supplemental restraint system" section and "Outside mirrors" in the LOCK position. Adjust the driver's seat, steering column, and outside mirrors will be canceled and must be restarted before a stored memory position can store a memory position. After ...
...driving checks and adjustments While the indicator light for the memory switch being set again. The tion, press the driver's seat and outside mirrors to the memorized position. Connect the battery cable or replace the fuse. 2. With the ignition switch placed in the ON position and..., see "Seats" in the "Safety-Seats, seat belts and supplemental restraint system" section and "Outside mirrors" in the LOCK position. Adjust the driver's seat, steering column, and outside mirrors will be canceled and must be restarted before a stored memory position can store a memory position. After ...
Owner's Manual
Page 160
... with the ignition switch in the "Monitor, climate, audio, phone and voice recognition systems" section of this manual. The driver's seat, steering column, and outside mirrors will move to the previous position when the driver's door is closed and the ignition switch is pushed. See "Comfort & Convenience settings" in the memory...
... with the ignition switch in the "Monitor, climate, audio, phone and voice recognition systems" section of this manual. The driver's seat, steering column, and outside mirrors will move to the previous position when the driver's door is closed and the ignition switch is pushed. See "Comfort & Convenience settings" in the memory...

Owner's Manual
Page 196
... disconnected or becomes discharged, the predicted course lines may be displayed incorrectly. Predicted course lines 6 : Indicate the predicted course when backing up . Use the inside mirror or glance over your shoulder to properly judge distances to lock while the engine is turned with different sized tires, the predicted course lines may...
... disconnected or becomes discharged, the predicted course lines may be displayed incorrectly. Predicted course lines 6 : Indicate the predicted course when backing up . Use the inside mirror or glance over your shoulder to properly judge distances to lock while the engine is turned with different sized tires, the predicted course lines may...

Owner's Manual
Page 339
...an automated toll road device or automatic payment device on a separate key ring to start using the following procedure: 1. NISSAN VEHICLE IMMOBILIZER SYSTEM The NISSAN Vehicle Immobilizer system will not allow the engine to avoid interference from other devices. ● Make sure the area around.... ● Lock all doors. ● Position seat and adjust head restraints and headrests (if so equipped). ● Adjust inside and outside mirrors. ● Fasten seat belts and ask all windows and lights are clean. ● Visually inspect tires for approximately 5 seconds. 5-10 Starting ...
...an automated toll road device or automatic payment device on a separate key ring to start using the following procedure: 1. NISSAN VEHICLE IMMOBILIZER SYSTEM The NISSAN Vehicle Immobilizer system will not allow the engine to avoid interference from other devices. ● Make sure the area around.... ● Lock all doors. ● Position seat and adjust head restraints and headrests (if so equipped). ● Adjust inside and outside mirrors. ● Fasten seat belts and ask all windows and lights are clean. ● Visually inspect tires for approximately 5 seconds. 5-10 Starting ...
Owner's Manual
Page 406
... so equipped) Low (Xenon) (if so equipped) Park/Turn Side marker Front fog light (if so equipped) Front personal/map lights Glove box light Vanity mirror light Step light Rear personal lights Door switch illumination High-mounted stop light (Type A) High-mounted stop light (Type B) Trunk light Rear combination light Tail... (HB3) H11 D2S 3457NAK WY5W H11 - 158 - 194 - LED LED LED 158 LED WY21W 921 W5W 168 158 * Always check with the Parts Department at a NISSAN dealer for the latest parts information.
... so equipped) Low (Xenon) (if so equipped) Park/Turn Side marker Front fog light (if so equipped) Front personal/map lights Glove box light Vanity mirror light Step light Rear personal lights Door switch illumination High-mounted stop light (Type A) High-mounted stop light (Type B) Trunk light Rear combination light Tail... (HB3) H11 D2S 3457NAK WY5W H11 - 158 - 194 - LED LED LED 158 LED WY21W 921 W5W 168 158 * Always check with the Parts Department at a NISSAN dealer for the latest parts information.

Owner's Manual
Page 408
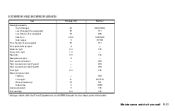
Vanity mirror light Use a cloth 1 to protect the housing. WDI0263 Replacement procedures All other lights are either type A, B, C or D. WDI0667 WDI0340 Front personal/map lights Use a cloth 1 to protect the housing. Indicates bulb removal Indicates bulb installation Maintenance and do-it-yourself 8-29 When replacing a bulb, first remove the lens, lamp and/or cover.
Vanity mirror light Use a cloth 1 to protect the housing. WDI0263 Replacement procedures All other lights are either type A, B, C or D. WDI0667 WDI0340 Front personal/map lights Use a cloth 1 to protect the housing. Indicates bulb removal Indicates bulb installation Maintenance and do-it-yourself 8-29 When replacing a bulb, first remove the lens, lamp and/or cover.

