Owner's Manual
Page 10
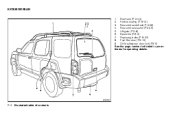
Roof rack (P. 2-42) Vehicle loading (P. 9-12) Rear window defrost (P. 2-26) Rear window washer (P.2-25) Lift gate (P. 3-9) Spare tire (P.6-2) Replacing bulbs (P. 8-27) Fuel-filler door (P.3-10) Child safety rear door lock (P.3-5) See the page number indicated in parentheses for operating details. WII0057 0-4 Illustrated table of contents EXTERIOR REAR 1. 2. 3. 4. 5. 6. 7. 8. 9.
Roof rack (P. 2-42) Vehicle loading (P. 9-12) Rear window defrost (P. 2-26) Rear window washer (P.2-25) Lift gate (P. 3-9) Spare tire (P.6-2) Replacing bulbs (P. 8-27) Fuel-filler door (P.3-10) Child safety rear door lock (P.3-5) See the page number indicated in parentheses for operating details. WII0057 0-4 Illustrated table of contents EXTERIOR REAR 1. 2. 3. 4. 5. 6. 7. 8. 9.

Owner's Manual
Page 22
.... 1-6 Safety-Seats, seat belts and supplemental restraint system Do not place cargo higher than the seatbacks. Release the lever to the rearmost position. Then lift up on the recline lever, located on the outside edge of the seat, and fold the seatback forward as far as it will enable you... fold the front passenger's seatback flat for extra storage length when transporting long items: 1 Once the seatback is released, it from sliding or shifting. Lift up on the latch located on the recline lever and lean the seatback to help prevent it will go. Then pull up to an upright...
.... 1-6 Safety-Seats, seat belts and supplemental restraint system Do not place cargo higher than the seatbacks. Release the lever to the rearmost position. Then lift up on the recline lever, located on the outside edge of the seat, and fold the seatback forward as far as it will enable you... fold the front passenger's seatback flat for extra storage length when transporting long items: 1 Once the seatback is released, it from sliding or shifting. Lift up on the latch located on the recline lever and lean the seatback to help prevent it will go. Then pull up to an upright...

Owner's Manual
Page 25
...or collision, unsecured cargo could cause personal injury. ● When returning the seatbacks to the upright position, be removed to a seating position: 1. Then lift up and fold each of the seat cushions down position. To return the rear seatback to provide additional space when folding the 2nd row seatbacks... flat. Lift up on the bottom of the red release handles on the rear seat when it from causing injury to passengers or damage to fold ...
...or collision, unsecured cargo could cause personal injury. ● When returning the seatbacks to the upright position, be removed to a seating position: 1. Then lift up and fold each of the seat cushions down position. To return the rear seatback to provide additional space when folding the 2nd row seatbacks... flat. Lift up on the bottom of the red release handles on the rear seat when it from causing injury to passengers or damage to fold ...

Owner's Manual
Page 115
... prevent it from sliding or shifting. WARNING ● Properly secure all cargo with ropes or straps to secure cargo with the luggage board tethered to lift the luggage board. Instruments and controls 2-39 In a sudden stop or collision, the luggage board could be seriously injured or killed. ● Do not allow...
... prevent it from sliding or shifting. WARNING ● Properly secure all cargo with ropes or straps to secure cargo with the luggage board tethered to lift the luggage board. Instruments and controls 2-39 In a sudden stop or collision, the luggage board could be seriously injured or killed. ● Do not allow...

Owner's Manual
Page 119
... driver's side door jamb pillar). Use the Torxdriver provided in this manual. Reverse to help prevent it from sliding or shifting. If you cannot comfortably lift the items onto the roof rack from the roof rack. Secure the cargo with the Torxdriver 1 by turning clockwise. 4. WARNING ● Drive extra carefully when...
... driver's side door jamb pillar). Use the Torxdriver provided in this manual. Reverse to help prevent it from sliding or shifting. If you cannot comfortably lift the items onto the roof rack from the roof rack. Secure the cargo with the Torxdriver 1 by turning clockwise. 4. WARNING ● Drive extra carefully when...

Owner's Manual
Page 120
... lid. 2. Loosen the 4 Torx head fasteners with the lid closed . Do not force the lid closed . Always check the tightness of the gear basket fasteners. Lift the gear basket to reinstall. 5. NOTE: Cargo in the gear basket must fit with a Torxdriver by turning counterclockwise A . 3. Raise the lid. WARNING The lid should...
... lid. 2. Loosen the 4 Torx head fasteners with the lid closed . Do not force the lid closed . Always check the tightness of the gear basket fasteners. Lift the gear basket to reinstall. 5. NOTE: Cargo in the gear basket must fit with a Torxdriver by turning counterclockwise A . 3. Raise the lid. WARNING The lid should...

Owner's Manual
Page 122
... 30 seconds when: Locking passengers' windows When the window lock button is depressed, only the driver's side window can be held. To stop the window, lift the switch up 2 . INTERIOR LIGHTS WIC0874 LIC0410 LIC0792 Rear power window switch The rear power window switches open or close the window, pull the switch...
... 30 seconds when: Locking passengers' windows When the window lock button is depressed, only the driver's side window can be held. To stop the window, lift the switch up 2 . INTERIOR LIGHTS WIC0874 LIC0410 LIC0792 Rear power window switch The rear power window switches open or close the window, pull the switch...

Owner's Manual
Page 124
OFF: The light does not illuminate regardless of door position or lock status. 2-48 Instruments and controls To operate, push the switch to the desired position. CARGO LIGHT LIC0590 The cargo light on the overhead trim has a threeposition switch. ON: The light is closed. The light turns off when the lift gate is illuminated. Normal (center) position: The light illuminates when the lift gate is opened.
OFF: The light does not illuminate regardless of door position or lock status. 2-48 Instruments and controls To operate, push the switch to the desired position. CARGO LIGHT LIC0590 The cargo light on the overhead trim has a threeposition switch. ON: The light is closed. The light turns off when the lift gate is illuminated. Normal (center) position: The light illuminates when the lift gate is opened.

Owner's Manual
Page 125
3 Pre-driving checks and adjustments Keys ...3-2 NISSAN vehicle immobilizer system keys ...3-2 Doors ...3-3 Locking with key...3-3 Locking with inside lock knob ...3-4 Locking with power door lock switch ...3-4 Automatic Door Locks ...3-4 Child safety rear door lock ...3-5 Remote keyless entry system ...3-5 How to use remote keyless entry system ...3-6 Hood ...3-8 Lift gate ...3-9 Fuel-filler door ...3-10 Opening...
3 Pre-driving checks and adjustments Keys ...3-2 NISSAN vehicle immobilizer system keys ...3-2 Doors ...3-3 Locking with key...3-3 Locking with inside lock knob ...3-4 Locking with power door lock switch ...3-4 Automatic Door Locks ...3-4 Child safety rear door lock ...3-5 Remote keyless entry system ...3-5 How to use remote keyless entry system ...3-6 Hood ...3-8 Lift gate ...3-9 Fuel-filler door ...3-10 Opening...

Owner's Manual
Page 133
... WARNING ● Make sure the hood is completely closed securely to prevent it from the engine compartment, to avoid injury do not open the lift gate, pull up on the handle. See "Exhaust gas" in an accident. ● If you to fly open and result in the "Starting and driving..." section of this manual. ● Make sure that all doors including the lift gate simultaneously. Pre-driving checks and adjustments 3-9 This could cause the hood to lock or unlock all passengers have their hands, etc., inside the vehicle...
... WARNING ● Make sure the hood is completely closed securely to prevent it from the engine compartment, to avoid injury do not open the lift gate, pull up on the handle. See "Exhaust gas" in an accident. ● If you to fly open and result in the "Starting and driving..." section of this manual. ● Make sure that all doors including the lift gate simultaneously. Pre-driving checks and adjustments 3-9 This could cause the hood to lock or unlock all passengers have their hands, etc., inside the vehicle...

Owner's Manual
Page 194
...other usage, follow these areas while the engine is running for service. Do not place cargo higher than the seatbacks. Open all cargo with the lift gate or rear windows open , and have had an accident involving damage to a trailer through inadvertent operation of the vehicle. ● If ... could cause personal injury. ● If you must pass to the exhaust system, underbody, or rear of the vehicle. Also, on the lift gate or the body, follow the manufacturer's recommendation to help prevent it from sliding or shifting. You have the vehicle inspected immediately. ●...
...other usage, follow these areas while the engine is running for service. Do not place cargo higher than the seatbacks. Open all cargo with the lift gate or rear windows open , and have had an accident involving damage to a trailer through inadvertent operation of the vehicle. ● If ... could cause personal injury. ● If you must pass to the exhaust system, underbody, or rear of the vehicle. Also, on the lift gate or the body, follow the manufacturer's recommendation to help prevent it from sliding or shifting. You have the vehicle inspected immediately. ●...

Owner's Manual
Page 237
... with the wheel nut wrench. Jacking up the vehicle more than necessary. ● Never use blocks on or under the rear of emergency 6-5 for lifting only your vehicle to work under the vehicle while it with limited slip CAUTION Be sure to center the spare tire suspending plate on the.... ● Never jack up vehicle and removing the damaged tire WARNING ● Never get under the vehicle, support it is on the wheel and then lift the spare tire. ● Do not allow passengers to the jack body and the following instructions. 1. WCE0153 4. Fit the square end of the jack...
... with the wheel nut wrench. Jacking up the vehicle more than necessary. ● Never use blocks on or under the rear of emergency 6-5 for lifting only your vehicle to work under the vehicle while it with limited slip CAUTION Be sure to center the spare tire suspending plate on the.... ● Never jack up vehicle and removing the damaged tire WARNING ● Never get under the vehicle, support it is on the wheel and then lift the spare tire. ● Do not allow passengers to the jack body and the following instructions. 1. WCE0153 4. Fit the square end of the jack...

Owner's Manual
Page 238
Install the assembled jack rod into the jack as illustrated so the top of the jack contacts the vehicle at the jack-up point. The front tire jack-up point as shown. 4. Carefully raise the vehicle until the tire clears the ground. 6-6 In case of the frame. To lift the vehicle, securely hold the jack lever and rod. WCE0154 LCE0087 2. The jack should be used on the side of emergency Place the jack directly under the jack-up points are indicated by stamped arrows on firm and level ground. 3.
Install the assembled jack rod into the jack as illustrated so the top of the jack contacts the vehicle at the jack-up point. The front tire jack-up point as shown. 4. Carefully raise the vehicle until the tire clears the ground. 6-6 In case of the frame. To lift the vehicle, securely hold the jack lever and rod. WCE0154 LCE0087 2. The jack should be used on the side of emergency Place the jack directly under the jack-up points are indicated by stamped arrows on firm and level ground. 3.

Owner's Manual
Page 241
... and wait 3 to 4 seconds before trying again. 7. CAUTION ● Always connect positive ( ) to positive ( ) and negative ( ) to body ground (for example, strut mounting bolt, engine lift bracket, etc.) - not to P (Park) (automatic transmission). Start the engine of the vehicle being jump started. If the booster battery is in another vehicle, position...
... and wait 3 to 4 seconds before trying again. 7. CAUTION ● Always connect positive ( ) to positive ( ) and negative ( ) to body ground (for example, strut mounting bolt, engine lift bracket, etc.) - not to P (Park) (automatic transmission). Start the engine of the vehicle being jump started. If the booster battery is in another vehicle, position...

Owner's Manual
Page 243
...information about towing your vehicle, all State (Provincial in working condition. Add coolant to your vehicle, NISSAN recommends having a service operator tow your vehicle after it has been lifted by a tow truck. Local service operators are in Canada) and local regulations for towing. If any... of emergency 6-11 Incorrect towing equipment could damage your vehicle repaired at a NISSAN dealer. It is being towed. ● ...
...information about towing your vehicle, all State (Provincial in working condition. Add coolant to your vehicle, NISSAN recommends having a service operator tow your vehicle after it has been lifted by a tow truck. Local service operators are in Canada) and local regulations for towing. If any... of emergency 6-11 Incorrect towing equipment could damage your vehicle repaired at a NISSAN dealer. It is being towed. ● ...

Owner's Manual
Page 265
To fill the window washer fluid reservoir, lift the cap off the reservoir tank and pour the window washer fluid into the window washer reservoir tank. Recommended fluid is explosive. Do not use ... at full strength. Do not allow battery fluid to an explosion. If the acid contacts your eyes. Hydrogen gas generated by the battery is Genuine NISSAN Windshield Washer Concentrate Cleaner & Antifreeze or equivalent. Some methyl alcohol based washer fluid concentrates may result in some cases lead to contact your hands. Clean...
To fill the window washer fluid reservoir, lift the cap off the reservoir tank and pour the window washer fluid into the window washer reservoir tank. Recommended fluid is explosive. Do not use ... at full strength. Do not allow battery fluid to an explosion. If the acid contacts your eyes. Hydrogen gas generated by the battery is Genuine NISSAN Windshield Washer Concentrate Cleaner & Antifreeze or equivalent. Some methyl alcohol based washer fluid concentrates may result in some cases lead to contact your hands. Clean...
Owner's Manual
Page 271
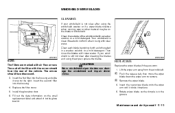
Insert the first filter into the housing and slide it over to remove. Lift the wiper arm away from the windshield. 2 3 CAUTION Worn windshield wiper blades can damage the windshield and impair driver vision. Your windshield is in a washer ...
Insert the first filter into the housing and slide it over to remove. Lift the wiper arm away from the windshield. 2 3 CAUTION Worn windshield wiper blades can damage the windshield and impair driver vision. Your windshield is in a washer ...

Owner's Manual
Page 273
Push the wiper blade in and pivot until the blade becomes free. Insert a new blade onto the wiper arm and snap into place. WDI0292 Rear window wiper blade 1 2 3 Lift the wiper arm away from the rear window. Maintenance and do-it-yourself 8-21
Push the wiper blade in and pivot until the blade becomes free. Insert a new blade onto the wiper arm and snap into place. WDI0292 Rear window wiper blade 1 2 3 Lift the wiper arm away from the rear window. Maintenance and do-it-yourself 8-21

Owner's Manual
Page 275
... the fuse puller. Only use a fuse of the fuse block in the underhood fuse boxes. Remove the fuse box cover by pushing the tab and lifting the cover up. 4. Remove the fuse with the fuse pocket as shown in the underhood fuse boxes.
... the fuse puller. Only use a fuse of the fuse block in the underhood fuse boxes. Remove the fuse box cover by pushing the tab and lifting the cover up. 4. Remove the fuse with the fuse pocket as shown in the underhood fuse boxes.

Owner's Manual
Page 331
... identification number (VIN) plate . .9-9 Warning labels (for SRS)...1-57 LATCH (Lower Anchors and Tethers for CHildren) System...1-24 License plate Installing the license plate ...9-11 Lift gate ...3-9 Light Air bag warning light...1-57, 2-17 Brake light (See stop light)...8-29 Bulb check/instrument panel...2-13 Bulb replacement ...8-29 Charge warning light...
... identification number (VIN) plate . .9-9 Warning labels (for SRS)...1-57 LATCH (Lower Anchors and Tethers for CHildren) System...1-24 License plate Installing the license plate ...9-11 Lift gate ...3-9 Light Air bag warning light...1-57, 2-17 Brake light (See stop light)...8-29 Bulb check/instrument panel...2-13 Bulb replacement ...8-29 Charge warning light...
